Navigation in React Native application is one of most used and yet hard to understand concepts I found with my experiment with the React Native. Even though there is good amount of documentation of the React Navigation available online at various places, I have put efforts to document it in a single place so that everyone can get easy access to it.
Here I’ll be showing simple navigation in React for the most common requirement for any application, where we may want to have Login Screen for the application, from which we can navigate to Main Screen and can Logout once we are done or directly show the Main Screen if already logged in.
Prerequisite:
Please follow this step by step guide to create sample navigation app.
-
Setup the project in React Native.
react-native init LoginNavigationDemo

cd LoginNavigationDemo
-
Install React Navigation.
npm install --save react-navigation
package.json
{
 "name": "LoginNavigationDemo",
 "version": "0.0.1",
 "private": true,
 "scripts": {
   "start": "node node_modules/react-native/local-cli/cli.js start",
   "test": "jest"
 },
 "dependencies": {
   "react": "16.0.0",
   "react-native": "0.51.0",
   "react-navigation": "^1.0.0-beta.21"
 },
 "devDependencies": {
   "babel-jest": "21.2.0",
   "babel-preset-react-native": "4.0.0",
   "jest": "21.2.1",
   "react-test-renderer": "16.0.0"
 },
 "jest": {
   "preset": "react-native"
 }
}
-
Install React Navigation & run the application. You will be presented with the startup screen if everything goes well.
npm install --save react-navigation
npm install

react-native run-android  (For Android)
react-native run-ios (For iOS)
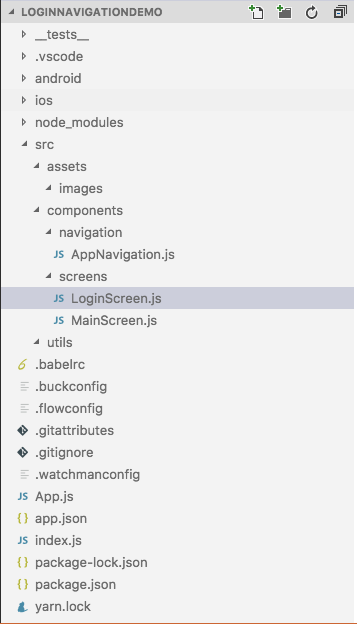
Note : I have my project structure as follows for better reusability and easy navigation.
-
Create Login screen - You can create simple Login screen with the TextEdit and Login button.
loginScreen.js
render() {
       return (
           <View style={styles.container}>

               {/* Username */}
               <Text>Username</Text>
               <TextInput
                   style={{ fontSize: 14 }}
                   placeholder="[email protected]"
                   value={this.state.username}
                   onChangeText={(text) => this.setState({ username: text })} />

               {/* Password */}
               <Text>Password</Text>
               <TextInput
                   style={{fontSize:14}}
                   secureTextEntry={true}
                   placeholder="enter your password"
                   value={this.state.password}
                   onChangeText={(text) => this.setState({ password: text })} />

               {/* Login Button */}
               <View style={{ marginTop: 20 }}>
                   <Button
                       title="Login"
                       onPress={() => this._validateLogin()} />
               </View>

           </View >
       );
   }
-
Working with the StackNavigator - StackNavigator is one of the Navigator class provided by React Navigation. We can use the StackNavigator to create the stack of Screen we want to navigate inside our application
StackNavigator can be placed in the seperate file or can be defined in the same file as loginScreen.js. We can declare the screen inside the StackNavigator like below,
AppNavigator.js
 Login: {
       screen: LoginScreenComponent
   },
   Main: {
       screen: MainScreenComponent
   }
To launch the StackNavigation Screen we need to supply it to component change event in your App.js file.
We can navigate to MainSceeen after the login is successful by calling the Main Screen of the StackNavigator ( AppNavigator.js).
this.props.navigation.navigate('Main');
To Navigate from MainScreen to LoginScreen we have to reset the screen with the ResetAction.
Using this demo you can easily navigate between the LoginScreen and MainScreen. That’s all, Happy REACTing!
Keep yourself updated on React Native Development with blogs from Surekha technologies. Please visit Mobile App Development Services to quickly connect with us.
For professional paid support, you may contact us at [email protected] .

