Introduction
Personalized web experience is the emerging requirement of today’s world. In order to fulfill this concept is introduced called Audience Targeting in Liferay. It will help you to monitor the audience of your portal. By using Audience Targeting application in Liferay you will be able to create different user segments from your audience. Once you have your user segments, then you can target different user segments by creating campaigns for them which allows you to display specific contents over given period of time. In this way, you will be able to measure the response of targeted user segments in the given time interval. It will also provide you the Reports on the basis of Campaign and Rules set by the user. Let’s explore in detail all the modules of Audience Targeting in Liferay.
Components of Audience Targeting in Liferay
1. User Segment
User Segment is a way to differentiate users and create their segments in order to target assets to them on the basis of their classifications. Here I want to focus on target assets which mean we are not only targeting content but we are also targeting document, blog, wiki, discussion and many more. There are certain rules used to create user segment so let’s go through that.
Rules Type :
Behavior Rules: Classify users on the basis of their behavior of navigation throughout the Site. Example: Content visited, Page visited, Previously visited site, Score points
Session Attributes Rules: Classify users on the basis of their session attributes. Example: Access time, Behavior, Browser, Device, IP Range, Location, Language, Operating system, Time, Sign up Date
User Attributes Rules: Classify users on the basis of the attributes. Example: Age, Gender, Regular Role, Site Member, Site Role, Organization Member, Organization Role, User Group Member, User Signed In, Custom fields.
Social Rules: Classify users on the basis of their profiles in social networks. It will only work if login from specific social network site is enabled. Example: Age, City, Education, Friends, Gender, Page Like ( Each for the specific social site )
NOTE: Behavior Rules and (selected) Session Attributes Rules will work with the anonymous users
2. Campaign
A Campaign is used to target specific user segment to their respective assets for a given period of time. To create a campaign you have to specify details like user segment, start date, end date, priority, description and others such details. Users belong to the specified segment will be targeted by the campaign. Priority plays its role when multiple campaigns are targeting specific user segment at a time. One can define an action that needs to be tracked while creating a campaign. An application will create a report on the basis of how certain that specified action is triggered.

3. Custom Reports
Custom Reports are used to monitor the campaign. Basically, campaign is creating reports in order to track the user behavior by tracking their actions. On the basis of this tracking actions, the report will generate statistics which is used to analyze the campaign. One can track user behavior on the components like Content, Content Form, Form, Link, Page, Youtube Videos. You have to specify details like Name, Friendly URL ( for page ), Select Form (for form), Event Type to track the specific components. Event Type could be like View, Submit and others which track the user action for that component. So in this way you can specify the actions for the components you want to track while the campaign is active to generate custom reports.
4. Define Targeted Assets
When it comes to targeting the assets to the specified user segments Liferay is providing three applications which are as mentioned below :
- Campaign Content Display
- User Segment Content Display
- User Segment Content List
Campaign Content Display and User Segment Content Display are used to display single content on the screen. These applications have configurations which have the condition like If user matches given campaign then display specified content to them. There is Otherwise condition in configuration which depicts that if above mentioned conditions get false then display this content. Default value of otherwise would be Don’t display anything. The User Segment Content list will display dynamic content list on the basis of user’s information and application configuration.
One need to configure the component with the specified user segments in order to start tracking it. Let’s say you need to track the page visits then you have to configure page and select the user segments from the SEO section. In this way, it will start tracking your page for the given user segment.
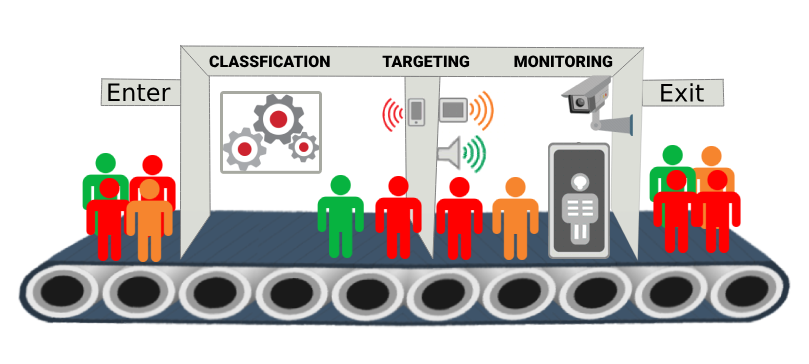
Pictograph of Audience Targeting in Liferay
Example
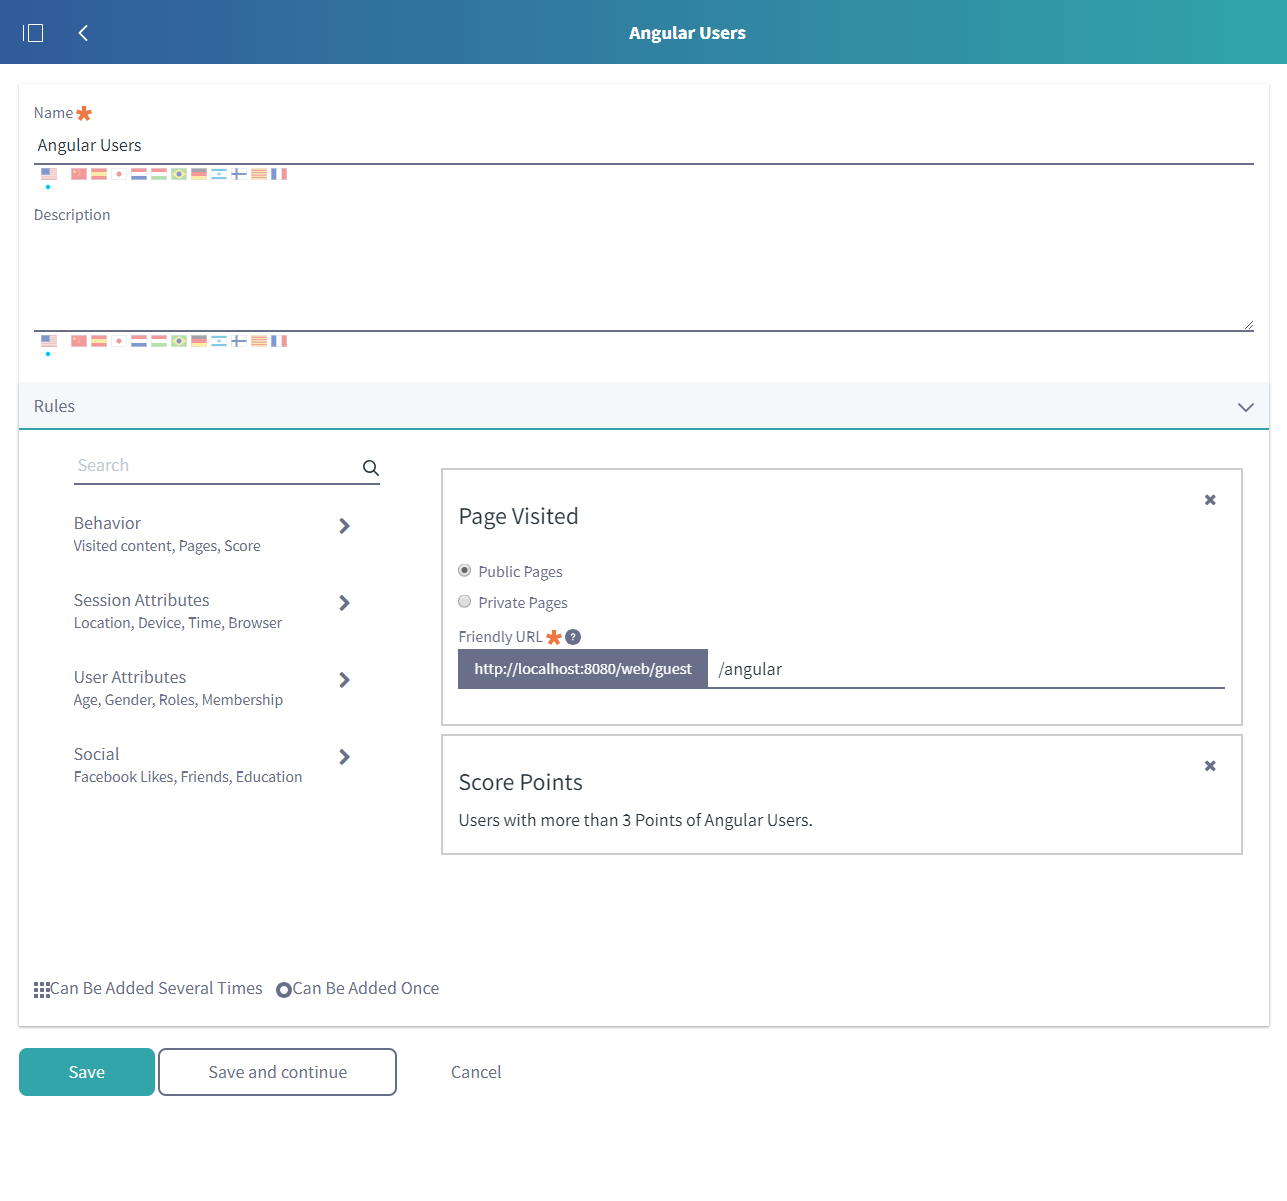
Let’s say you have one page for Angular on your site and you have to give some special offer to the user who visited this page certain number of times. In order to create user segment, you have to open the User Segment section in the Audience Targeting configuration. For this case, you need to create user segment by specifying Behavioral Rule’s component named Page Visited. Specify friendly URL of your angular page. Along with Page Visited you also need to add component named Score Points where you will specify on how many number of visit of the page you want to show offer to the user. Let’s set it to 3 which means when user visit this page 4th time onwards they will be able to view the offer. So in this way you will create your user segment.
Now we will create a campaign from the Campaign section in the Audience Targeting configuration. In create campaign form specify details like Title, Description, User Segment ( you had created in the above step ), Priority, Active, Start Date, End Date, Date Time Zone. Once you fill the form and create campaign you can open that campaign and go to the Reports section. Here you can create custom report that you need to track the campaign. Let’s say you need to check how many users had view your offer, how many users have clicked on that offer and go to offer page, how many users submitted application form from the offer page. You have to create a custom report by adding 3 components to your custom report named Content, Page and Form. In Content component specify your offer content and event type should be view, In Page component specify your offer page and event type should be visit and in Form component specify your application form and event type should be submit. So in this way, we will create the report that tracks 3 scenarios for our campaign.
Now go to your Angular Page and add Campaign Content Display. You need to configure this Campaign Content Display so open it’s configuration and specify that if the user matches given user segment then display them specified offer content.
In order to track the page visit of offer page go to it’s SEO configuration section and select your user segment.
We’re good to go now without a single line of code.
Great !!
Additional Reading
You can also explore your knowledge about Liferay 7 / DXP by going through our other blogs like Keypoints for upgrading to Liferay 7 / DXP, Language support in Liferay 7 / DXP, Liferay DXP Forms and others.
For professional paid support, you may contact us at [email protected] .

