In this blog post I will show you how to integrate world’s leading social networking Facebook and world’s leading business network Linkedin into Liferay portal. I will show you how to create a Facebook and Linkedin app, and how to integrate these apps with Liferay.
To achieve social login functionality with Liferay, there are two major steps:
- Create a social app
- Integrate app with Liferay
I will first show you how to create a Facebook app and how to integrate this app with Liferay. Then, I will show you how to create Linkedin app and how to integrate this app with Liferay.
- Integrate Facebook with Liferay
1. Create a Facebook App:
Go to Facebook Developer site by clicking here and login with your Facebook credentials. Now click on MyApps showing at top-right corner and then click Add a New App you will see a screen like below:
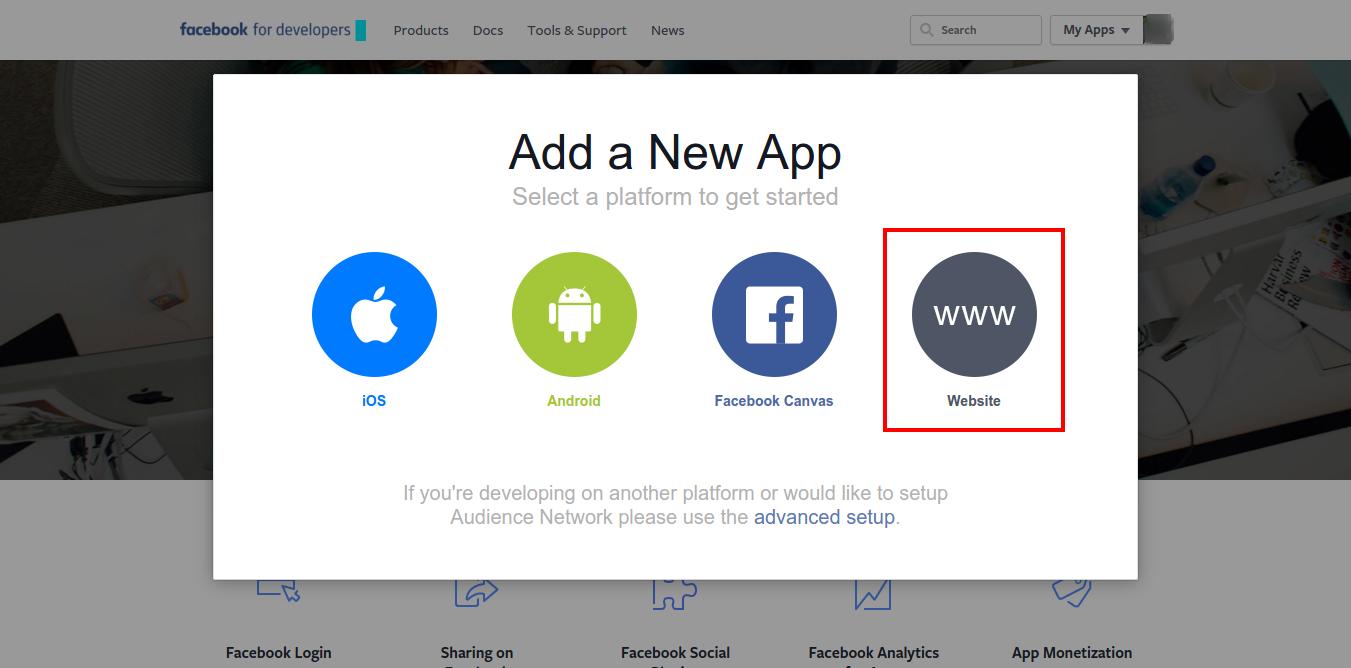
Then click on Website as highlighted in above image. Clicking on Website, you will see a screen like below:
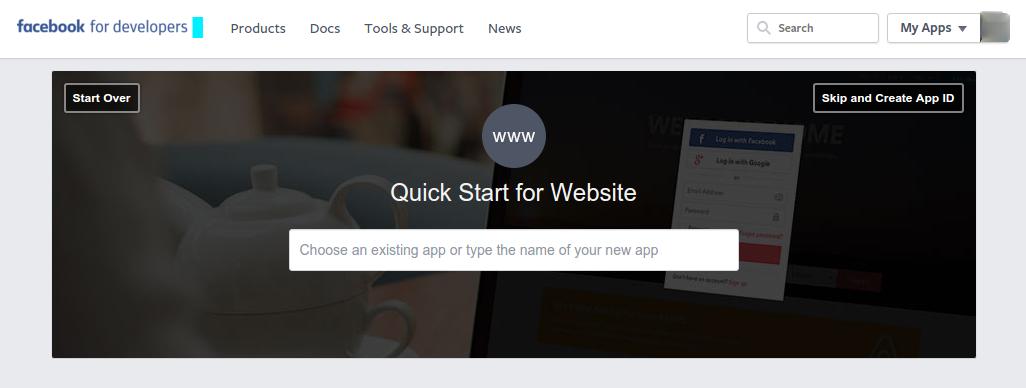
At top-right corner, there is a link Skip and Create App ID as displaying in above image. Clicking on this link, you will see a screen like below:
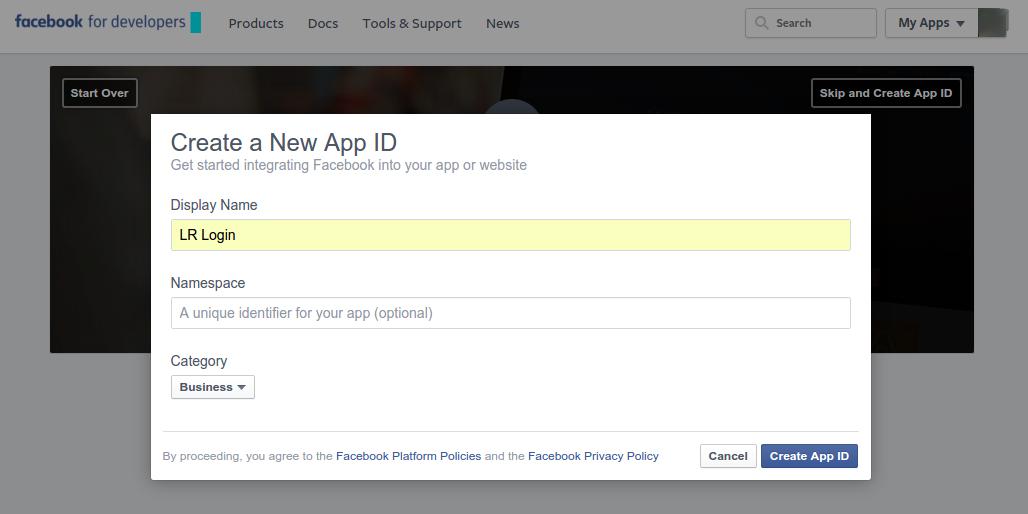
Provide Display name, Namespace(optional) and select Category, then click on Create App ID.
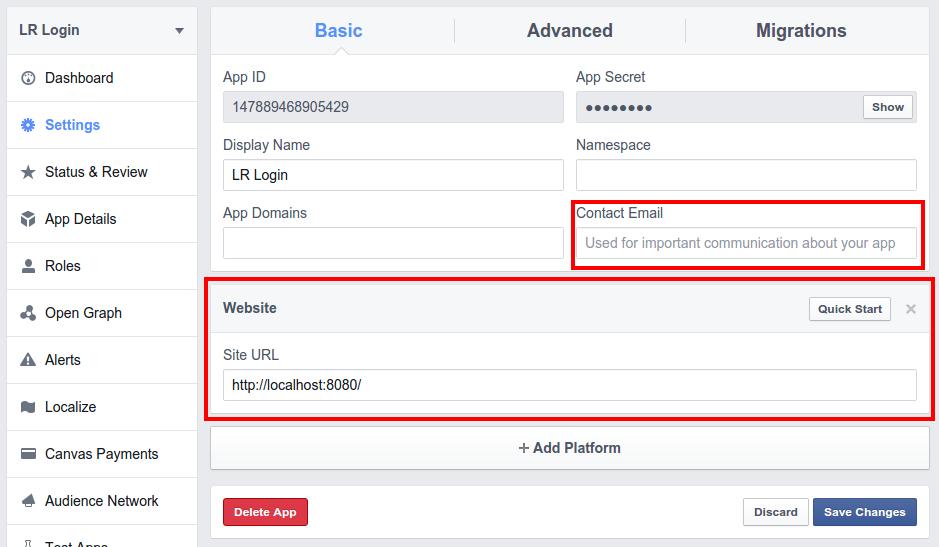
You will redirected to a page where you will get App ID and App Secret key. Now click on Settings as shown in below image:
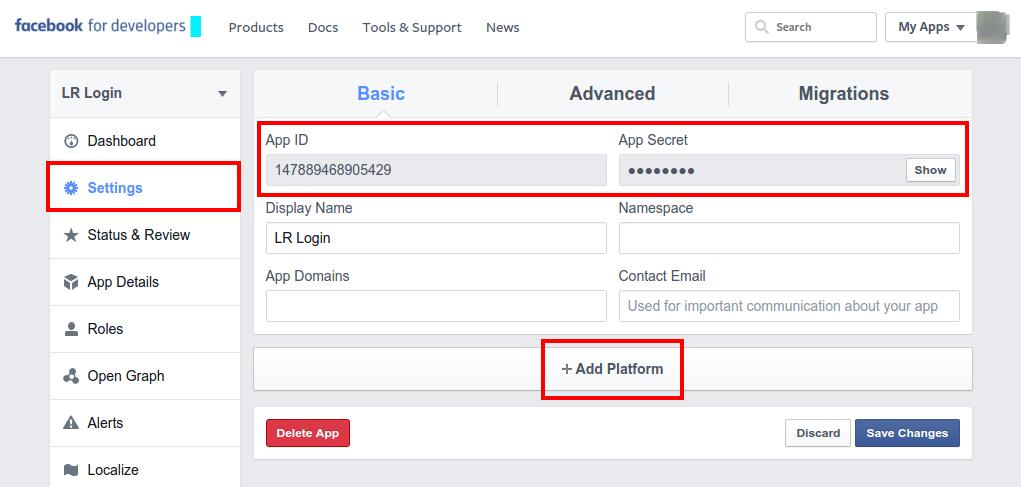
Click on Add Platform, a pop up is opened. Select Website from various platforms. Provide the Site URL of your website(in my case it is localhost) and your Contact Email. Click on Save Changes as shown in below image.
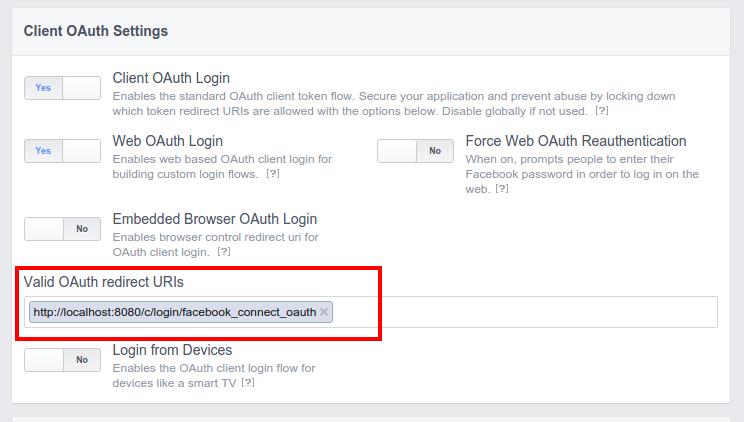
Now click on Settings > Advanced tab and move down to set Valid OAuth redirect URIs as shown in below image. Copy value of Redirect URL field from Liferay > Control Panel > Configuration > Portal Settings > Authentication > Facebook and paste it to Valid OAuth redirect URIs field as shown in below image:
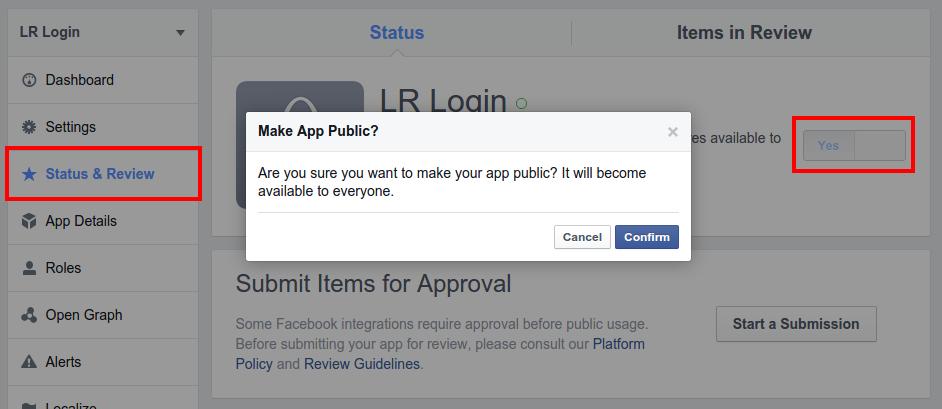
After all this successfully done, you have created your Facebook app. Now we have to make this app and all its live features available publically to able to login for general public. Make it public by clicking on Status & Review as shown below. Change No to Yes and click Confirm.
Now, we have to integrate this app for login with Facebook credentials to Liferay portal.
2. Integrate App with Liferay:
Login to Liferay portal with administrative user, if already not. Now, go to Liferay > Control Panel > Configuration > Portal Settings > Authentication > Facebook as below:
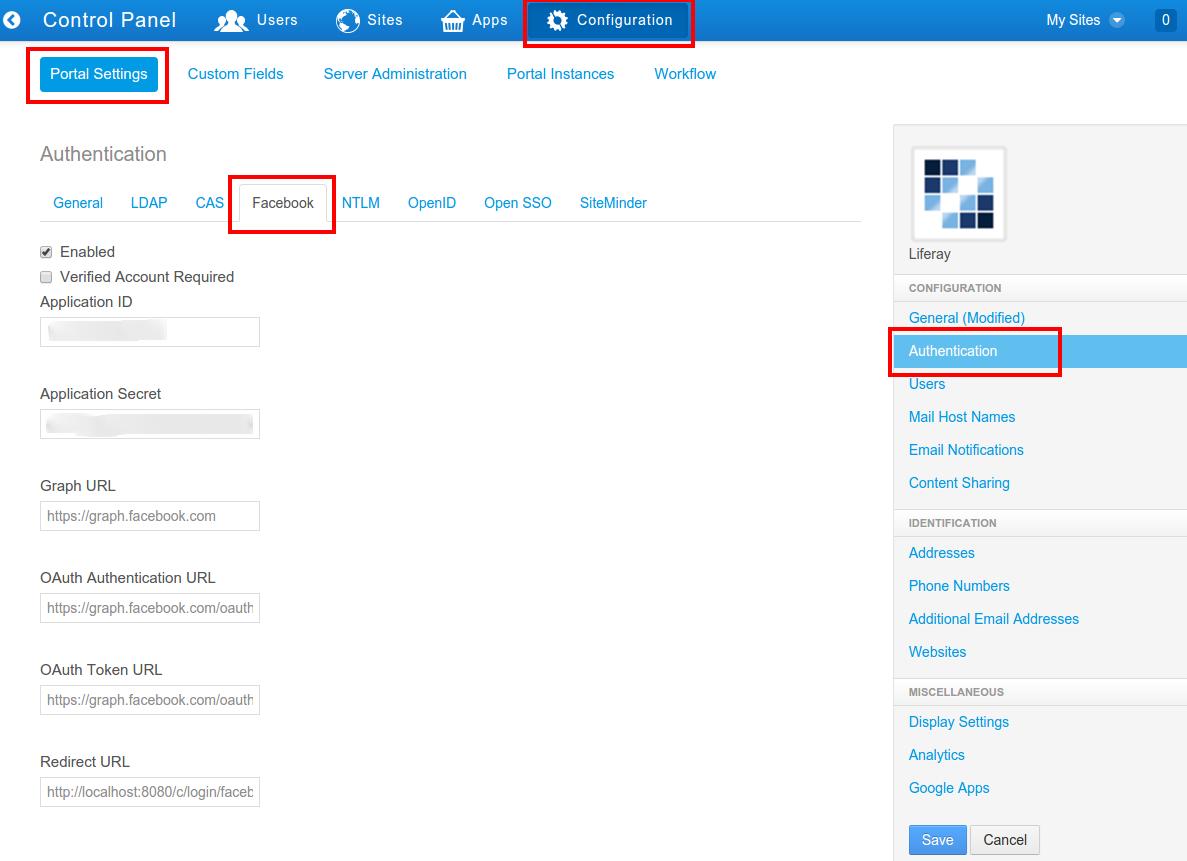
Provide Application ID and Application Secret, and tick Enabled. If you have change your domain name then remember to change the domain name in Redirect URL field in the above form and then Save changes.
Now, Logout from Liferay. You can see a Facebook icon in login portlet below. Clicking on that, a new window will open and you will redirect to Facebook login page. Enter your Facebook credentials and you will be able to login in Liferay with Facebook account.
- Integrate Linkedin with Liferay
1. Create a Linkedin App:
Go to Linkedin Developer site by clicking here and login with your Linkedin credentials. Now click on MyApps showing at top-right corner. You will see a screen like below:
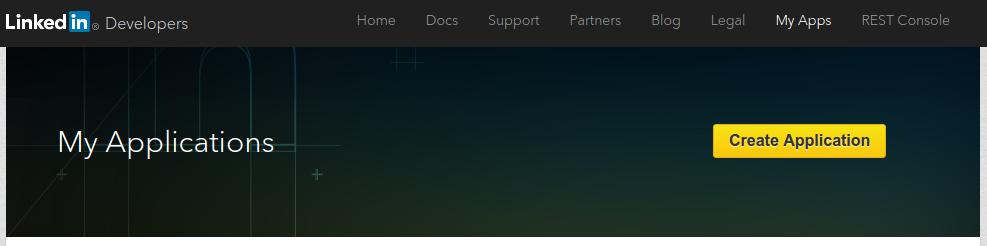
Then click on Create Application as shown in the above image. You will be redirected to Create a New Application page. On that page, enter all the information which contains asterisk(*). You will see a screen like below:
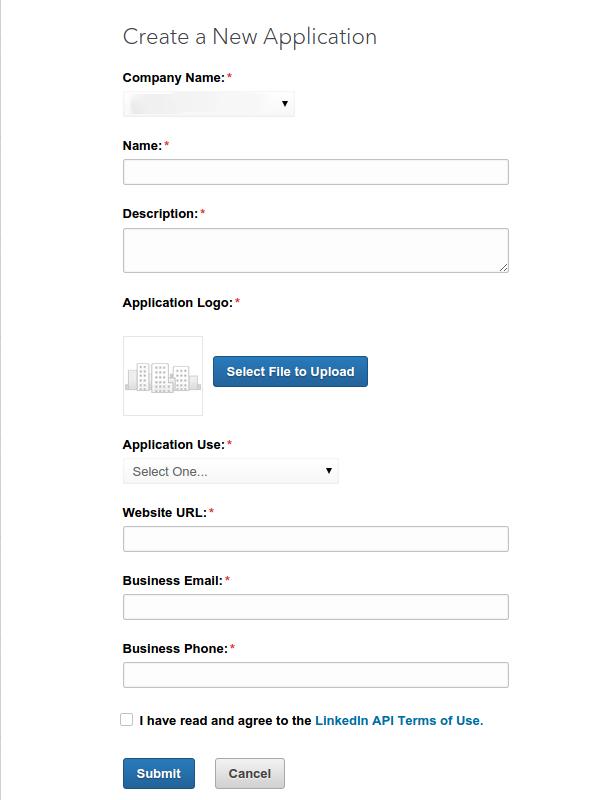
After you entered all the required information, click on Submit button. Once you created the application successfully, you will see a screen as shown below:
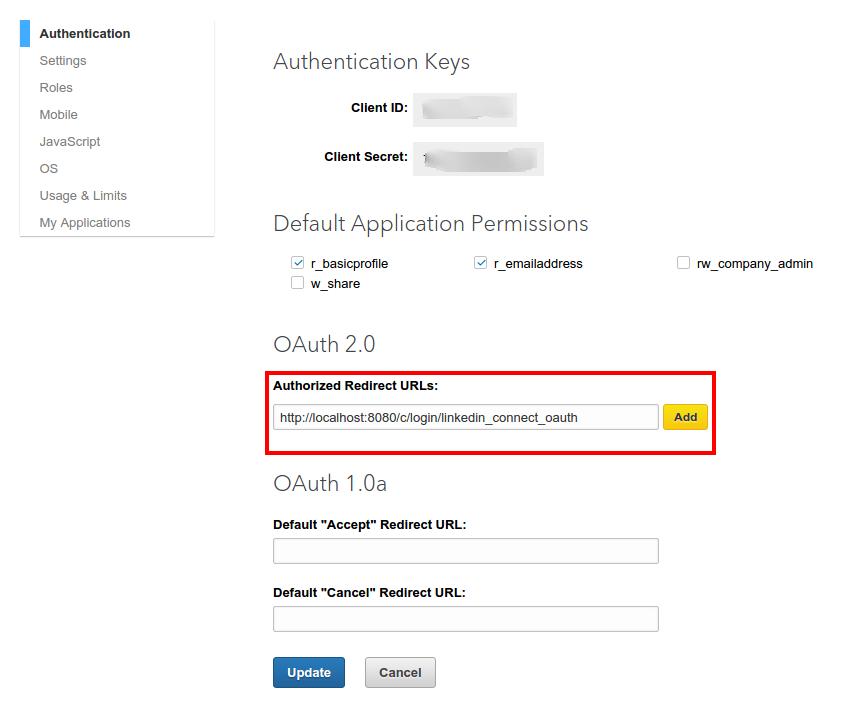
You will see app listing page which will contain all the needed information to integrate the app with your website. Enter value to the Authorized Redirect URLs field same as displayed in the above image(please update domain name, if required). Click on Update button. After all this successfully done, you have created your Linkedin app.
Now, we have to integrate this app for login with Linkedin credentials to Liferay portal.
2. Integrate App with Liferay:
First, download our Liferay app from here and deploy this app to your Liferay.
Login to Liferay portal with administrative user, if already not. Now, go to Liferay > Control Panel > Configuration > Portal Settings > Authentication > Linkedin page looks like below:
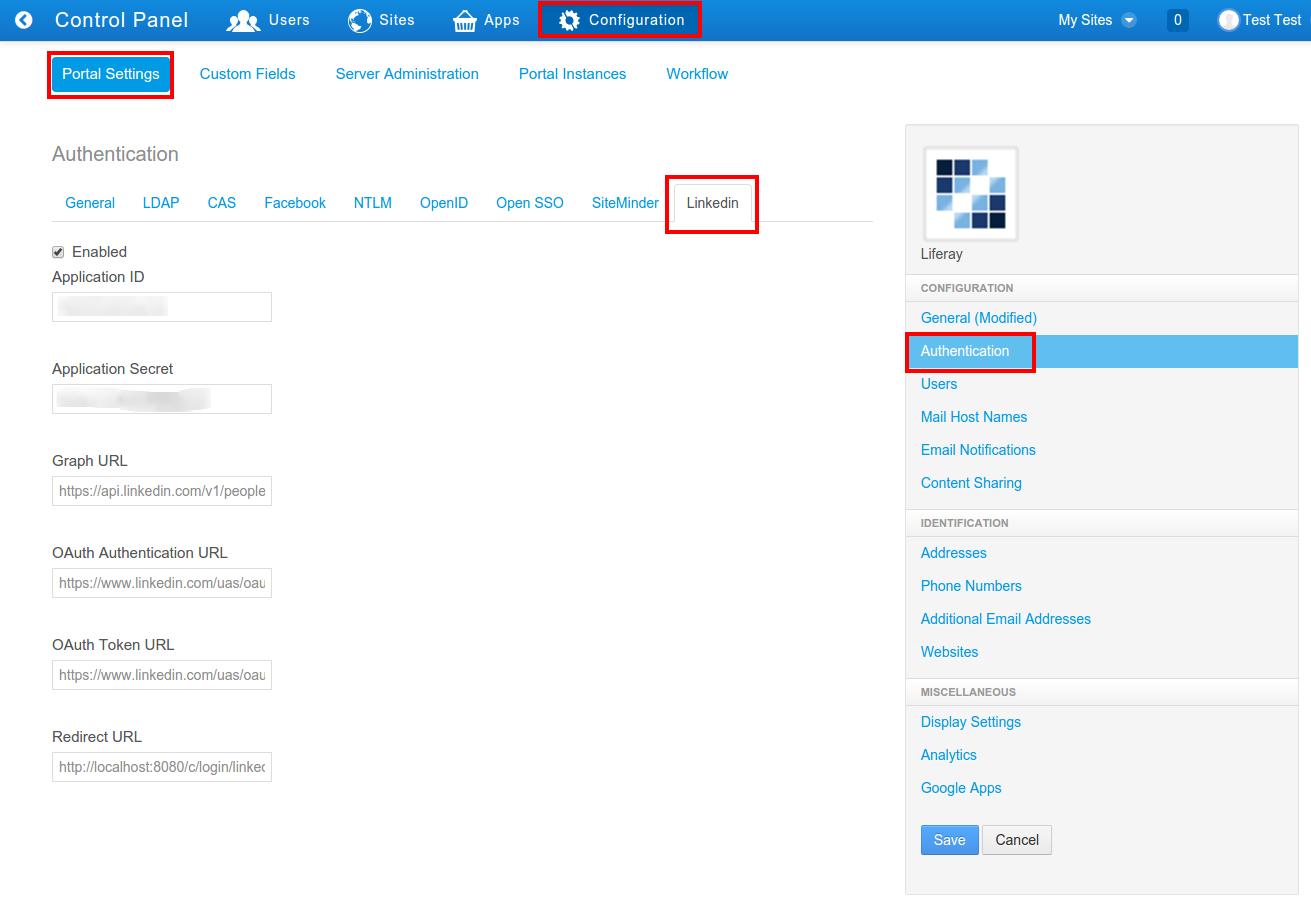
Provide values to the fields as below:
- Check Enabled
- Application ID : <<your Linkedin app id>>
- Application Secret : <<your Linkedin app secret key>>
- Graph URL : https://api.linkedin.com/v1/people/~
- OAuth Authentication URL : https://www.linkedin.com/uas/oauth2/authorization
- OAuth Token URL : https://www.linkedin.com/uas/oauth2/accessToken
- Redirect URL : http://localhost:8080/c/login/linkedin_connect_oauth (same as entered in the Linkedin app)
If you have change your domain name then remember to change the domain name in Redirect URL field in the above form and then Save changes.
Now, Logout from Liferay. You can see a Linkedin icon in login portlet. Clicking on that, a new window will open and you will be redirected to Linkedin login page. Enter your Linkedin credentials and you will be able to login in Liferay with Linkedin account.
For more implementation details or support you may contact us at [email protected].
For professional paid support, you may contact us at [email protected] .

