Securing Headless APIs with OAuth2 in Liferay DXP: A Complete Guide
 June 26, 2025
In the digital world of today, Liferay Headless APIs have flexible integration with any other system and custom applications. Security is the foremost important factor while accessing these APIs. At this point, OAuth2 comes into the picture. This industry-standard protocol provides secure and token-based access to Liferay's data on safe and controlled interactions with APIs without revealing sensitive credentials such as usernames and passwords. This blog will discuss how OAuth2 secures, scales, and provides flexibility to your Headless API integrations inside Liferay development.
What is Headless API?
In Liferay, a Headless API refers to a set of RESTful APIs, providing developers feedback on Liferay's core functionality and services, whereas a traditional user interface is not directly used. The term "headless" denotes that the API allows access to Liferay's back-end functions without being connected to a certain front-end view layer. This is central to headless architecture, which decouples the frontend and backend for greater flexibility.
What Is OAuth2?
OAuth 2.0 is an authorization framework that allows third-party applications to gain access to user data or services without exposing user credentials (such as usernames or passwords). Passing on the usage of direct login, it instead uses a token with limited access based on permissions defined inside the scopes, thus enhancing API authentication.
Why is OAuth 2.0 Important for Securing Headless APIs?
Headless APIs expose backend data and services for use in front-end applications, mobile apps, and third-party systems. Without proper API security, these APIs can become major vulnerabilities. OAuth 2.0 addresses this by offering a robust and flexible authorization framework that secures access without relying on traditional credentials.
Key Benefits of Using OAuth 2.0:
- Token-Based Access for Better Security
Instead of using usernames and passwords, OAuth 2.0 uses short-lived access tokens, reducing the risk of credential leaks and enabling safer, concurrent sessions.
- Granular Permissions Through Scopes
OAuth scopes define exactly what a client can access—from read-only access to full administrative control—enforcing least-privilege access for each client.
- No Password Sharing
Clients never need to handle or store user passwords. Authentication is handled securely through token exchange, keeping credentials safe and out of transit.
- Support for Multiple Client Types
OAuth 2.0 supports a variety of flows tailored to different clients—backend servers, single-page apps (e.g., React), mobile apps, and more—ensuring secure access across platforms.

Securing Headless API with OAuth 2.0 in Liferay
- Enable OAuth2 Provider
If not already enabled, go to: Control Panel → Configuration → System Settings → OAuth2
Ensure its enabled and configured with proper settings (e.g., default access token lifetime, supported grant types) as part of your Liferay Integration.
- Create an OAuth 2.0 Application
- Navigate to: Control Panel → Security → OAuth2 Administration
- Click "PLUS(+)" button.
- Fill the details as per below Image:
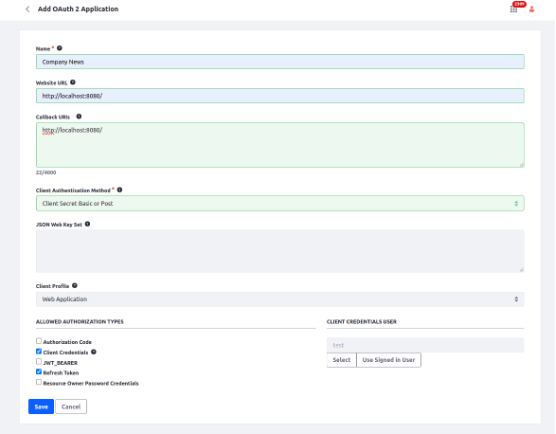
- Website URL: Provide the landing URL of your application's.
- Callback URIs: This is the URI where Liferay redirects the user after they approve or deny authorization.
- Client Authentication Method:
- Client Secret (Basic or Post) – Authenticates using client ID and secret, either in the HTTP header (Basic) or request body (Post).
- Client Secret JWT – Authenticates using a JWT signed with the client secret.
- Private Key JWT – Authenticates using a JWT signed with the client’s private key for stronger security.
- JSON Web Key Set: Used only if you're using JWT-based authorization (e.g., JWT Bearer flow).
- Client Profile
- Web Application: Traditional server-side apps.
- Native Application: Mobile or desktop apps (less secure, no secret).
- Headless Server: Used for server-to-server, headless services.
- User Agent-Based Application: Single-page apps (e.g., React, Angular).
- Allowed Authorization Types (Grant Types)
These define how your app will get tokens:
- Authorization Code: For apps that redirect users to login.
- Client Credentials: For system-to-system (machine-to-machine) calls.
- JWT_BEARER: Use signed JWTs to get tokens (SSO integrations).
- Refresh Token: Allows getting a new access token without user login.
- Resource Owner Password Credentials: Direct login using username/password (only for trusted apps).
- Client Credentials User:
Specifies the default user identity that Liferay will use to authorize API requests when the client_credentials grant is used.
- Machine-to-machine (server-to-server) integrations
- Background services or scheduled jobs
- Headless applications with no user interaction
- Click Save.
- Once You Save your OAuth2 Configurations. The client-id and secret-id will automatically be generated, and it will be shown at top of the page. and you will see the two more tabs "Scopes" and "Authorizations".
- Inside the scopes you can give the permissions as per your requirement as I given in below image. (I've given permission to Object entry)
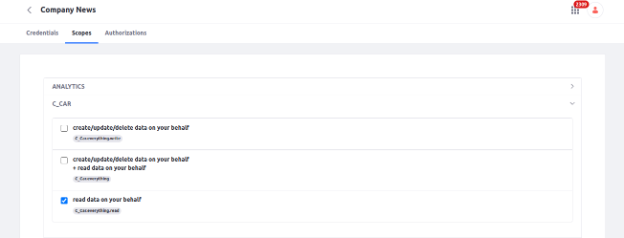
- Once given permission clicks on the "Save" button.
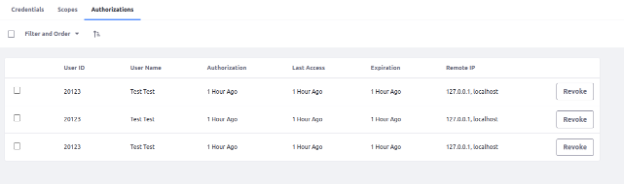
- Inside the Authorization tab you will find the Authorization details with time, Expiration and Remote IP. You can also revoke your generated token by clicking on the Revoke button.

Accessing the resource using POSTMAN
- Now Open the POSTMAN for testing the Headless APIs permissions.
- Add new HTTP POST request and hit the following URL with body.
- URL: http://{your server IP}/o/oauth2/token
- Inside the Body, select x-www-form-urlencoded and set the Key and Values as per the below Image.
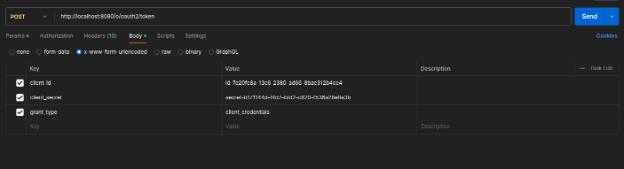
- client_id = {OAuth2 Client ID which you have generated earlier}
- client_secret = {OAuth2 Client secret which you have generated earlier}
- grant_type = client_credentials
- You will get the access token as a Response as per the below Image. copy that access token.
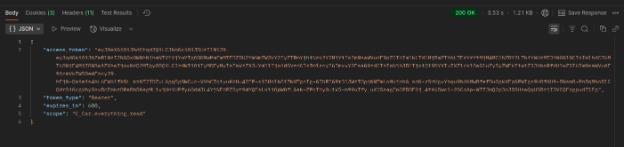
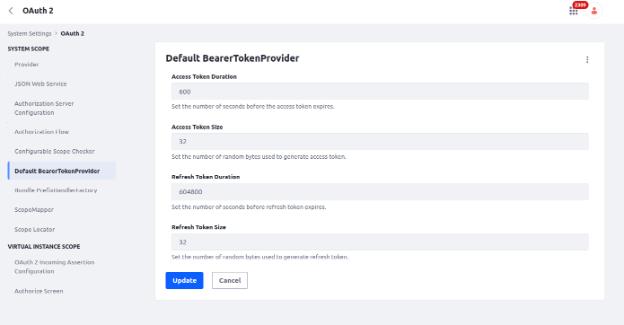
- As you can see, the "expires_in": 600 value means the token will expire in 10 minutes. If you'd like to change this, follow the steps below to set a custom access token duration:
- Go to, Control Panel -> System Settings. Inside the Security tab click on OAuth2.
- From the Left side panel click on Default BearerTokenProvider and inside the “Access Token Duration” field, set your own expiration time in seconds as per below image.
- Now create a GET request in POSTMAN. and hit the following URL. you'll get the output as per the below Image. URL: http://{your server IP}/o/c/cars/{car entry id} (You can use your own Headless API endpoint)

- Now select Auth Type as Bearer Token inside the Authorization and paste the access token as per below image.
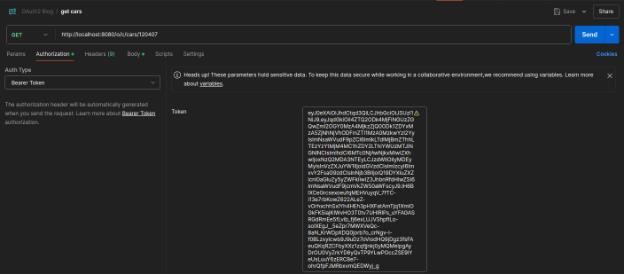
- Now again hit the same URL.
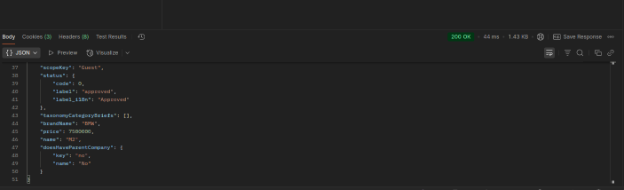
- Hurray! You’ve successfully secured your Headless API using OAuth2 authentication in Liferay.
Conclusion:
OAuth2 offers a secure, scalable, and flexible method for API authentication and authorization in Headless architecture. With token-based access and configurable scopes, unauthorized clients are blocked from accessing protected resources without revealing sensitive credentials. This significantly enhances API security and supports a wide range of Liferay Integration scenarios—from mobile and SPAs to backend services. Implementing OAuth2 in Liferay Development ensures your applications are secure, modern, and future-ready.