The GOGO Shell in Liferay is a powerful tool that enables users to interact with the Liferay platform.By default, it provides access to OSGi commands, allows for bundle management, and offers interaction with Liferay services. However, one of its most compelling features is the ability to create custom commands tailored to your specific use cases.
In this blog, we will explore how to create your own custom GOGO Shell commands in Liferay and discuss some practical use cases.
Why Create Custom GOGO Shell Commands?
Custom GOGO Shell commands offer several benefits, including:
- Automating Repetitive Tasks: If you frequently perform certain actions, you can automate them with a custom command, saving time and reducing human error.
- Enhancing Liferay Features: You can build additional features that are not available out of the box, extending Liferay's capabilities to better suit your needs.
In many organizations, documents stored within Liferay need to be categorized and tagged for easier management and retrieval. However, Liferay's default GOGO Shell commands do not provide a straightforward way to automate the process of adding tags to documents in bulk. This can lead to inefficiencies, especially when administrators or content managers need to tag large numbers of documents manually, one at a time, through the Liferay user interface.
For example, let's say an organization has thousands of documents in its document library, and each document needs to be tagged with specific keywords such as "Finance", "Legal", and "Reports". Manually adding these tags to each document via the user interface is a tedious and time-consuming task. A custom GOGO Shell command would allow the administrator to automate this process by applying the appropriate tags to multiple documents at once based on predefined criteria.
By creating a custom GOGO Shell command, we can automate the tagging process and apply tags to documents based on criteria like file type, creation date, or even specific keywords within the document content. Here's how a custom command might work:
How to Create Custom GOGO Shell Commands in Liferay?
Example of Adding Tags to Documents using Custom GOGO Shell Command
Define the Custom Command:
You could create a custom command named tagDocuments that accepts parameters like document IDs and tags and automatically adds those tags to the specified documents.
Prerequisites:
- JAVA 8
- Liferay 7.4
- Liferay Developer Studio 3.9.8
Step 1: Create a Liferay Workspace in Eclipse IDE
Begin by setting up a Liferay workspace in Eclipse IDE. This will be the foundation for creating your Liferay modules.
Step 2: Create a Liferay Module Project (API Type)
Next, create a Liferay module project of type API. This module will serve as the container for your custom GOGO Shell command.
Step 3: Add Dependencies to the build.gradle File
Add the following dependencies to the build.gradle file of your module to enable the creation of custom commands:
- compileOnly group: "org.osgi", name: "org.osgi.service.component.annotations", version: "1.3.0"
- compileOnly group: "org.apache.felix", name: "org.apache.felix.gogo.runtime", version: "1.0.2"
- compileOnly group: "com.liferay.portal", name: "com.liferay.portal.kernel", version: "2.0.0"
Step 4: Implement the Custom Command
Create a public Java class in your module and use the following code to define a custom command:
import com.liferay.asset.kernel.service.AssetTagLocalService;
import com.liferay.document.library.kernel.service.DLAppService;
import com.liferay.portal.kernel.exception.PortalException;
import org.osgi.service.component.annotations.Component;
import org.osgi.service.component.annotations.Reference;

@Component(
    immediate = true,
    service = Object.class,
    property = {
        "osgi.command.scope=blade",
        "osgi.command.function=tagDocuments"
    }
)
public class TagDocumentsCommand {

    @Reference
    private DLAppService _dlAppService;

    @Reference
    private AssetTagLocalService _assetTagLocalService;

    public void tagDocuments(String documentIds, String tags) throws PortalException {
        // Split the document IDs and tags by comma
        String[] documentIdArray = documentIds.split(",");
        String[] tagArray = tags.split(",");

        // Iterate over the document IDs
        for (String documentIdStr : documentIdArray) {
            long documentId = Long.parseLong(documentIdStr.trim());
            // Iterate over the tags and apply each one to the file
            for (String tagName : tagArray) {
                // Add logic to add tag in file
            }
            System.out.println("Tagged document with ID " + documentId + " with tags: " + String.join(",", tagArray));
        }
    }
}
Understanding the @Component Annotation and Method Details
In this section, we break down the key elements of the code used to create the custom GOGO Shell command. Understanding how the '@Component' annotation works and how parameters are passed to the method is crucial for building a functional and effective custom command.
@Component Annotation
The '@Component' annotation is part of the OSGi specification. It registers a class as an OSGi component, enabling it to be managed by the OSGi container. This allows you to expose functionality as an OSGi service, which other parts of the system can interact with, such as the GOGO Shell in this case.
The annotation also defines specific properties that tell the OSGi runtime how to wire and expose the command:
- osgi.command.scope=blade: This specifies the general namespace for the OSGi command. You can think of it as the "category" or "group" of the command. In this case, the command will be grouped under "blade."
- osgi.command.function=tagDocuments: This defines the name of the command. It corresponds to the method name within the class. The Gogo Shell will invoke this method when the user runs the custom command in the shell.
Method and Parameters
The method defined within the class is the core functionality that gets executed when the GOGO Shell command is triggered. In this example, the method name is 'tagDocuments', and it accepts two parameters:
- String documentIds: This parameter is used to pass a list of document IDs that you want to tag. For example, the user might input a string like "2345,3422", representing the document IDs they want to target.
- String tags: This parameter accepts the tags you want to apply to the documents. The tags are passed as a comma-separated string (e.g., "Finance, Legal"), which the method will process and apply to the specified documents.
Together, these two parameters allow the custom command to identify the target documents and the tags to apply, making it a powerful tool for automating tasks like bulk-tagging documents in Liferay.

Step 5: Build and Deploy Your Module
Build your module using the Liferay Gradle plugin and deploy it to your Liferay instance. This will make the custom command available in the Gogo Shell.
Testing the Custom Command
To test your custom command from the GOGO Shell UI in Liferay, you need to follow a few steps:
- Log in to the Liferay portal with admin credentials.
- Open the Control Panel and access the GOGO Shell.
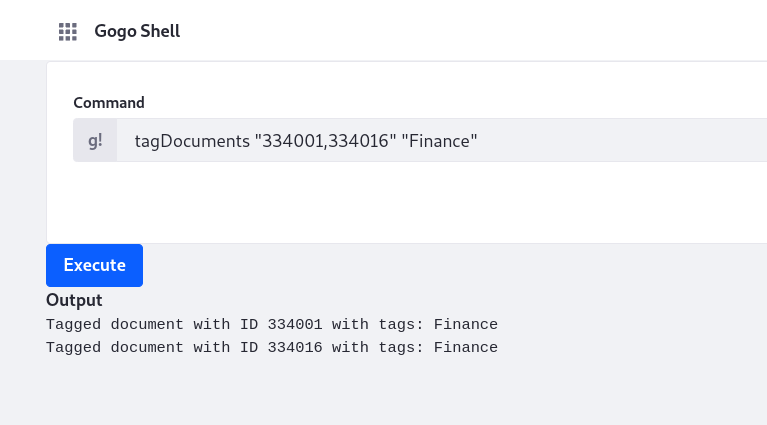
- Once you're in the Gogo Shell UI, you can view all the available commands by typing help and pressing Enter. This will show a list of all available commands in your Liferay instance, including any custom command you've defined, such as your tagDocuments "334001,334016" "Finance" command.
Conclusion
Creating custom GOGO Shell commands in Liferay offers a highly efficient way to automate repetitive tasks and extend the platform's functionality. With Liferay Development Services, businesses can streamline workflows such as bulk tagging documents, managing services, and integrating external systems. Custom commands not only save time but also reduce errors, enhancing overall efficiency. By leveraging the power of the GOGO Shell, developers can tailor Liferay to meet specific needs and unlock advanced use cases. This flexibility makes it an invaluable tool for improving operational efficiency and optimizing the Liferay experience.