Deploying Liferay with MySQL on Kubernetes (K8s) (Self-Hosted with Local Volumes)
Getting Liferay up and running on your own Kubernetes (K8s) infrastructure doesn't have to be complicated. Let me walk you through setting up Liferay on your own Kubernetes cluster. We'll be using Liferay as our digital experience platform (it's really solid for this kind of work) paired with MySQL for the database, all hosted on your own infrastructure with local storage that actually persists your data.
What makes Liferay interesting is its flexibility across use cases. Corporate portals, team collaboration platforms, customer websites - it handles them all pretty well. Our setup preserves everything important: database records, content files, deployment artifacts, OSGi components, and system logs.
After running this configuration through various test scenarios, I can confirm it's reliable for development work, staging environments, and moderate production workloads where infrastructure control matters.
Overview
Liferay Portal runs on Java with Apache Tomcat under the hood, and like most enterprise applications, it needs a solid database foundation - that's where MySQL comes in. Running everything on Kubernetes (K8s) gives you some real advantages: automatic scaling when traffic spikes, built-in fault tolerance, and much easier day-to-day management once you get everything configured properly.
For storage, we're using local volumes instead of expensive cloud storage solutions. This keeps costs down while still providing the data persistence you absolutely need for a production-ready system.
Here's what we'll accomplish together: setting up a dedicated Kubernetes (K8s) namespace to keep everything organized, configuring reliable persistent storage, getting both MySQL and Liferay deployed and talking to each other properly, and finally exposing Liferay through a NodePort service so your team can access it from their browsers. We'll even cover SSL configuration to keep your connections secure.
Prerequisites
Your Kubernetes (K8s) Setup: You need a working Kubernetes (K8s) cluster running. If you're just experimenting or doing dev work, minikube is perfect. For anything more serious, go with kubeadm. Quick check - run kubectl cluster-info to make sure everything's talking properly.
kubectl Tool: Make sure you've got kubectl installed and it can actually communicate with your cluster. Try kubectl version - if it gives you version info without complaining, you're good to go.
Storage Provisioner: Planning to use dynamic storage? You'll need a local path provisioner running. Don't have one set up? No worries - I'll show you how to create volumes manually instead.
Admin Access: You're going to need sudo or root privileges on your Kubernetes node since we'll be creating directories and tweaking permissions.
Step 1: Set Up Directories
Here's the thing about containerized apps - when they restart (and they will), everything inside gets wiped clean unless you've got persistent storage sorted out. We need to create specific directories on your Kubernetes (K8s) server for all the important stuff: MySQL database files, Liferay's application data, deployment packages, OSGi modules, and all those log files that'll help you troubleshoot later.
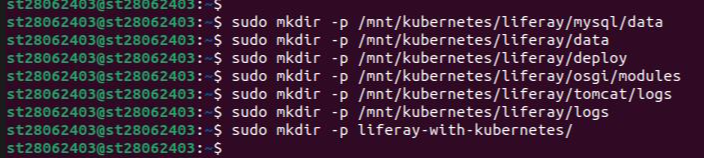
Run the following commands to create the required directories:
- sudo mkdir -p /mnt/kubernetes/liferay/mysql/data
- sudo mkdir -p /mnt/kubernetes/liferay/data
- sudo mkdir -p /mnt/kubernetes/liferay/deploy
- sudo mkdir -p /mnt/kubernetes/liferay/osgi/modules
- sudo mkdir -p /mnt/kubernetes/liferay/tomcat/logs
- sudo mkdir -p /mnt/kubernetes/liferay/logs
- sudo mkdir -p liferay-with-kubernetes/
MySQL Data Storage (/mnt/kubernetes/liferay/mysql/data): This is where all your MySQL database files live - basically everything that makes your database persistent when containers restart.
Liferay Core Data (/mnt/kubernetes/liferay/data): Your main Liferay stuff goes here - portal settings, uploaded documents, user data, all the essential bits that make your site work.
Hot Deployment Area (/mnt/kubernetes/liferay/deploy): Drop your WAR files or LPKG packages here and Liferay will automatically pick them up and deploy them. Pretty handy for adding new functionality on the fly.
OSGi Modules (/mnt/kubernetes/liferay/osgi/modules): Custom modules and extensions that expand what Liferay can do get stored in this folder.
Tomcat Logs (/mnt/kubernetes/liferay/tomcat/logs): When things go sideways with the application server, this is where you'll find the clues to figure out what happened.
Liferay Application Logs (/mnt/kubernetes/liferay/logs): Liferay's own log files - great for troubleshooting portal-specific issues and tracking user activity.
Project Workspace (liferay-with-kubernetes/): Just a local folder on your machine where we'll keep all our Kubernetes (K8s) configuration files organized.
Step 2: Configure Permissions
Before we proceed, we need to address directory permissions for our containerized services. MySQL and Liferay will require appropriate read-write access to these storage locations once deployed. Container environments often encounter permission conflicts, making it prudent to establish proper access controls at this stage.
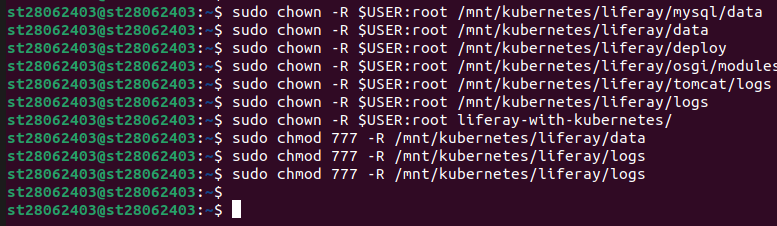
Run these commands to fix the ownership and permissions:
- sudo chown -R $USER:root /mnt/kubernetes/liferay/mysql/data
- sudo chown -R $USER:root /mnt/kubernetes/liferay/data
- sudo chown -R $USER:root /mnt/kubernetes/liferay/deploy
- sudo chown -R $USER:root /mnt/kubernetes/liferay/osgi/modules
- sudo chown -R $USER:root /mnt/kubernetes/liferay/tomcat/logs
- sudo chown -R $USER:root /mnt/kubernetes/liferay/logs
- sudo chown -R $USER:root liferay-with-kubernetes/
- sudo chmod 777 -R /mnt/kubernetes/liferay/data
- sudo chmod 777 -R /mnt/kubernetes/liferay/logs
- sudo chmod 777 -R /mnt/kubernetes/liferay/logs
chown -R $USER:root: The chown command makes sure your current user owns these directories while keeping them in the root group - this way, container processes can access them without issues.
chmod -R 777: Those chmod 777 commands might look overly permissive, but Liferay needs pretty liberal file access for things like document uploads and log writing. Better to be safe than spend hours debugging permission errors.
Step 3: Deploy MySQL
MySQL is going to be the backbone of our Liferay setup - it handles all the portal content, user data, and configuration settings. We need to set up a few things here: persistent storage so the database survives container restarts, the actual MySQL deployment, and a service that lets Liferay talk to the database.
3.1 Create MySQL PV and PVC
Storage setup involves creating two components. The Persistent Volume essentially registers our storage location with Kubernetes (K8s), while the Persistent Volume Claim handles the actual storage request from MySQL's perspective. Since we're managing our own infrastructure here, local storage is the most practical approach - no need to complicate things with network storage solutions.
Jump into your project directory first:
Now create the storage configuration file named mysql-pv-pvc.yml:
Add the following configuration:
apiVersion: v1

kind: PersistentVolume

metadata:

  name: mysql-pv

  labels:

    type: local

spec:

  capacity:

    storage: 5Gi

  accessModes:

    - ReadWriteOnce

  storageClassName: local-storage

  local:

    path: /mnt/kubernetes/liferay/mysql/data

  nodeAffinity:

    required:

      nodeSelectorTerms:

        - matchExpressions:

            - key: kubernetes.io/hostname

              operator: In

              values:

                - node_name #your node name
---

apiVersion: v1

kind: PersistentVolumeClaim

metadata:

  name: mysql-pvc

  namespace: liferay

spec:

  accessModes:

    - ReadWriteOnce

  resources:

    requests:

      storage: 3Gi

  storageClassName: local-storage
PersistentVolume (PV): What's happening here? The Persistent Volume section reserves 5GB of space at /mnt/kubernetes/liferay/mysql/data on your node. That nodeAffinity part makes sure this volume gets attached to a specific node - you'll need to swap out node_name with whatever your actual node is called (check kubectl get nodes to find it).
PersistentVolumeClaim (PVC): The Persistent Volume Claim is MySQL saying "hey, I need 3GB of storage from the liferay namespace." It matches up with our PV since they're both using the local-storage class.

3.2 Create MySQL Deployment
MySQL deployment defines everything about how the MySQL container should run - which image to use, environment settings, and how to connect our storage.
Create a file named mysql-deployment.yml:
Add the following configuration:
apiVersion: apps/v1

kind: Deployment

metadata:

 name: mysql

 namespace: liferay

spec:

 replicas: 1

 selector:

   matchLabels:

     app: mysql

 template:

   metadata:

     labels:

       app: mysql

   spec:

     nodeSelector:

       kubernetes.io/hostname: your_node_name

     containers:

     - name: mysql

       image: mysql:8.0

       ports:

         - containerPort: 3306

       env:

         - name: MYSQL_ROOT_PASSWORD

           value: "root"

         - name: MYSQL_DATABASE

           value: "liferay"

       volumeMounts:

         - name: mysql-data

           mountPath: /var/lib/mysql

     volumes:

       - name: mysql-data

         persistentVolumeClaim:

           claimName: mysql-pvc
replicas: 1 - We're keeping it simple with just one MySQL instance
image: mysql:8.0 - This version plays nicely with Liferay 7.4
Environment variables - Sets up the root password (definitely change "root" to something secure in production) and creates our "liferay" database
Volume mounts - Connects our persistent storage to /var/lib/mysql where MySQL keeps its data files
Node selector - Makes sure this runs on your specific node (replace node_name with your actual hostname)
3.3 Create MySQL Service
MySQL also needs a service so Liferay can actually connect to it. Create the service configuration:
This service acts like an internal network endpoint that Liferay can use to reach the database.
Create a file named mysql-service.yml:
Add the following configuration:
apiVersion: v1

kind: Service

metadata:

  name: mysql

  namespace: liferay

spec:

  selector:

    app: mysql

  ports:

    - port: 3306

      targetPort: 3306
selector: app: mysql - This tells the service to route traffic to our MySQL pod
ports - Opens up port 3306 (MySQL's standard port) so other services in the cluster can connect
namespace: liferay - Keeps everything organized in our dedicated liferay namespace
3.4 Deploy MySQL
Time to actually deploy everything we've configured:
kubectl create namespace liferay
kubectl apply -f mysql-pv-pvc.yml
kubectl apply -f mysql-deployment.yml -n liferay
kubectl apply -f mysql-service.yml -n liferay

kubectl create namespace liferay: Creates our dedicated workspace to keep Liferay and MySQL separate from other cluster resources.
kubectl apply: Apply all our MySQL configurations - storage, deployment, and service - in one go.
Step 4: Deploy Liferay
Now for the main event - getting Liferay running. This is a bit more involved than MySQL since Liferay needs storage for multiple things: application data, deployment packages, OSGi modules, various log files, plus all the configuration files that tell Tomcat and Liferay how to behave.
4.1 Create Liferay PVs and PVCs
Liferay's storage needs are more complex than MySQL - we're creating five different persistent volumes to keep things organized and manageable.
Create a file named liferay-pv-pvc.yml:
Add the following configuration:
#1. Liferay Data

apiVersion: v1

kind: PersistentVolume

metadata:

  name: liferay-data-pv

  labels:

    type: local

spec:

  capacity:

    storage: 5Gi

  accessModes:

    - ReadWriteOnce

  storageClassName: local-storage

  local:

    path: /mnt/kubernetes/liferay/data

  nodeAffinity:

    required:

      nodeSelectorTerms:

        - matchExpressions:

            - key: kubernetes.io/hostname

              operator: In

              values:

                - node_name #Replace with your node name

---

apiVersion: v1

kind: PersistentVolumeClaim

metadata:

  name: liferay-data-pvc

  namespace: liferay

spec:

  accessModes:

    - ReadWriteOnce

  resources:

    requests:

      storage: 5Gi

  storageClassName: local-storage

#2. Liferay Deploy

---

apiVersion: v1

kind: PersistentVolume

metadata:

  name: liferay-deploy-pv

  labels:

    type: local

spec:

  capacity:

    storage: 2Gi

  accessModes:

    - ReadWriteOnce

  storageClassName: local-storage

  local:

    path: /mnt/kubernetes/liferay/deploy

  nodeAffinity:

    required:

      nodeSelectorTerms:

        - matchExpressions:

            - key: kubernetes.io/hostname

              operator: In

              values:

                - node_name #Replace with your node name
---

apiVersion: v1

kind: PersistentVolumeClaim

metadata:

  name: liferay-deploy-pvc

  namespace: liferay

spec:

  accessModes:

    - ReadWriteOnce

  resources:

    requests:
      storage: 2Gi

  storageClassName: local-storage

#3. Liferay OSGI Modules

---

apiVersion: v1

kind: PersistentVolume

metadata:

  name: liferay-osgi-modules-pv

  labels:

    type: local

spec:

  capacity:

    storage: 1Gi

  accessModes:

    - ReadWriteOnce

  storageClassName: local-storage

  local:

    path: //mnt/kubernetes/liferay/osgi/modules

  nodeAffinity:

    required:

      nodeSelectorTerms:

        - matchExpressions:

            - key: kubernetes.io/hostname

              operator: In

              values:

                - node_name #Replace with your node name

---
apiVersion: v1

kind: PersistentVolumeClaim

metadata:

  name: liferay-osgi-modules-pvc

  namespace: liferay

spec:

  accessModes:

    - ReadWriteOnce

  resources:

    requests:

      storage: 1Gi

  storageClassName: local-storage


#4. Tomact Logs

---

apiVersion: v1

kind: PersistentVolume

metadata:

  name: tomcat-logs-pv

  labels:

    type: local

spec:

  capacity:

    storage: 3Gi

  accessModes:

    - ReadWriteOnce

  storageClassName: local-storage

  local:

    path: /mnt/kubernetes/liferay/tomcat/logs

  nodeAffinity:

    required:

      nodeSelectorTerms:

        - matchExpressions:

            - key: kubernetes.io/hostname

              operator: In

              values:

                - node_name #Replace with your node name

---

apiVersion: v1

kind: PersistentVolumeClaim

metadata:

  name: tomcat-logs-pvc

  namespace: liferay

spec:

  accessModes:

    - ReadWriteOnce

  resources:

    requests:

      storage: 3Gi

  storageClassName: local-storage

#4. Liferay Logs

---

apiVersion: v1

kind: PersistentVolume

metadata:

  name: liferay-logs-pv

  labels:

    type: local

spec:

  capacity:

    storage: 3Gi

  accessModes:

    - ReadWriteOnce

  storageClassName: local-storage

  local:

    path: /mnt/kubernetes/liferay/logs

  nodeAffinity:

    required:

      nodeSelectorTerms:

        - matchExpressions:

            - key: kubernetes.io/hostname

              operator: In

              values:

                - node_name #Replace with your node name

---

apiVersion: v1

kind: PersistentVolumeClaim

metadata:

  name: liferay-logs-pvc

  namespace: liferay

spec:

  accessModes:

    - ReadWriteOnce

  resources:

    requests:

      storage: 3Gi

  storageClassName: local-storage
Each PV/PVC pair corresponds to a specific directory (data, deploy, osgi/modules, tomcat/logs, logs).
storage: 5Gi, 3Gi, 2Gi, 1Gi: Allocates storage sizes (adjustable based on needs).
nodeAffinity: Binds each PV to the specified node (replace node_name).
namespace: liferay: Places PVCs in the liferay namespace.
4.2 Create Liferay ConfigMaps
Liferay needs several configuration files to run properly - Tomcat's server settings, Liferay portal properties, and JVM startup options. We'll manage these through Kubernetes (K8s) ConfigMaps, which makes updating configs much easier later.
4.2.1 Create ConfigMap for server.xml
First up is configuring Tomcat's connectors for HTTP, HTTPS, and AJP traffic:
Create a file named serverxml-configmap.yml:
Add the following configuration:
    apiVersion: v1

kind: ConfigMap

metadata:

  name: server-xml-config

  namespace: liferay

data:

  server.xml: |

    <?xml version="1.0" encoding="UTF-8"?>

    <Server port="8005" shutdown="SHUTDOWN">

      <Listener className="org.apache.catalina.startup.VersionLoggerListener" />

      <Listener className="org.apache.catalina.core.AprLifecycleListener" SSLEngine="on" />

      <Listener className="org.apache.catalina.core.JreMemoryLeakPreventionListener" />

      <Listener className="org.apache.catalina.mbeans.GlobalResourcesLifecycleListener" />

      <Listener className="org.apache.catalina.core.ThreadLocalLeakPreventionListener" />


      <GlobalNamingResources>

       <Resource name="UserDatabase" auth="Container"

                  type="org.apache.catalina.UserDatabase"

                  description="User database that can be updated and saved"

                  factory="org.apache.catalina.users.MemoryUserDatabaseFactory"

                  pathname="conf/tomcat-users.xml" />

      </GlobalNamingResources>

      <Service name="Catalina">

        <Connector protocol="AJP/1.3"

                   address="0.0.0.0"

                   secretRequired="false"

                   port="8009"

                   packetSize="65536"

                   redirectPort="8443"

                   URIEncoding="UTF-8" />

        <Connector port="8080" protocol="HTTP/1.1"

                   connectionTimeout="20000"

                   redirectPort="8443"

                   URIEncoding="UTF-8" />


<Connector port="8443" protocol="org.apache.coyote.http11.Http11NioProtocol"

maxThreads="150" SSLEnabled="true" scheme="https" secure="true">

          <SSLHostConfig protocols="TLSv1.2">

  <Certificate certificateKeyFile="/usr/local/liferay/cert/keyfile.key"

                         certificateFile="/usr/local/liferay/cert/certfile.crt"

                         type="RSA" />

          </SSLHostConfig>

        </Connector>

        <Engine name="Catalina" defaultHost="localhost">

          <Realm className="org.apache.catalina.realm.LockOutRealm">

            <Realm className="org.apache.catalina.realm.UserDatabaseRealm"

                   resourceName="UserDatabase"/>

          </Realm>


          <Host name="localhost" appBase="webapps"

                unpackWARs="true" autoDeploy="true">

          </Host>

        </Engine>

      </Service>

    </Server>
Connectors: We're configuring three different ways to connect - regular HTTP on port 8080, secure HTTPS on port 8443 (with SSL certificates), and AJP on port 8009 if you want to integrate with a web server like Apache.
SSLHostConfig: References SSL certificates mounted at /usr/local/liferay/cert.
4.2.2 Create ConfigMap for portal-ext.properties
The portal-ext.properties file configures Liferay’s database connection and virtual hosts.
Create a file named portalext-configmap.yml:
Add the following configuration:
     apiVersion: v1

kind: ConfigMap

metadata:

  name: portalext-config

  namespace: liferay

data:

  portal-ext.properties: |

    # Make sure the domain name is correct

    virtual.hosts.valid.hosts=localhost,127.0.0.1,[::1],[0:0:0:0:0:0:0:1]

    web.server.protocol=http

    web.server.https.port=30767


    jdbc.default.url=jdbc:mysql://mysql.liferay.svc.cluster.local:3306/liferay?useUnicode=true&characterEncoding=UTF-8&useFastDateParsing=false

    jdbc.default.driverClassName=com.mysql.cj.jdbc.Driver

    jdbc.default.username=root

    jdbc.default.password=root
virtual.hosts.valid.hosts: Allows access via localhost and IP addresses.
web.server.https.port: Sets the external HTTPS port to 30767 (NodePort).
jdbc.default.url: Connects to the MySQL service (mysql.liferay.svc.cluster.local) and the liferay database.
jdbc.default.username/password: Uses the MySQL credentials (update in production).
4.2.3 Create ConfigMap for setenv.sh
The setenv.sh file configures JVM options for Tomcat.
Create a file named setenv-configmap.yml:
Add the following configuration:
apiVersion: v1

kind: ConfigMap

metadata:

 name: setenv-sh-config

 namespace: liferay

data:

 setenv.sh: |

   CATALINA_OPTS="$CATALINA_OPTS -Dfile.encoding=UTF-8 -Djava.locale.providers=JRE,COMPAT,CLDR -Djava.net.preferIPv4Stack=true -Duser.timezone=GMT -Xms2560m -Xmx2560m -XX:MaxNewSize=1536m -XX:MaxMetaspaceSize=768m -XX:MetaspaceSize=768m -XX:NewSize=1536m -XX:SurvivorRatio=7"
CATALINA_OPTS: Sets JVM options for encoding, locale, memory allocation, and garbage collection, optimized for Liferay.
4.3 Create Liferay Secret for SSL Certificates
Liferay’s HTTPS connector requires SSL certificates. This step generates a self-signed certificate and creates a Kubernetes Secret.
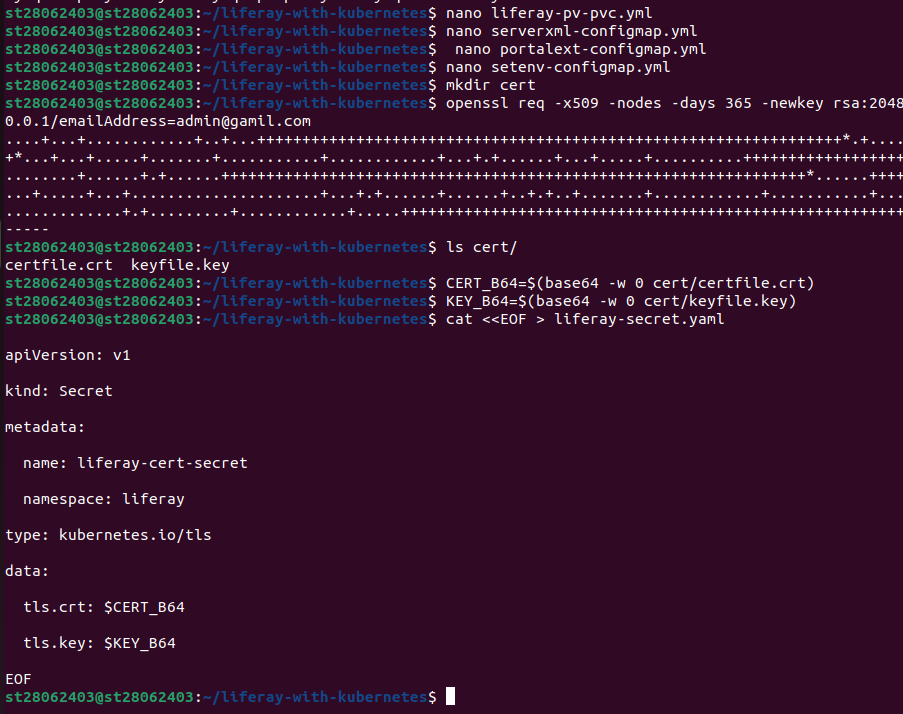
Generate the certificate:
The certificate files have to be base64 encoded - it's just how Kubernetes handles secret storage.
And save them directly into shell variables:
Create a file named liferay-secret.yml:
cat < < EOF > liferay-secret.yml

apiVersion: v1

kind: Secret

metadata:

  name: liferay-cert-secret

  namespace: liferay

type: kubernetes.io/tls

data:

  tls.crt: $CERT_B64

  tls.key: $KEY_B64

EOF
type: kubernetes.io/tls: Stores the base64-encoded certificate and key.
namespace: liferay: Places the Secret in the liferay namespace.
4.4 Create Liferay Deployment
The Deployment defines the Liferay container, including its image, ports, environment variables, resources, and volume mounts.
Create a file named liferay-deployment.yml:
Add the following configuration
apiVersion: apps/v1

kind: Deployment

metadata:

 name: liferay

 namespace: liferay

spec:

 replicas: 1

 selector:

   matchLabels:

     app: liferay

 template:

   metadata:

     labels:

       app: liferay

   spec:

     nodeSelector:

       kubernetes.io/hostname: node_name #your_node_name

     securityContext:

       fsGroup: 1000

     containers:

       - name: liferay

         image: liferay/portal:7.4.3.112-ga112

         ports:

           - containerPort: 8080

           - containerPort: 8009

         env:

           - name: LIFERAY_JPDA_ENABLED

             value: "true"

           - name: JPDA_ADDRESS

             value: "8000"

           - name: JPDA_TRANSPORT

             value: "dt_socket"

           - name: LIFERAY_RETRY_PERIOD_JDBC_PERIOD_ON_PERIOD_STARTUP_PERIOD_DELAY

             value: "10"

           - name: LIFERAY_RETRY_PERIOD_JDBC_PERIOD_ON_PERIOD_STARTUP_PERIOD_MAX_PERIOD_RETRIES

             value: "1"

           - name: LIFERAY_JVM_OPTS

             value: "-Xms4096m -Xmx8192m"

         resources:

           requests:

             memory: "6Gi"

             cpu: "4"

           limits:

             memory: "8Gi"

             cpu: "4"

         volumeMounts:

           - name: liferay-data

             mountPath: /opt/liferay/data

           - name: liferay-deploy

             mountPath: /opt/liferay/deploy

           - name: tomcat-logs

             mountPath: /opt/liferay/tomcat/logs

           - name: liferay-logs

             mountPath: /opt/liferay/logs

           - name: osgi-modules

             mountPath: /opt/liferay/osgi/modules

           - name: portal-ext

             mountPath: /opt/liferay/portal-ext.properties

             subPath: portal-ext.properties

           - name: server-xml

             mountPath: /opt/liferay/tomcat/conf/server.xml

             subPath: server.xml

           - name: set-env

             mountPath: /opt/liferay/tomcat/bin/setenv.sh

             subPath: setenv.sh

           - name: liferay-cert

             mountPath: /usr/local/liferay/cert

     volumes:

       - name: liferay-data

         persistentVolumeClaim:

           claimName: liferay-data-pvc

       - name: liferay-deploy

         persistentVolumeClaim:

           claimName: liferay-deploy-pvc

       - name: tomcat-logs

         persistentVolumeClaim:

           claimName: tomcat-logs-pvc

       - name: liferay-logs

         persistentVolumeClaim:

           claimName: liferay-logs-pvc

       - name: osgi-modules

         persistentVolumeClaim:

           claimName: liferay-osgi-modules-pvc

       - name: portal-ext

         configMap:

           name: portalext-config

       - name: server-xml

         configMap:

           name: server-xml-config

       - name: set-env

         configMap:

           name: setenv-sh-config

       - name: liferay-cert

         secret:

           secretName: liferay-cert-secret
image: liferay/portal:7.4.3.112-ga112: Uses Liferay Portal 7.4 GA112.
ports: Exposes 8080 (HTTP) and 8009 (AJP).
env: Enables JPDA debugging and configures JDBC retry settings.
resources: Allocates 6-8Gi of memory and 4 CPUs for Liferay’s high resource demands.
volumeMounts: Mounts data, logs, modules, and configuration files.
securityContext: Sets fsGroup: 1000 to match Liferay’s default user permissions.

4.5 Create Liferay Service
The Service exposes Liferay externally via a NodePort.
Create a file named liferay-service-nodeport.yml:
Add the following configuration:
apiVersion: v1

kind: Service

metadata:

  name: liferay-service

  namespace: liferay

spec:

  selector:

    app: liferay

  type: NodePort

  ports:

    - protocol: TCP

      port: 8080

      targetPort: 8080

      nodePort: 30767
type: NodePort: Exposes Liferay on port 30767 of the node’s IP.
selector: app: liferay: Targets the Liferay pod.
ports: Maps port 8080 to the container’s port 8080.
4.6 Deploy Liferay
Apply the Liferay manifests:
kubectl apply -f liferay-pv-pvc.yml
kubectl apply -f portalext-configmap.yml -n liferay
kubectl apply -f serverxml-configmap.yml -n liferay
kubectl apply -f setenv-configmap.yml -n liferay
kubectl apply -f liferay-secret.yml -n liferay
kubectl apply -f liferay-deployment.yml -n liferay
kubectl apply -f liferay-service-nodeport.yml -n liferay
Applies PVs, PVCs, ConfigMaps, Secret, Deployment, and Service to deploy Liferay in the liferay namespace.

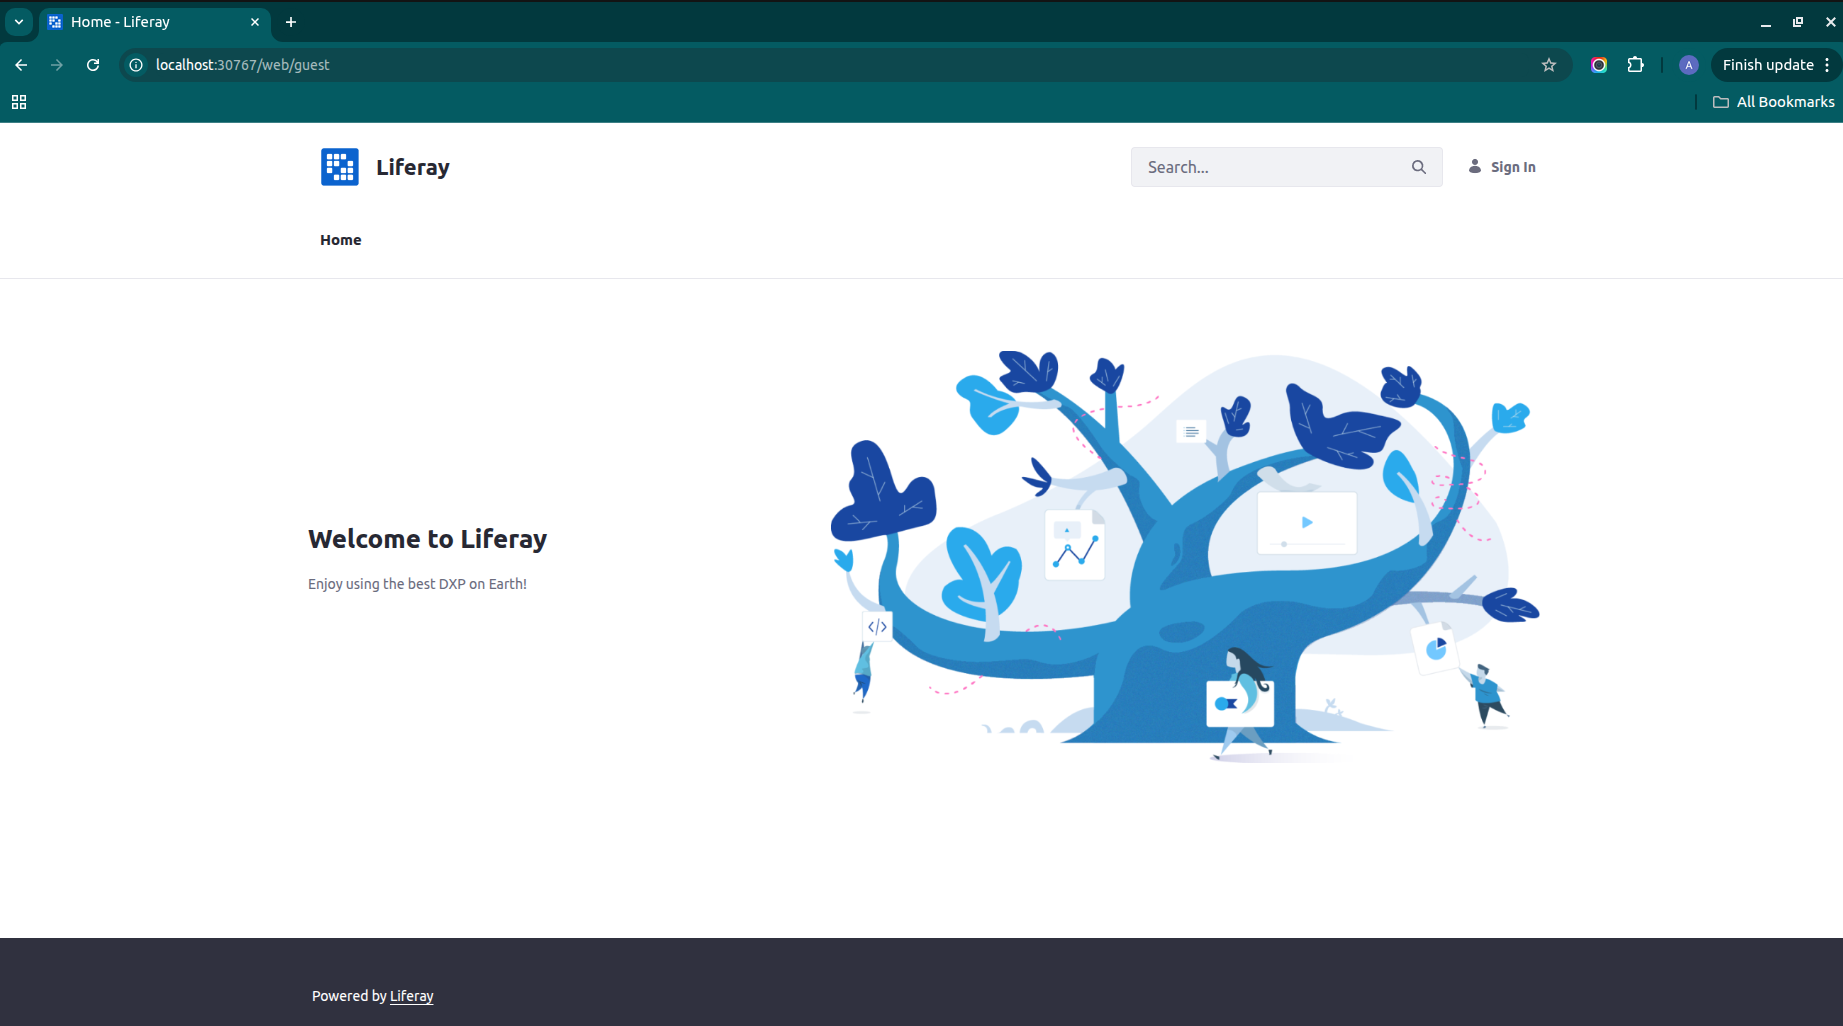
Step 5: Access Liferay
After deployment, access Liferay through the NodePort service:
Retrieve the node’s IP address:
 Open a browser and navigate to http://<node-ip>:30767.
Log in using the default Liferay admin credentials (e.g., [email protected] / test for Liferay 7.4, unless customized).
Step 6: Verify Deployment
Check the status of the pods and services:
kubectl get pods -n liferay
kubectl get services -n liferay
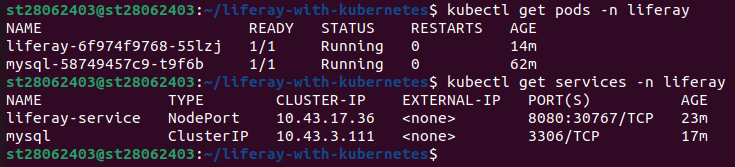 Ensure both the MySQL and Liferay pods are in the Running state.
Conclusion
This deployment provides a robust, self-hosted Liferay setup on Kubernetes (K8s) with persistent storage using local volumes. The detailed steps ensure reliable configuration of MySQL and Liferay, with separate storage for data, logs, deployment artifacts, and OSGi modules to support modularity and persistence. The inclusion of SSL certificates enhances security for HTTPS access. This setup is ideal for development or small-scale production but can be enhanced for enterprise use with managed storage, secure secrets management, and load balancing. Key considerations for production include updating default passwords, securing SSL certificates, and adjusting resource limits based on workload. This approach leverages Kubernetes’ strengths for scalability and resilience, making it a practical solution for hosting Liferay.
Notes
Node Name: Replace node_name in all manifests with your node’s hostname (use kubectl get nodes to find it).
Security: Update MYSQL_ROOT_PASSWORD and Liferay admin credentials in production. Use Kubernetes (K8s) Secrets for sensitive data.
SSL Certificates: The self-signed certificate is suitable for testing; use a trusted certificate authority for production.
Storage Sizes: Adjust storage sizes (e.g., 5Gi, 3Gi) based on workload requirements.
Production Enhancements: Use managed storage (e.g., NFS, cloud storage) or dynamic provisioning. Replace NodePort with a LoadBalancer or Ingress for external access.
Troubleshooting: If pods fail to start, check logs with kubectl logs <pod-name> -n liferay and verify directory permissions.
This setup has been tested to ensure a functional Liferay deployment, providing a solid foundation for building digital experiences on Kubernetes (K8s).