Getting Odoo up and running on your local machine doesn't have to be complicated. This guide will walk you through everything you need to know. We'll be installing Odoo (the popular open-source ERP and CRM platform) alongside PostgreSQL, all running on a local Kubernetes (K8s) cluster with persistent storage.
What makes this setup particularly useful is that we're configuring proper storage persistence for all the important bits, your Odoo data, application logs, any custom modules you develop, enterprise add-ons, and of course, the PostgreSQL database itself. This means your data sticks around even when containers restart, making it perfect whether you're developing, testing, or even running a smaller production environment.
If you want to take this setup further for your business, Odoo Consulting Services can help you optimize configurations, integrate custom modules, and ensure smooth scalability. With the right guidance, your Odoo environment can be tailored to fit your exact business needs.
Overview of Deploying Odoo on Kubernetes (K8s)
Odoo is essentially a complete business management platform, but like most enterprise applications, it relies heavily on a robust database to handle all your business data - that's where PostgreSQL comes in. While you could run Odoo in various ways, Kubernetes (K8s) gives you some real advantages: your setup becomes much more scalable, you get built-in fault tolerance, and managing everything becomes significantly easier once you get the hang of it.
We'll stick with local volumes for storage here. Why? Well, when you're running everything on your own hardware and want to avoid the nightmare of configuring network-attached storage or dealing with cloud providers, local volumes are your friend. They're straightforward to set up, won't strain your resources if you're on older hardware, and honestly - they just work. Your data stays put when containers restart, which is really all we need for this kind of setup.
Here's what we'll accomplish: we'll create a dedicated Kubernetes (K8s) namespace to keep everything organized, configure persistent storage so your data survives restarts, get both PostgreSQL and Odoo deployed and talking to each other, and finally expose Odoo through a NodePort service so you can actually access it from your web browser. I've tested these steps multiple times to make sure everything works reliably, so you should have a smooth installation experience.
Prerequisites
Your Kubernetes (K8s) Setup: Make sure you've got a working Kubernetes (K8s) cluster running. I usually recommend minikube if you're just testing things out or learning - it's super easy to set up on your laptop. But if this is going into production or you want something more robust, kubeadm is your best bet. Whatever you choose, just verify it's actually running before we continue.
Kubectl Tool: You'll need kubectl installed and talking to your cluster properly. Quick test - try running kubectl version in your terminal. If it spits back version info without complaining, you're all set.
Storage Handler: If you want Kubernetes (K8s) to automatically create storage volumes (which is pretty convenient), you'll need a local path provisioner running. Don't have one? No worries - we can create the volumes manually instead.
Admin Rights: You're going to need sudo or root access on your Kubernetes node since we'll be creating directories and setting up permissions.
Step 1: Directory Setup:
Persistent storage is required to preserve Odoo and PostgreSQL data in case of pod restarts. Here's the deal with containers - when they restart (and they will), everything inside gets wiped clean. That's why we need to set up persistent storage to keep our Odoo and PostgreSQL data safe.
What we're doing is creating specific folders on your Kubernetes server for all the important stuff - your Odoo application data, log files, any custom modules you've built, enterprise add-ons, and the PostgreSQL database files. Kubernetes (K8s) will then mount these folders as Persistent Volumes inside your containers, so your data survives restarts.
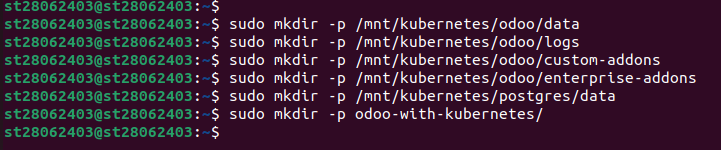
Let's create these directories now:
sudo mkdir -p /mnt/kubernetes/odoo/data
sudo mkdir -p /mnt/kubernetes/odoo/logs
sudo mkdir -p /mnt/kubernetes/odoo/custom-addons
sudo mkdir -p /mnt/kubernetes/odoo/enterprise-addons
sudo mkdir -p /mnt/kubernetes/postgres/data
sudo mkdir -p odoo-with-kubernetes/
/mnt/kubernetes/odoo/data: Stores Odoo's core data, such as configuration and session data.
/mnt/kubernetes/odoo/logs: Holds Odoo logs for monitoring and debugging.
/mnt/kubernetes/odoo/custom-addons: Stores custom Odoo modules or addons developed for particular business needs.
/mnt/kubernetes/odoo/enterprise-addons: Keeps enterprise addons for Odoo paid features (if any).
/mnt/kubernetes/postgres/data: Stores PostgreSQL database files to ensure data is maintained.
odoo-with-kubernetes/: Local working directory for maintaining Kubernetes (K8s) manifest files.
Step 2: Set Permissions
Proper permissions enable PostgreSQL and Odoo containers to access and write to the directories. This step assigns ownership to the current user and grants permissive permissions to the directory of logs, which Odoo requires for the sake of writing logs.
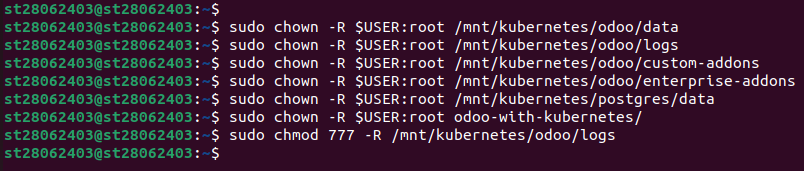
Execute the following commands:
sudo chown -R $USER:root /mnt/kubernetes/odoo/data
sudo chown -R $USER:root /mnt/kubernetes/odoo/logs
sudo chown -R $USER:root /mnt/kubernetes/odoo/custom-addons
sudo chown -R $USER:root /mnt/kubernetes/odoo/enterprise-addons
sudo chown -R $USER:root /mnt/kubernetes/postgres/data
sudo chown -R $USER:root odoo-with-kubernetes/
sudo chmod 777 -R /mnt/kubernetes/odoo/logs
chown -R $USER:root: Changes ownership to the current user and root group so the containers (which are run as particular users) can read the directories.
chmod -R 777 /mnt/kubernetes/odoo/logs: Grants read, write, and execute rights to all users on the logs directory because Odoo requires higher permissions for logging.
Step 3: PostgreSQL Deployment
PostgreSQL is the database backend used by Odoo to hold all the business information. It creates a Persistent Volume (PV) and Persistent Volume Claim (PVC) for storage, a Deployment to run the PostgreSQL container, and a Service to enable communication with Odoo.
Create PostgreSQL Persistent Volume and PVC
PV identifies the node's storage location, and the PVC requests storage for the PostgreSQL pod. Local storage implementation offers ease for self-hosted installations.
First, navigate to your project folder:
cd odoo-with-kubernetes/
Now we need to create a configuration file for PostgreSQL storage. Create a new file called postgres-pv-pvc.yml and add this content:
nano postgres-pv-pvc.yml
Add the following configuration:
apiVersion: v1

kind: PersistentVolume

metadata:

  name: postgres-pv

  labels:

    type: local

spec:

  capacity:

    storage: 3Gi

  accessModes:

    - ReadWriteOnce

  storageClassName: local-storage

  local:

    path: /mnt/kubernetes/postgres/data

  nodeAffinity:

    required:

      nodeSelectorTerms:

        - matchExpressions:

            - key: kubernetes.io/hostname

              operator: In

              values:

                - node_name #Replace with your node name

---

apiVersion: v1

kind: PersistentVolumeClaim

metadata:

  name: postgres-pvc

  namespace: odoo

spec:

  accessModes:

    - ReadWriteOnce

  resources:

    requests:

      storage: 3Gi

  storageClassName: local-storage
Here's what this file does: The PersistentVolume section tells Kubernetes about a 3GB storage space located at /mnt/kubernetes/postgres/data on your server. The nodeAffinity part makes sure this volume gets attached to a specific node - you'll need to replace node_name with your actual node's hostname (just run kubectl get nodes to find it).
The PersistentVolumeClaim is basically your app saying "hey, I need 3GB of storage from the odoo namespace." It matches up with the PersistentVolume we just defined since they both use the same storage class called local-storage.
Provision PostgreSQL Deployment
The Deployment creates the PostgreSQL container, both in terms of image, environment variables, and storage mounts.
Create a file called postgres-deployment.yml:
nano postgres-deployment.yml
Add the following configuration:
  apiVersion: apps/v1

kind: Deployment

metadata:

  name: postgres

spec:

  replicas: 1

  selector:

    matchLabels:

      app: postgres

  template:

    metadata:

      labels:

        app: postgres

    spec:

      nodeSelector:

        kubernetes.io/hostname: node_name #Replace with your node name

      containers:

      - name: postgres

        image: postgres:13

        ports:

          - containerPort: 5432

        env:

          - name: POSTGRES_DB

            value: "postgres"

          - name: POSTGRES_USER

            value: "odoo"

          - name: POSTGRES_PASSWORD

            value: "postgres"

        volumeMounts:

          - name: postgres-data

            mountPath: /var/lib/postgresql/data

      volumes:

        - name: postgres-data

          persistentVolumeClaim:

            claimName: postgres-pvc
replicas: 1: Scales up to one PostgreSQL pod for simplicity.
image: postgres:13: Utilizes PostgreSQL 13, the compatible one with Odoo 19.
env: Specifies the database name (postgres), user (odoo), and password (postgres). Change the password in production.
volumeMounts: Mounts the PVC at /var/lib/postgresql/data to persist database files.
Create PostgreSQL Service
The Service exposes PostgreSQL in the cluster for Odoo to use to connect to.
Create a file called postgres-service.yml:
apiVersion: v1

kind: Service

metadata:

  name: postgres

  namespace: odoo

spec:

  selector:

    app: postgres

  ports:

    - port: 5432

      targetPort: 5432
selector: app: postgres: Picks the PostgreSQL pod.
ports: Opens up the default port 5432 for PostgreSQL for communication within the cluster.
namespace: odoo: Places the service in the odoo namespace.
Create Odoo Namespace and Deploy PostgreSQL:
Setting Up Your Odoo Workspace and Getting PostgreSQL Running
kubectl create namespace odoo
kubectl apply -f postgres-pv-pvc.yml
kubectl apply -f postgres-deployment.yml -n odoo
kubectl apply -f postgres-service.yml
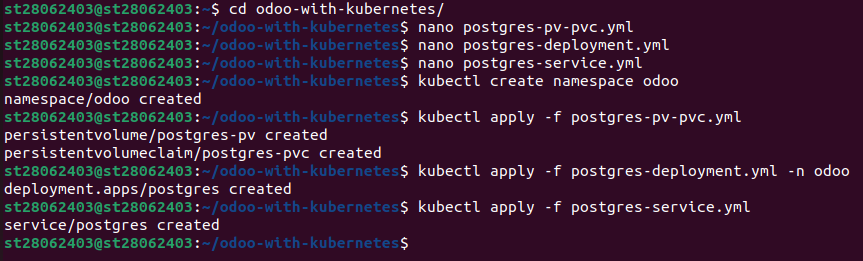
kubectl create namespace odoo: This keeps all our Odoo stuff organized and separate from other things running on your cluster.
kubectl apply: This command actually deploys PostgreSQL itself along with the service that lets other components talk to it.
Step 4: Odoo Deployment
Odoo Deployment requires persistent storage to store its data, logs, add-ons, and configuration files. This section builds PVs, PVCs, an Odoo configuration ConfigMap, an Odoo application Deployment, and an external access NodePort Service for Odoo.
Odoo Persistent Volumes and PVCs
Odoo uses four PVs and PVCs for data, logs, custom add-ons, and enterprise add-ons for persistence and modularity.
Create a file named odoo-pv-pvc.yml:
Set the following setting:
     #1. Odoo Data

apiVersion: v1

kind: PersistentVolume

metadata:

  name: odoo-data-pv

  labels:

    type: local

spec:

  capacity:

    storage: 3Gi

  accessModes:

    - ReadWriteOnce

  storageClassName: local-storage

  local:

    path: /mnt/kubernetes/odoo/data

  nodeAffinity:

    required:

      nodeSelectorTerms:

        - matchExpressions:

            - key: kubernetes.io/hostname

              operator: In

              values:

                - node_name #Replace with your node name

---

apiVersion: v1

kind: PersistentVolumeClaim

metadata:

  name: odoo-data-pvc

  namespace: odoo

spec:

  accessModes:

    - ReadWriteOnce

  resources:

    requests:

      storage: 3Gi

  storageClassName: local-storage


#2.Odoo Logs

---

apiVersion: v1

kind: PersistentVolume

metadata:

  name: odoo-logs-pv

  labels:

    type: local

spec:

  capacity:

    storage: 2Gi

  accessModes:

    - ReadWriteOnce

  storageClassName: local-storage

  local:

    path: /mnt/kubernetes/odoo/logs

  nodeAffinity:

    required:

      nodeSelectorTerms:

        - matchExpressions:

            - key: kubernetes.io/hostname

              operator: In

              values:

                - node_name #Replace with your node name

---

apiVersion: v1

kind: PersistentVolumeClaim

metadata:

  name: odoo-logs-pvc

  namespace: odoo

spec:

  accessModes:

    - ReadWriteOnce

  resources:

    requests:

      storage: 2Gi

  storageClassName: local-storage


#3.Odoo Custom Addons

---

apiVersion: v1

kind: PersistentVolume

metadata:

  name: odoo-customaddons-pv

  labels:

    type: local

spec:

  capacity:

    storage: 2Gi

  accessModes:

    - ReadWriteOnce

  storageClassName: local-storage

  local:

    path: /mnt/kubernetes/odoo/custom-addons

  nodeAffinity:

    required:

      nodeSelectorTerms:

        - matchExpressions:

            - key: kubernetes.io/hostname

              operator: In

              values:

                - node_name #Replace with your node name

---

apiVersion: v1

kind: PersistentVolumeClaim

metadata:

  name: odoo-customaddons-pvc

  namespace: odoo

spec:

  accessModes:

    - ReadWriteOnce

  resources:

    requests:

      storage: 2Gi

  storageClassName: local-storage


#4.Odoo Enterprise Addons

---

apiVersion: v1

kind: PersistentVolume

metadata:

  name: odoo-enterpriseaddons-pv

  labels:

    type: local

spec:

  capacity:

    storage: 3Gi

  accessModes:

    - ReadWriteOnce

  storageClassName: local-storage

  local:

    path: /mnt/kubernetes/odoo/enterprise-addons

  nodeAffinity:

    required:

      nodeSelectorTerms:

        - matchExpressions:

            - key: kubernetes.io/hostname

              operator: In

              values:

                - node_name #Replace with your node name

---

apiVersion: v1

kind: PersistentVolumeClaim

metadata:

  name: odoo-enterpriseaddons-pvc

  namespace: odoo

spec:

  accessModes:

    - ReadWriteOnce

  resources:

    requests:

      storage: 3Gi

  storageClassName: local-storage
Every PV/PVC is linked with a specific directory (data, logs, custom-addons, enterprise-addons).
storage: 3Gi or 2Gi: Specifies storage sizes (variable based on requirement).
nodeAffinity: Binds each PersistentVolume (PV) to the specified node (use node_name).
namespace: odoo: Put PVCs in the odoo namespace.
Create an Odoo ConfigMap manifest file.
This ConfigMap holds the odoo.conf file, which is basically Odoo's instruction manual for things like connecting to PostgreSQL and locating your installed modules.
Create a file named configmap-odoo.yml:
Include the following context:
apiVersion: v1

kind: ConfigMap

metadata:

     name: odoo-config

     namespace: odoo

data:

    odoo.conf: |

         [options]

         addons_path = /mnt/extra-addons/enterprise-addons,/mnt/extra-addons/custom-addons,/usr/lib/python3/dist-packages/

         data_dir = /var/lib/odoo

         admin_passwd = admin_password

         csv_internal_sep = ,

         db_maxconn = 64

         db_host = postgres.odoo.svc.cluster.local

         db_name =

         db_port = 5432

         db_template = template1

         dbfilter = .*

         debug_mode = False

         email_from = False

         limit_memory_hard = 1677721600

         limit_memory_soft = 6291456000

         limit_request = 8192

         limit_time_cpu = 600

         limit_time_real = 1200

         list_db = True

         log_db = False

         log_handler = [':INFO']

         log_level = info

         logfile = /var/log/odoo/odoo.log

         longpolling_port = 8072

         max_cron_threads = 2

         smtp_password = False

         smtp_port = 25

         smtp_server = localhost

         smtp_ssl = False

         smtp_user = False

         workers = 0

         xmlrpc = True

         xmlrpc_interface =

         xmlrpc_port = 8069

         ;xmlrpcs = True

         ;xmlrpcs_interface =

         ;xmlrpcs_port = 8071
Create an Odoo Deployment manifest file.
Alright, create the deployment file for Odoo itself. This is basically the blueprint that tells Kubernetes (K8s), "Here's how I want my Odoo container to run" - covering everything from the Docker image we're using to the ports we need open, plus all the environment variables and storage connections.
Go ahead and create the deployment file:
Place the following settings:
 apiVersion: apps/v1

kind: Deployment

metadata:

  name: odoo

spec:

  replicas: 1

  selector:

    matchLabels:

      app: odoo

  template:

    metadata:

      labels:

        app: odoo

    spec:

      nodeSelector:

        kubernetes.io/hostname: node_name #Replace with your node name

      securityContext:

        runAsUser: 0

        runAsGroup: 0

        fsGroup: 0

      containers:

        - name: odoo

          image: odoo:17

          ports:

            - containerPort: 8069

            - containerPort: 8072

          env:

            - name: HOST

              value: "postgres.odoo.svc.cluster.local"

            - name: USER

              value: "odoo"

            - name: PASSWORD

              value: "postgres"

          volumeMounts:

            - name: odoo-data

              mountPath: /var/lib/odoo

            - name: odoo-config

              mountPath: /etc/odoo/odoo.conf

              subPath: odoo.conf

            - name: odoo-logs

              mountPath: /var/log/odoo

            - name: enterprise-addons

              mountPath: /mnt/extra-addons/enterprise-addons

            - name: custom-addons

              mountPath: /mnt/extra-addons/custom-addons

      volumes:

        - name: odoo-config

          configMap:

            name: odoo-config

        - name: odoo-data

          persistentVolumeClaim:

            claimName: odoo-data-pvc

        - name: odoo-logs

          persistentVolumeClaim:

            claimName: odoo-logs-pvc

        - name: custom-addons

          persistentVolumeClaim:

            claimName: odoo-customaddons-pvc

        - name: enterprise-addons

          persistentVolumeClaim:

            claimName: odoo-enterpriseaddons-pvc
image: odoo:17: Uses Odoo version 17.
- ports: Listens on 8069 (primary HTTP port) and 8072
- env: Specifies database connection parameters (host, user, password).
- securityContext: Runs the container as root (user/group 0) to match directory permissions.
- volumeMounts: Mounts the data, logs, addons, and the ConfigMap for the config file.
Create a Service manifest file for Odoo.
The Service exposes Odoo externally via a NodePort, allowing browser access.
Create a file called odoo-service-nodeport.yml:
Add the following configuration:
 apiVersion: v1

kind: Service

metadata:

  name: odoo-service

spec:

  selector:

    app: odoo

  type: NodePort

  ports:

    - protocol: TCP

      port: 8069

      targetPort: 8069

      nodePort: 30069
- type: NodePort: Exposes Odoo on node IP port 30069.
- selector: app: odoo: Chooses the Odoo pod.
- ports: Maps port 8069 to container port 8069.

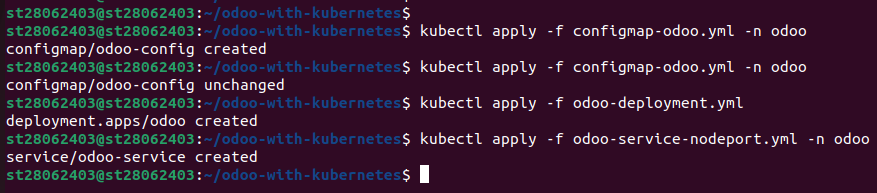
Install the entire set of Odoo manifest files.
Install the Odoo manifests:
- kubectl apply -f odoo-pv-pvc.yml
- kubectl get pv

- kubectl apply -f configmap-odoo.yml -n odoo
- kubectl apply -f configmap-odoo.yml -n odoo
- kubectl apply -f odoo-deployment.yml
- kubectl apply -f odoo-service-nodeport.yml -n odoo
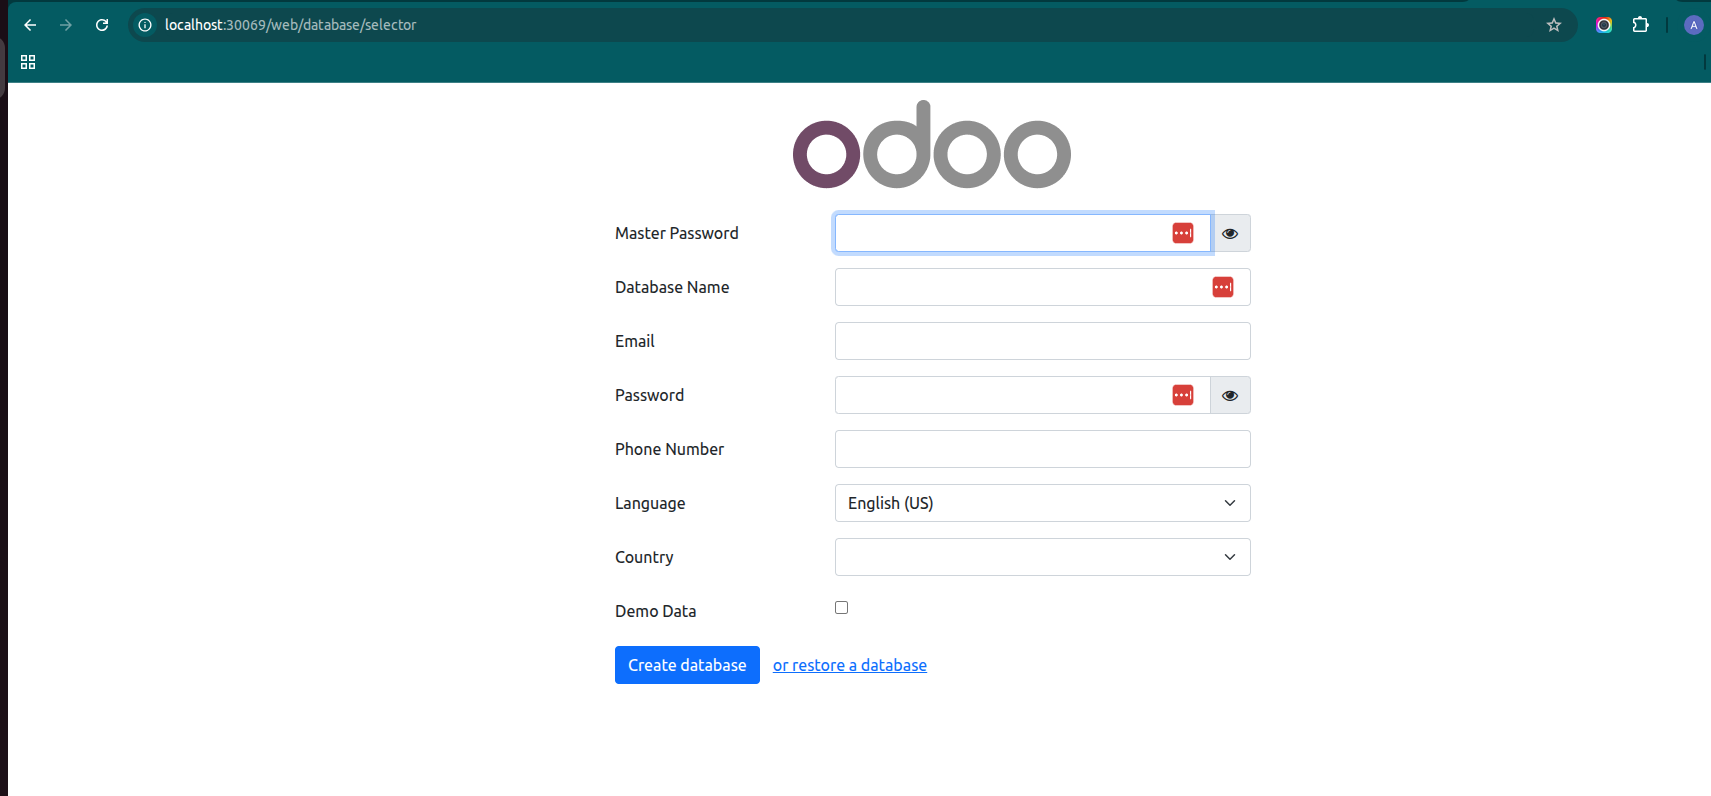
Step 5: Access Odoo
After deployment, access Odoo through the NodePort service:
Find the node IP address:
- kubectl get nodes -o wide

- Open Odoo at http://<internal-node-ip>:30069.
- Log in as the admin with the default password set as admin_password (defined in the ConfigMap).
Step 6: Verify Deployment
Ensure everything is working well:
kubectl get pods -n odoo
kubectl get services -n odoo
kubectl get pods: Verifies running PostgreSQL and Odoo pods
kubectl get services: Verifies that postgres and odoo-service services are active.
Ensure that both the PostgreSQL and Odoo pods are in the Running state.
Final Thoughts on Deploying Odoo 19 on Kubernetes (K8s)
What we've built here gives you a solid starting point for running Odoo on Kubernetes (K8s) without breaking the bank. The local storage approach keeps things simple and cheap, while still giving you all the benefits of containerized deployment.
Following this guide, you end up with a complete Odoo system that keeps your data safe and has PostgreSQL handling the heavy lifting on the database side. It's perfect for dev work, testing out new configurations, or even running a smaller business – anywhere you don't need enterprise-level redundancy.
When you're ready to scale this up for serious production use, there are plenty of ways to expand it. You could move to managed storage solutions for better performance, lock down security with proper secrets management and stronger authentication, or add multiple Odoo instances behind a load balancer for high availability.
The whole setup follows Kubernetes conventions pretty well, so it's maintainable and won't paint you into a corner later. If you're looking to host your own ERP system without vendor lock-in or monthly subscription fees, this approach gives you a lot of flexibility to grow as your needs change. And if you want expert help in setting up, customizing, or scaling further, you can always hire Odoo developer to make the process smoother and more efficient.
Notes:
- Don't forget to swap out node_name in your manifest files with your actual node's hostname - just run kubectl get nodes to see what it's called.
- Second, make sure you update that admin password in the ConfigMap - the default one is fine for testing
- Storage sizes (e.g., 3Gi, 2Gi) can be resized to whatever you need.
- For production, employ a managed storage system or dynamic provisioning instead of local volumes.
- Ensure the local path provisioner is set if dynamic storage provisioning is enabled.
FAQ on Deploying Odoo 19 on Kubernetes (K8s)
1. Do I need separate containers for Odoo and PostgreSQL?
Yes. Odoo and PostgreSQL should run in separate containers. It makes scaling, updates, and maintenance much easier.
2. Can I run multiple Odoo instances on the same cluster?
Yes. You can deploy multiple Odoo pods as long as each one points to its own database or schema. Use separate PVCs and config maps for clean isolation.
3. What’s the best way to manage Odoo configuration in Kubernetes (K8s)?
Use ConfigMaps for general settings and Secrets for sensitive values like database passwords. Mount them as environment variables or files depending on preference.
4. How do I handle file storage for Odoo on Kubernetes (K8s)?
Odoo stores attachments on disk. Use a PersistentVolume and mount it into the Odoo container. For distributed setups, use shared storage like NFS, Ceph or an equivalent cloud option.
5. How do I scale Odoo on K8s?
You can add more replicas of the Odoo web workers. The Odoo longpolling service should run separately. Database scaling will depend on your PostgreSQL setup.