What is Liferay?
Liferay is an open-source portal framework that allows organizations to create websites, intranets, and other digital experiences. It provides features like content management, user management, and workflow integration. Liferay is highly customizable and supports the development of applications using Java, making it a popular choice for building enterprise-level solutions.
What is Elasticsearch?
Elasticsearch is a distributed search and analytics engine built on Apache Lucene. It enables fast full-text search, data exploration, and real-time analytics across large datasets. It is commonly used for log and event data analysis, making it easier to find and visualize information.
What is Kibana?
Kibana is a data visualization and exploration tool for Elasticsearch. It provides an intuitive interface to create visualizations, dashboards, and reports based on data stored in Elasticsearch. Users can interact with data through charts, graphs, and maps, making it easier to analyze trends and patterns.
What is Docker?
Docker is a platform that allows developers to automate the deployment of applications inside lightweight, portable containers. Containers package an application and its dependencies, ensuring consistent performance across different environments. Docker simplifies the development workflow, enhances scalability, and improves resource utilization.
What is docker-compose.yml ?
This Docker Compose file sets up a group of services: Kibana, Elasticsearch, MySQL, and Liferay. It uses a network called webnet to allow these services to communicate with each other. Kibana is used for visualizing data stored in Elasticsearch, which is set to run in a simple, single-node mode without security. MySQL serves as the database, with a specified root password and a database created at startup, storing its data in a mounted folder. Liferay is a web application that relies on MySQL and opens multiple ports for access. There’s also a section for an optional PostgreSQL database that is currently commented out. Overall, this setup creates a working environment for data handling and application use.
In this blog, we will show you how to set up Liferay, Elasticsearch, and Kibana using Docker. This combination can improve your application's search features and help you create useful data visualizations.
Prerequisites:
- Docker and Docker Compose installed on your machine.
- Basic knowledge of Docker commands.
Step 1: Create Folder Structure
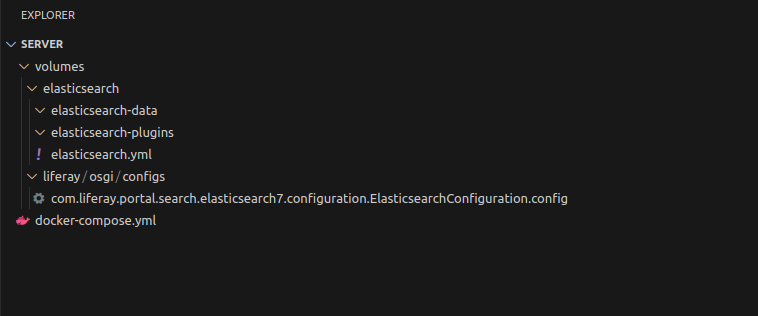
elasticsearch-data: This folder will store data generated by Elasticsearch.
elasticsearch-plugins: This folder is for any plugins you may want to install.
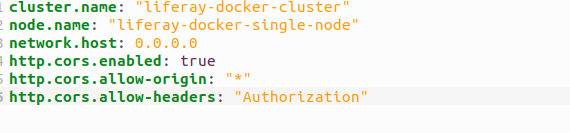
Insert below data in elasticsearch.yml file
Step 2: Setting Up Folder and file structure for Liferay
- Navigate to the Volumes Folder: This folder will store data generated by Elasticsearch.
- Create Configuration Directory: Inside the osgi folder, create a new directory named configs.
- Create Configuration File: Within the configs directory, create a file named com.liferay.portal.search.elasticsearch7.configuration.ElasticsearchConfiguration.config. Ensure the filename matches exactly.
- Initialize Configuration Settings: Begin by opening the newly created file and fill in the following configuration parameters:

OperationMode: This configuration option instructs Liferay to connect to an external Elasticsearch server.
ProductionModeEnabled: Set to true to enable production mode
NetworkHostAddresses: Specifies the address where Elasticsearch is running. Ensure the URL points to your Elasticsearch container.
Step 3: Setting Up Docker Compose file.
In the Docker Compose file, you can specify the versions of Elasticsearch and Kibana you wish to use. Make sure both services have the same version. For this setup, we’ll use version 7.17.1.
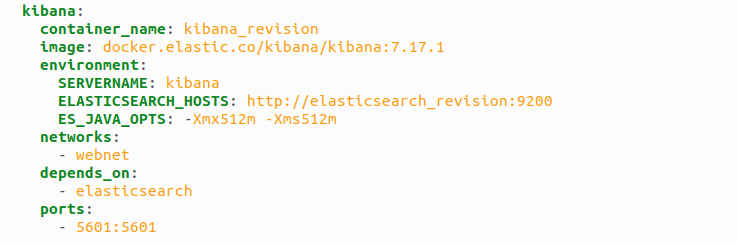
- Setting Up Docker Compose for Kibana: The docker-compose file sets up a Kibana service called kibana_revision using version 7.17.1 of the Kibana Docker image. It includes environment variables to configure the server's name and connect to an Elasticsearch instance at http://elasticsearch_revision:9200. The configuration also allocates 512 MB of memory for Kibana. It connects to a network named webnet to communicate with other services and ensures that Elasticsearch starts before Kibana does. Finally, it maps port 5601 from the container to port 5601 on the host machine, allowing users to access Kibana in a web browser at http://localhost:5601.
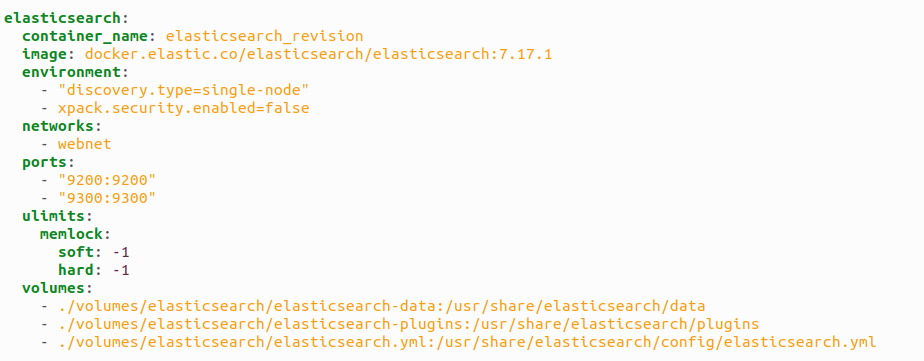
- Setting Up Docker Compose for Elasticsearch: The docker-compose file sets up an Elasticsearch service called elasticsearch_revision using version 7.17.1 of the Elasticsearch Docker image. It runs in single-node mode and has security features turned off. The service connects to a network called webnet and maps ports 9200 and 9300 so you can access Elasticsearch from your host machine. It also allows Elasticsearch to use as much memory as needed. Additionally, it links local folders for data, plugins, and configuration, ensuring that data is saved even if the container stops.
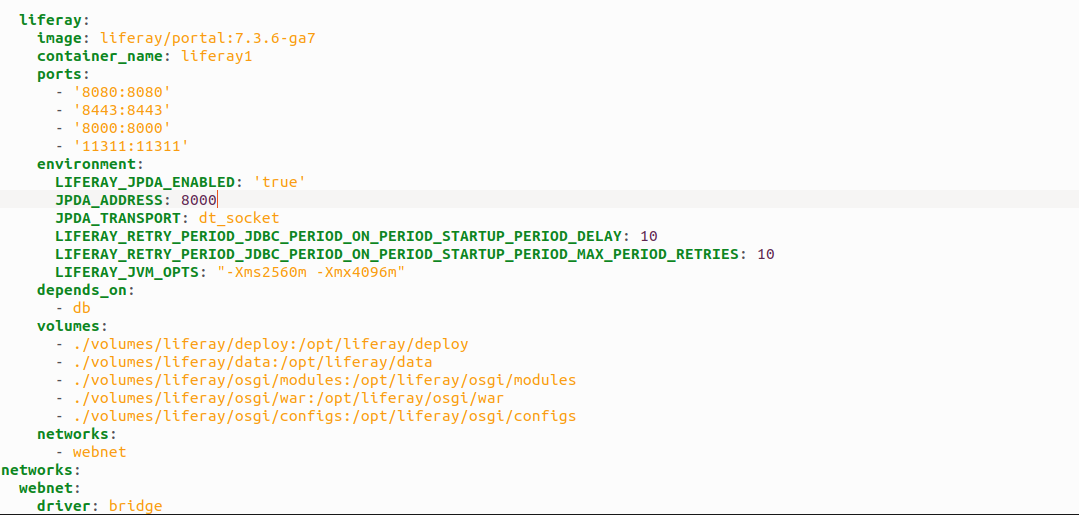
- Setting Up Docker Compose for Liferay: The docker-compose file sets up a Liferay service called liferay1 using version 7.3.6-ga7 of the Liferay image. It opens several ports (8080, 8443, 8000, and 11311) so you can access the Liferay portal and other features. The configuration includes settings for debugging and memory usage, allowing the program to use between 2560 MB and 4096 MB of memory. This service relies on a database named db. It also connects local folders for settings, data storage, and deployments to keep everything organized and saved. Finally, the Liferay service is part of a network called webnet for easy communication with other services.
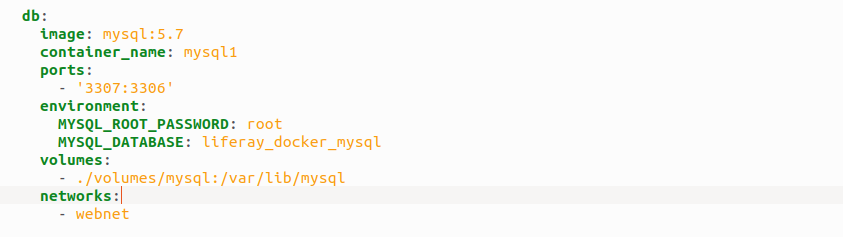
- Setting Up Docker Compose for MySQL: Below is a set up MySQL database using Docker. It creates a container named mysql1 running MySQL version 5.7. The database can be accessed on port 3307 on your computer, while it runs on the default port 3306 inside the container. The root password is set to "root," and a database called liferay_docker_mysql is created automatically. Data is stored in a folder on your computer (. /volumes/mysql) so it won't be lost when the container is stopped. The database is also connected to a network called webnet for communication with other services.
Step 4: Run Docker Compose
Open your terminal and change the directory to the folder containing your volumes. Then, run the command:
"sudo docker-compose up"
This command will initiate the Elasticsearch and Kibana services as specified in your Docker Compose configuration. Monitor the terminal output for any logs to confirm that both services start successfully without any issues.
Note: If you encounter any permission errors, run the following command in your root folder:
"sudo chmod -R 777 /volumes/".
Step 5: Install Elasticsearch Plugins
Once Elasticsearch and Kibana are running, open a new terminal window and execute the following commands to install necessary analysis plugins. These plugins enhance the text analysis capabilities of Elasticsearch:
- sudo docker exec -it {elasticsearch-container-name} bash
Here my container name is “elasticsearch_revision”, you must replace it with your container name.
- sudo docker exec -it elasticsearch_revision bash
- ./bin/elasticsearch-plugin install analysis-icu
- ./bin/elasticsearch-plugin install analysis-kuromoji
- ./bin/elasticsearch-plugin install analysis-smartcn
- ./bin/elasticsearch-plugin install analysis-stempel
- Exit
Step 6: Copy Plugins to Data Directory
After installing the plugins, copy them to your local machine using:
Go to the ./server directory that you created in the first step.
sudo docker cp elasticsearch_revision:/usr/share/elasticsearch/plugins/ ./volumes/elasticsearch/elasticsearch-data/plugins/
Step 7: Set Permissions
To ensure that Elasticsearch can read and write to the data directories, set the appropriate permissions:
"sudo chmod -R 777 . /volumes/"
Step 8: Restart Docker
- sudo docker compose down
- sudo docker compose up
Step 9: Check if Elasticsearch and Kibana are running using the following URL.
- Elastic Search: http://localhost:9200/
- Kibana: http://localhost:5601/
- Liferay: http://localhost:8080/
Note: If you are getting any permission-related errors, adjust the permissions on the volume folder using:
"sudo chmod -R 777 . /volumes/"
Conclusion:
You've successfully set up Liferay with Elasticsearch and Kibana using Docker. This configuration enhances your Liferay platform by integrating powerful search functionalities through Elasticsearch, while Kibana enables insightful data visualizations. Leveraging Liferay Integration Services further extends these capabilities, ensuring smooth data flow between Liferay and Elasticsearch and ultimately optimizing your portal’s search experience and analytics.