What is workflow?
Workflow is a sequence of small tasks. Each task will be processed by different people. In the end, all tasks join together and will complete the big task.
Introduction of workflow in Liferay.
Liferay DXP provides the workflow engine called Kaleo. Kaleo workflow allows a user to define simple to complex business processes/workflows. In Liferay CE, workflow is written in an XML document and if you are Liferay EE customer then they provide a graphical view to create a workflow.
This blog covers the following points
- Enabling Workflow
- Creating/Designing Workflow Definitions
- Configure assets with workflow
- Using workflow with other applications
Enabling Workflow
Workflow can be enabled in two ways:
- First from Liferay Portal level
Control Panel > Configuration > Workflow Configuration
2. And second from site level
Site > Configuration > Workflow Configuration
Liferay provides the pre-installed workflow definition called the Single Approver Workflow . In this workflow, only one approval required before an asset get published.
Creating/Designing Workflow Definitions
You can create or design workflow using Kaleo Designer or you can write XML.
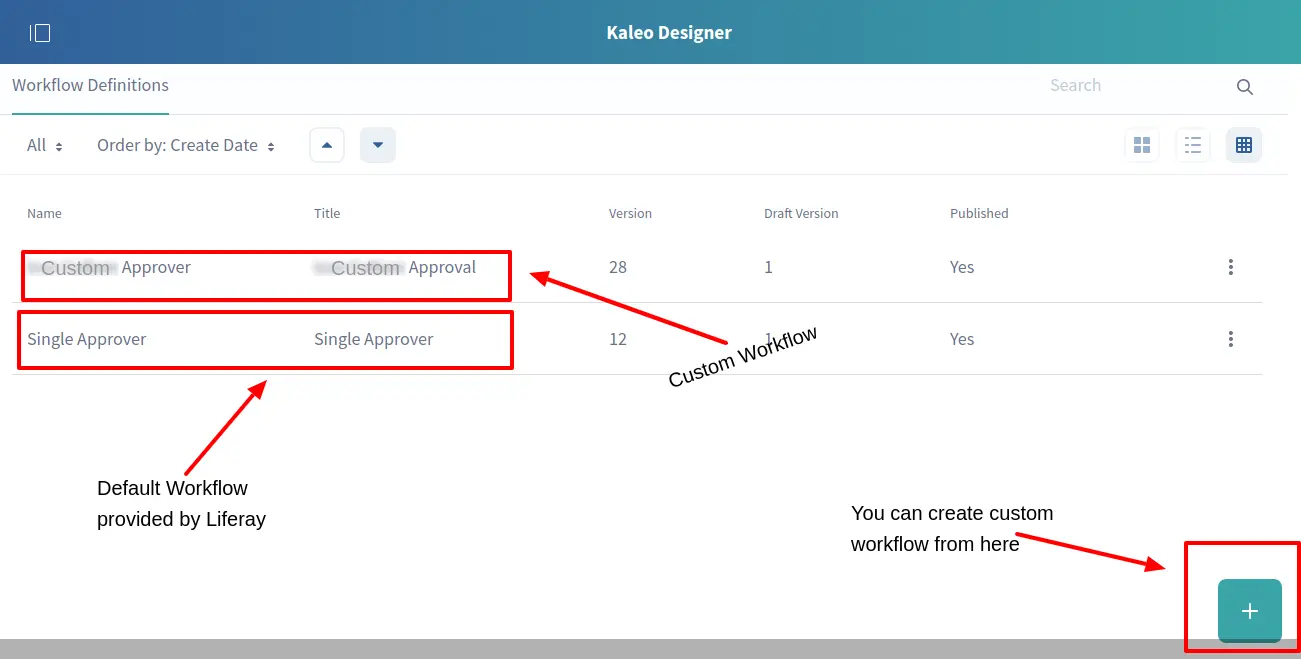
Control Panel > Configuration > Kaleo Designer
After opening Kaleo Designer, you can see default workflow on the right side and if you want to add new workflow definition then click on “+” and design the custom workflow as per your requirements.
Enabled workflows asset action depends on the workflow definition. Workflow is a combination of tasks, condition, state, and transition. The transition is used to move from one node to another node.
Given the below picture shows the type of nodes and transition which are used to create workflow definition.
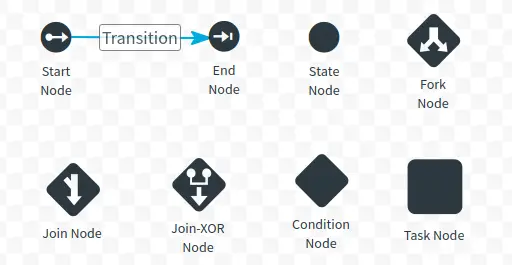
There are different type of properties used in nodes and transition. I will give you a brief introduction of each property.
Nodes:
General properties:
- Action: This property will execute the action. In Action property, we can write the Groovy script for actions which we wants to perform for state or task. There are two type of execution. “On Entry” and “On Exit”. We can add Priority as well but it is optional.
- Notification: This property generates the notification. For notification, Template and Template Language elements are available. In Template, we write the notification message. Freemarker, Text, and Velocity template languages are available. Notification Type gives the options to notify a user in different ways. Here notification types are Email, Instant Messenger, Private Message, and User Notification.
- Description: Description is a type of note, which is to describe the state.
- Name: Name of the node.
- Type: Type of the node.
Task Node properties:
- Timers: Basic idea of timer property is to give specific time after the actions are being triggered. Here we provide the duration in number or fractional. Once you set the duration then you need to pick the action - either a Notification or a Reassignment.
- Assignments: Task is linked with the different assignments. Like Asset Creator, Resource Actions, Roles, Roles Type, Scripted Assignment, and User.
Note: In action property one more execution type is added “On Assignment” for Task node.
Condition Node properties:
- Script: Edit a script for your condition node. Clicking on Edit Script brings up the script editor for the Script Language you specified.
Transition:
- Name: Name of transition.
- Default: Value of transition. Default value is false.
START CREATING A WORKFLOW DEFINITION
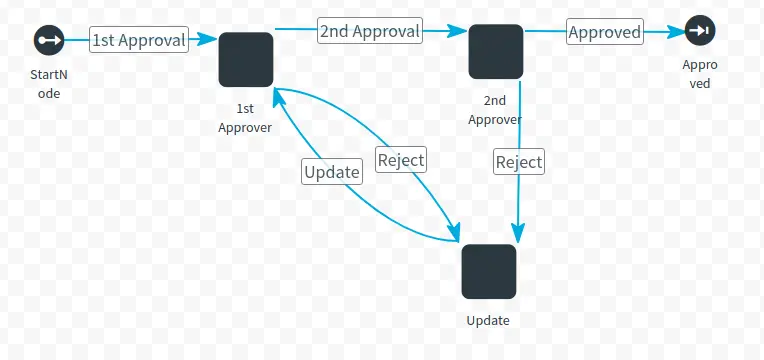
Below is a diagram of a Multiple Approval workflow definition. It has two states and three task node.
Configure assets with workflow
After creating workflow definition, you can set it to the specific asset.
Go to Site > Configuration > Workflow Configuration to enable the workflow.
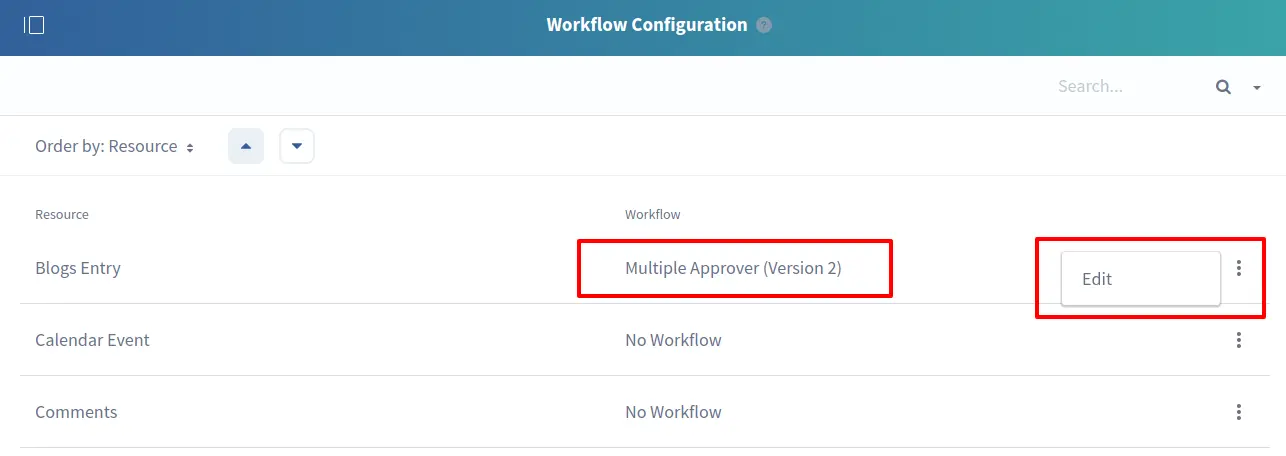
Click on ellipsis then click on Edit and select the created workflow from the workflow dropdown. Now create a new blog and publish it. This blog will goes under the workflow process. Once the workflow process is completed the blog will be published.
Using workflow with other applications
In the above example, You have learnt to set up workflow in Blogs Entry asset. You can set the workflow for all other assets similarly, a process remains the same. But for the following assets workflow can be configured within their respective portlets. Documents and Media and Dynamic Data Lists are more configuration specific.
For Example, to set workflow for Documents and Media
Go to Site > Content > Documents and Media
Now you need to add folder with any name in documents and media then click on folder Edit. You can see the “ Document Type Restrictions and Workflow ” panel, in this panel by default option “ Use Document Type Restrictions and Workflow of the Parent Folder (Home) ” is selected. Checked the “ Default Workflow for This Folder (My Documents) ” radio button to enable workflow and select the workflow from the drop-down.

Happy Designing!
