Integrating external systems with Liferay can be challenging, especially when it comes to securing communication, managing access, and ensuring scalability. Configuring Service Access Policies (SAPs) and setting up secure authentication mechanisms like OAuth2 are essential for developers to secure remote services in Liferay.
In this blog, we'll explore how to secure Liferay's remote services using OAuth2 and SAPs, providing a strong framework for safeguarding sensitive data and ensuring controlled access to resources.
Understanding Remote Services in Liferay
Liferay DXP provides powerful web services that enable external systems to interact with portal functionality. These services can be accessed via JSON protocols at http://localhost:8080/api/jsonws/. Both Liferay portlet and non-Java clients can access and use these web services.
Using Service Builder, developers can easily generate remote services for custom entities by setting the remote-service attribute to true in the service.xml file. This generates all required classes, interfaces, and JSON web service files. The business logic needs to be implemented in the *ServiceImpl class.
Securing Remote Services:
To ensure secure communication, Liferay supports:
Authentication: OAuth2 uses tokens for secure identity verification, replacing traditional passwords.
Authorization: OAuth2 controls access with defined scopes, ensuring clients only perform permitted actions.
Method-Level Security: Service Access Policies (SAPs) require explicit whitelisting of remote methods.
Best Practices
These measures create a secure and scalable environment for integrating external systems with Liferay.
- Use OAuth2 for secure authentication and authorization.
- Configure SAPs to whitelist only necessary methods.
- Regularly audit logs for unauthorized access attempts.
Understanding the Use Case for Liferay Remote Services
Liferay's remote services are crucial in scenarios where external systems or applications need to interact with the portal, such as:
Decoupled Architecture: Remote services allow different applications to communicate with Liferay without being tightly coupled, supporting separation of frontend and backend.
Cross-Server Communication: In environments with load balancing or microservices, remote services enable seamless interaction between different servers. For instance, UI nodes on one server can call the processing node of another server.
Custom Integration: External tools or third-party applications, such as CRM or ERP systems, can integrate with Liferay seamlessly by invoking its remote services.
Direct service calls within the same server environment can create tight coupling, making it harder to scale and maintain. Remote services, on the other hand, offer a decoupled and scalable approach for managing interactions across servers and external systems.
Prerequisites
To follow this guide, ensure you have:
- Liferay DXP 7.4 or above.
- A Liferay instance with the necessary services deployed.
- Basic knowledge of Java and JSON.
- Brief overview of Service Access Policy (SAP) in Liferay.
Creating and Securing Remote Services
Create Remote Service in Liferay
A remote service in Liferay is a service that is exposed for external access via JSONWS. Follow these steps to create one:
Step 1: Define the Service
Use the Liferay Service Builder to define the service in the service.xml file.
<service-builder dependency-injector="ds" package-path="com.stpl.lr.book">
    <namespace>BOOK</namespace>
    <entity local-service="true" name="Book" remote-service="true" uuid="true">
        <column name="bookId" primary="true" type="long" />
        <column name="bookName" type="String" />
    </entity>
</service-builder>
Step 2: Build the Service
Run the Service Builder tool to generate the necessary classes:
Step 3: Implement Business Logic
Implement the business logic in the generated service class (e.g., BookServiceImpl). For example, add methods such as createBook or getBooks, and then build the service:
public Book createBook(String title) {
    long bookId = counterLocalService.increment(Book.class.getName());
    Book book = bookPersistence.create(bookId);
    book.setBookName(title);
    bookPersistence.update(book);
    return book;
}

public Book getBookById(long bookId) throws NoSuchBookException {
    return bookPersistence.findByPrimaryKey(bookId);
}
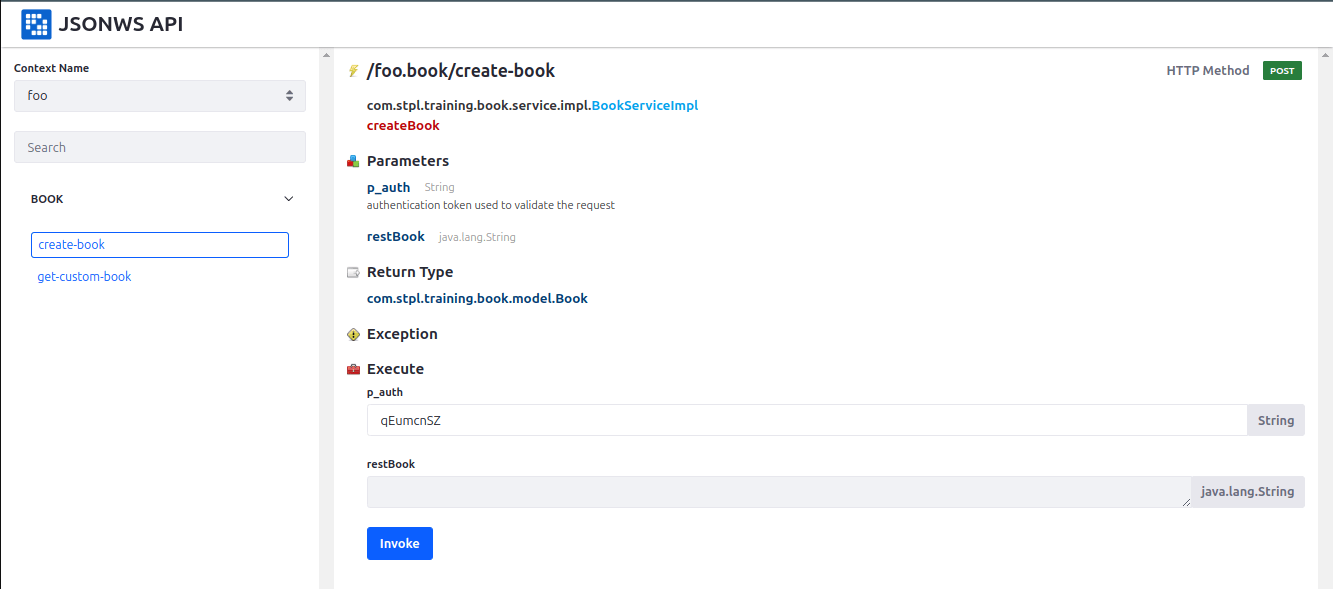
Step 4: Deploy the Service
Deploy your module to make the service available. Once deployed, you can access it via JSONWS (e.g., http://localhost:8080/api/jsonws). Select Service Namespace in Context Name.
Securing Remote Services with Service Access Policies (SAP)
To prevent unauthorized access, Liferay uses Service Access Policies (SAPs) to define which remote services can be accessed.
Steps to Create an SAP:
- Navigate to Control Panel > Security > Service Access Policy.
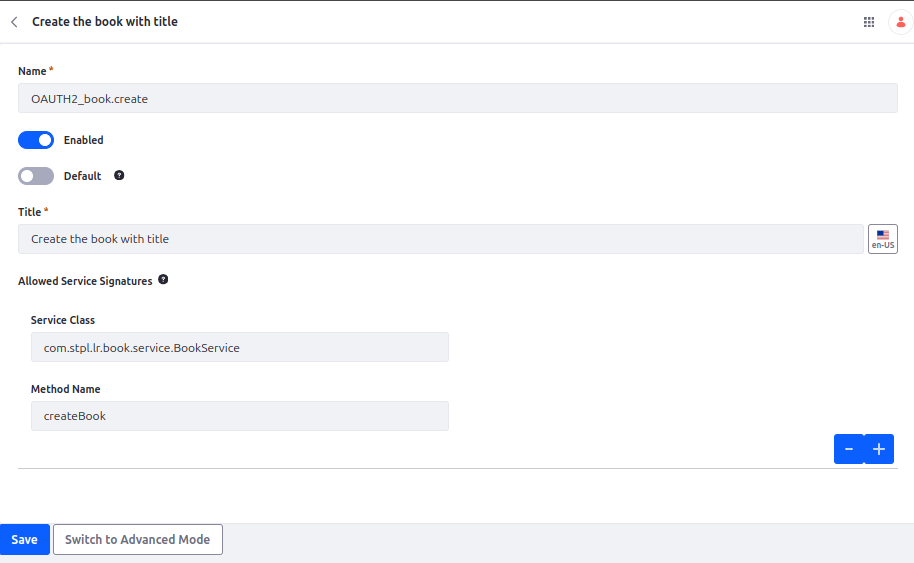
- Click Add and fill in the details for the first SAP:
- Name: OAUTH2_book.create
- Enable your policy.
- Disable the Default Option: Uncheck the default option (If selected, the service policy will be applied to all incoming requests, including unauthorized requests).
- Title: Provide the localized title to the policy.
- Define Allowed Service Signatures:
- Example: com.stpl.training.book.service.BookService#createBook
- Save the policy.
- Repeat the process to create the second SAP:
- Name: OAUTH2_book.getById
- Enable your policy.
- Disable the Default Option.
- Title: Provide the localized title to the policy.
- Define Allowed Service Signatures:
- Example: com.stpl.training.book.service.BookService#getBookById
- Save the policy.
Securing APIs with OAuth2
Using OAuth2, you can ensure secure access to remote services by tying access tokens to specific scopes. To set up OAuth2 for a remote service, the first step is to create a Service Access Policy to register the remote service, as explained in the previous step.
Steps to Configure OAuth2:
Step 1: Create OAuth2 in Liferay
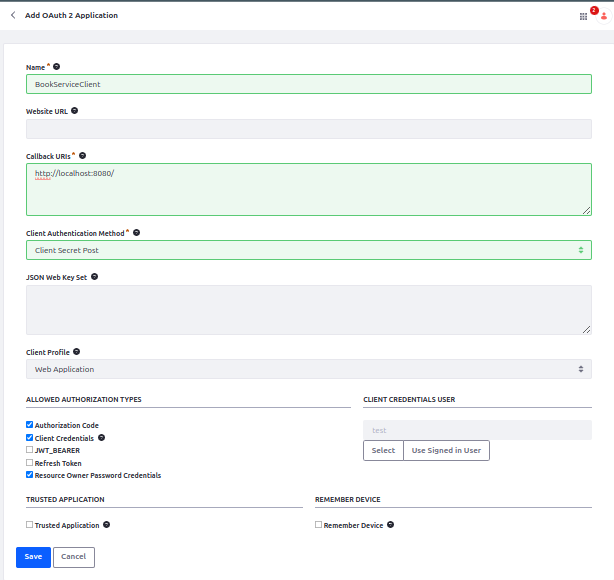
Navigate to Control Panel > Security > OAuth2 Administration. Click Add and fill in the details:
- Name : BookServiceClient
- Callback URIs: Specify where to redirect the user after the authorization.
- Client Profile: Select Client Credentials.
Save the application to generate the Client ID and Client Secret.
Step 2: Add OAuth2 Scopes
Assign only the OAUTH2_book.create SAP to the application under the Scopes section :
- Scope: Portal Services ➡ Select Policy: OAUTH2_book.create
- The getBookById SAP is not selected.
Save the changes.

Invoking the Remote Service
Securely invoking remote services is essential for efficient integration with Liferay's APIs. The process involves two key steps:
Step 1: Obtain an OAuth2 Access Token
The client application requests a token using its Client ID and Secret Key. Once authenticated, the server returns the access token.
Step 2: Call the Remote Service Endpoint
With the access token, the client application can send API requests to interact with Liferay's remote services, such as the createBook method.
The diagram below shows the flow of these interactions, from requesting an access token to receiving an authorized API response:
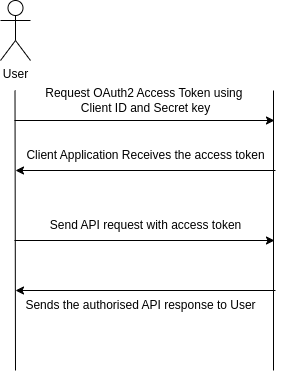
In this example, only the createBook method is accessible because it is included in the OAuth2 application's scope through the Service Access Policy (SAP). Other methods, like getBookById, are not accessible because they are not part of the selected scopes in the OAuth2 application.
Conclusion
By following these steps, you can securely interact with Liferay's remote services. Remote services play a crucial role in development, especially when integrating Liferay DXP with third-party systems, enabling cross-server communication, or supporting decoupled architectures. Leveraging OAuth2 and Service Access Policies within your Liferay DXP Services ensures robust protection against unauthorized access while maintaining the flexibility required for seamless integration.