Social Site Authentication in Odoo 8.0 - Surekha Technologies
Social Site Authentication in Odoo 8.0

Odoo is a suite of Open Source business apps written in Python and released under the AGPL license. It is used by more than 2 million users worldwide to manage companies of all different sizes.
The server and business logic portion of Odoo is primarily written in the Python programming language. The web client is primarily written in JavaScript.
It’s very interesting to share about how to authenticate guest user by social site like Gmail, Facebook and LinkedIn in Odoo.
It is expected that Odoo has been installed properly on the system.
Setting up the basic environment :
- Create fresh database in Odoo.(Optional, you may use your existing database.)
- Install module named auth_oauth and auth_signup under setting menu.
- Go to Setting -> General Setting -> Portal Access -> Allow external users to sign up.
1. Gmail Authentication
How to make authentications ?
- Obtain OAuth 2.0 credentials from the Google Developers Console.
- Obtain an access token from the Google Authorization Server.
- Send the access token to the API.
- Refresh the access token, if necessary.
Google App
Create Google App
Description of Google App:-
Client ID :- This is generated by Google App and you will have to mention it in your Odoo configuration for Gmail authentication.
Redirect URIs :- Applications that use languages and frameworks like PHP, Java, Python, Ruby, and .NET must specify authorized redirect URIs. The redirect URIs are the endpoints to which the OAuth 2.0 server can send responses. After successfully validating user, it’s the page you want to redirect user.
JavaScript origins :- The origins identify the domains from which your application can send API requests.
Odoo provide Gmail authentication out of the box.
Step for Gmail authentication configuration :
Step 1: Setting->OAuth Providers->Google OAuth2
- Log in to Azure DevOps and navigate to your project.
- Provider Name :- Specify provider name like Google.
- Log in to Azure DevOps and navigate to your project.
- Client ID :- Specify client ID which is generated from Google app.
- Log in to Azure DevOps and navigate to your project.
- Allowed :- Allowed True for activating authentication link from login page of Odoo.
- Log in to Azure DevOps and navigate to your project.
- Body :- Enter text for displaying link on login page.
- Log in to Azure DevOps and navigate to your project.
- Authentication URL :- Specify Authentication URL for Google. e.g. https://accounts.google.com/o/oauth2/auth.
- Log in to Azure DevOps and navigate to your project.
- Scope :- Specify scope of user profile for access data. e.g. https://www.googleapis.com/auth/userinfo.email https://www.googleapis.com/auth/userinfo.profile
- Log in to Azure DevOps and navigate to your project.
- Validation URL :- e.g. https://www.googleapis.com/oauth2/v1/tokeninfo
- Log in to Azure DevOps and navigate to your project.
- Data URL :- e.g. https://www.googleapis.com/oauth2/v1/userinfo
Step 2: After Configuration completed you need to restart your Odoo server. Now you should be able to see below screen.
Step 3: After click on link you will be redirect to Google authentication page.
Step 4: After entering password you have to accept account permission.
Step 5: Odoo will create user from the data which it got from google app and automatically log him in the system.
2. LinkedIn Authentication
Important thing is that Odoo does not support LinkedIn authentication out of the box till version 8.0. So we have to inherit existing controller for LinkedIn authentication in Odoo. For that, first we have to understand that how LinkedIn authentication works.
- Steps for LinkedIn authorization :
- Creating a LinkedIn application.
- Requesting an Authorization Code(As LinkedIn only supports Code as Response Type).
- Exchanging authorization code for a Request Token.
- Making authentication requests.
Create LinkedIn App with following value.
Description :-
- Client ID :- The "API Key" generated when you registered your application.
- Client Secret ID :- We have to mention this secret code in our customized controller.
- Default Application Permission :- Selecting the default permission of user profile for accessing data.
- Redirect URLs :- The URL by which the users will be sent back to after the authorization. This value must match one of the defined OAuth 2.0 Redirect URLs in your configured application.
STEP FOR LINKEDIN AUTHENTICATION CONFIGURATION:
Step 1: Settings -> OAuth Providers -> Create new Profile for LinkedIn authentication provider.
Description :-
- Provider Name :- Enter provider name “LinkedIn”.
- Client ID :- The "API Key" generated when your registered your application in LinkedIn(Same way as we did in Google).
- Allowed :- Allowed True for activating authentication link from login page of Odoo.
- Body :- Enter text for displaying link on login page.
- Authentication URL :- Specify Authentication URL for LinkedIn. i.e. https://www.linkedIn.com/uas/oauth2/authorization
- Scope :- Specify scope of user profile for access data. i.e. r_basicprofile
- Validation URL :- e.g. https://api.linkedIn.com/v1/people/~
- Data URL :- e.g. https://api.linkedIn.com/v1/people/~
Step 2: After configuration completed you should be able to see below screen.
Step 3: Now we need to write custom code for controller :
- LinkedIn accept code as response_type so we need to pass response_type=code in url string. So first step is creating url for redirect user to LinkedIn server.
- For inserting link we have to inherit OAuthLogin class in our module then override list_providers method in our class.
- Log in to Azure DevOps and navigate to your project.
- Syntax for import python class from openerp.addons.auth_oauth.controllers.main import OAuthLogin
- Log in to Azure DevOps and navigate to your project.
- Override method of above class def list_providers(self):
In this method if provider name is equal to LinkedIn then pass response_type=code
if provider['name'].upper() == "LinkedIn":
params = dict(
debug=request.debug,
response_type='code',
client_id=provider['client_id'],
redirect_uri=return_url,
scope=provider['scope'],
state=simplejson.dumps(state),
)
Step 4: After above changes you should be able to redirect LinkedIn site for authentication.
Step 5: After successfully login LinkedIn gives code as response so using this code we need to request LinkedIn for access token.
So we have to inherit existing controller class OAuthController class in our module then override signin method in our class. LinkedIn returns code. You also need to import supported LinkedIn libraries. For that execute below commands.
- sudo apt-get update
- sudo apt-get install python-pip
- pip install python-LinkedIn
- sudo apt-get install enum
Step 6: Using above code we got the token. Then we pass this token for getting data from LinkedIn.
LinkedIn returns user profile data in xml format so once again we have to override list of methods from res_users class.
2. _auth_oauth_rpc :- Pass parameter in url for get profile data in JSON format.
If Provider is LinkedIn then
url = url + "&format=json"
req = urllib2.Request(url)
req.add_header('Authorization',access_token)#Added header for get profile data from LinkedIn.
response = urllib2.urlopen(req)
response_json = response.read()
return simplejson.loads(response_json)
2. _auth_oauth_validate :-
If Provider is LinkedIn then pass following parameter in _auth_oauth_rpc method.
data = self._auth_oauth_rpc(cr, uid, p.data_endpoint, "Bearer "+access_token)
3. _auth_oauth_signin :-
When LinkedIn responds with profile data then send firstName and lastName as a key value pair using this data we create new user in Odoo system so insert both value in name key.
name = validation["firstName"] +" "+validation["lastName"]
4. auth_oauth :-
Map id returned from LinkedIn to user_id key.
validation["user_id"]=validation["id"]
After all these changes you need to restart your Odoo server. Then you should able to login with LinkedIn.
3. Facebook Authentication
You need to have a facebook application for your project.
Description :-
- App ID :- This is generated by Facebook App and you will have to mention in your Odoo configuration for Facebook authentication.
- Redirect URIs :- Applications that use languages and frameworks like PHP, Java, Python, Ruby, and .NET must specify authorized redirect URIs. The redirect URIs are the endpoints to which the OAuth 2.0 server can send responses. After successfully validating user, on which page you want to redirect user.
STEPS FOR FACEBOOK AUTHENTICATION CONFIGURATION :
Step 1: Setting -> OAuth Providers -> Create new OAuth
Description :-
- Provider Name :- Specify provider name like Facebook.
- Client ID :- Specify client ID which is generated from Facebook app(App ID).
- Allowed :- Allowed True for activating authentication link from login page of Odoo.
- Body :- Enter text for displaying link on login page.
- Authentication URL :- Specify Authentication URL for Google. e.g. https://www.facebook.com/dialog/oauth
- Scope :- Specify scope of user profile for access data. e.g. email
- Validation URL :- e.g. https://graph.facebook.com/me
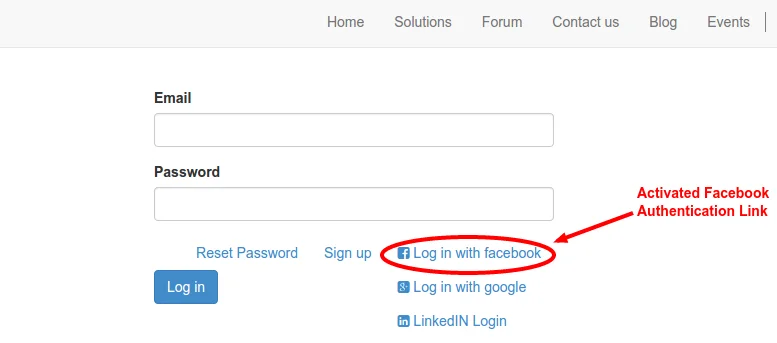
Step 2: After configuration completed you should be able to see below screen.
Step 3: Now we need to write custom code for controller.
Step 4: After successfully login of any user, Facebook provides JSON of user data like user id, name,birth date etc.
Also it returns unique id of logged user in a JSON under “id” key, but for Odoo workflow for authentication it takes “user_id” key, so just what we have to do is assign “id” in “user id” key. So we have to inherit _auth_oauth_rpc method of res_user class.
f = urllib2.urlopen(url)
response = f.read()
newResponse = simplejson.loads(response)
if 'user_id' in newResponse.keys():
newResponse = newResponse
elif 'id' in newResponse.keys():
newResponse['user_id']=newResponse['id']
print "\n\n\nFacebook Returned JSON is ===> ",newResponse
return newResponse
Step 5: Now code is completed after click on link you will be redirect to Facebook authentication page.
Step 6: After entering password you have to accept account permission.
Step 7: Odoo will create user from data which it got from facebook app and automatically log him in the system.
Thank you for reading this blog. I hope this blog will help you for achieving this functionalities.
For professional paid support, you may contact us at [email protected] .
For Your Business Requirements
