Upgrade Ember Application To Octane
 January 20, 2021
This guide is for developers who already know Ember, and who want to migrate the application to Octane.
It is important to have knowledge about the new features and deprecation introduced within the Octane version.
Here are some core features introduced in Octane,
- Native JavaScript classes
- Tracked properties
- Decorators
- Async functions (async/await)
- "Outer HTML" templates
- Modifiers
- <AngleBracket> syntax
Some features made optional in Octane like,
- inner HTML" components
- Non-native classes
- Curly component invocation
- jQuery
- Computed properties and observers
If you’re new to the Octane version, We recommend you to get an overview of new features before you go for upgrades.
Reference: https://guides.emberjs.com/release/
Steps of Upgradation for normal Ember app
- Upgrade CLI version
- The Ember CLI can be used with older app versions too.
$ npm uninstall -g ember-cli
$ npm install -g ember-cli
$ ember --version
- Upgrade an Ember app CLI version
- If ember-cli-update is installed globally, execute the below command
- or execute,
- To Enable Octane Mode
- To enable octane mode Install @glimmer/component and @glimmer/tracking packages.
- After that, Update the “config/optional-features.json” file to toggle all of the Octane Mode features.
- To Update code syntax and structure automatically
- Codemods automatically make the syntax changes to source code that you would usually have to do manually. This assures that we are using the latest patterns and platform features. Use the below command to get a list of codemods for your project.
$ ember-cli-update --run-codemods
- After executing any codemod, Run your tests to make sure everything still works as expected.
Checklist to upgrade the ember version to Octane.
- while creating new components use the following command
-
$ ember generate component my-component -gc
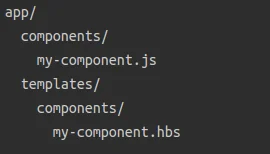
- Template co-location
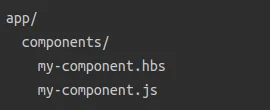
- The Component templates have moved into the “Component” directory in Octane. This is known as "template co-location."
before:
after:
- Convert your ember app code to native JavaScript class syntax
- Import Component from @glimmer/component package.
- Use native class syntax while defining the class.
before:
my-component.js
import Component from ‘@ember/component’;
export default Component.extend({ });
after:
my-component.js
import Component from ‘@glimmer/component’;
export default class MyComponent extends Component{ }
- In the same way, we have to use the constructor rather than the init method with native class syntax.
- Convert the curly bracket to Angle Brackets.
- Convert curly bracket components “{{my-component}}” to Angle Brackets “<MyComponent />” components in the template file.
before:
after:
- Same as above nested components invocation use “::“ between dir name and component name.
- Use Tracked Properties
- Replaced computed properties with tracked properties.
before:
my-component.js
export default Component.extend({
  index: 0;
});
after:
my-component.js
import { tracked } from ‘@glimmer/tracking’;
export default class MyComponent extends Component{
  @tracked index = 0;
}
- Same way Modify Plain Old JavaScript Objects to add tracked properties.
- @action, {{on}} and {{fn}}
- In the Octane, actions are removed as a defined object of the actions. Instead, @action decorator is introduced.
before:
my-component.js
export default Component.extend({
  action: {
	sayHello(){
	  console.log('Hello, world!');
	}
});
after:
my-component.js
import { action } from '@ember/object';
export default class MyComponent extends Component {
  @action
   sayHello() {
    console.log('Hello, world!');
  }
}
- The {{on}} Modifier is replacement of {{action}} modifier. It will take the event name as the 1st argument and a callback function as the 2nd argument
- In octane, {{fn}} is a helper that is used to call functions along with the arguments.
before:
test.hbs
<button type="button" onClick={{action "sayHello"}}> say hello! </button> after:
test.hbs
<button type="button" {{on "click" this.sayHello}}> say hello!</button>
- Remove two-way data binding and Implement One-way Data Flow
- Classic component's arguments are two-way bound. That means, when you change a value from the child component, it also changes the value of the same variable in the parent component.
- After the octane version, two-way data binding is removed.
- With the octane version to update the parent component property from the child component, we have to pass a handler function as well and invoke it from the child component.
- Use {{did-insert}} and {{will-destroy}} Modifiers rather than didInsertElement and willDestroyElement hooks.
- install @ember/render-modifiers
$ ember install @ember/render-modifiers
Component:
scroll.js
import Component from '@glimmer/component';
import { tracked } from '@glimmer/tracking';
import { action } from '@ember/object';

export default class Scroll extends Component {
  @tracked scrollOffset;
  @action
  listener(e){
    this.scrollOffset = e.clientY;
  }
  @action
  registerListener(element){
    element.addEventListener('scroll', this.listener);
  }
  @action
  unRegisterListener(element){
    element.removeEventListener('scroll', this.listener);
  }
}
Template:
scroll.hbs
<div {{did-insert this.registerListener}} {{will-destroy this.unRegisterListener}}> ... </div>
- Accessing a route’s model
- From the octane to access the result from the route's model hook use @model
Before:
First name: {{model.name}} After:
First name: {{@model.address}}
That is it, hope you will find this blog helpful to get the overall idea about the key points that you will have to take care of while upgrading your ember application into the Octane version.
If you find any difficulties feel free to post a message in the comment box below, we have Ember experts to help you out with your queries. Good Luck!