Dynamic Odoo custom snippets represent a powerful enhancement to the website builder, as it allows you to create data-driven content directly from the back end. Rather than static snippets where you have to update the content manually, dynamic snippets can automatically fetch and display dynamic information such as the newest products, blog posts, and or services.
Dynamic Snippets in Odoo 18: Easy Step-by-Step Guide with Live Data Example
Step 1: Set up the Development Environment for Creation of Dynamic Snippet
- Install Odoo 18:
First, install Odoo 18 and ensure that it’s working properly.
- Create a Custom Module:
If you haven’t made your custom module yet, use the Odoo scaffolding command to create one.
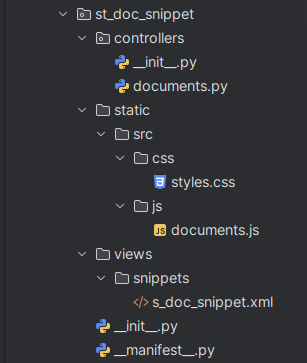
Step 2: Directory Structure for the Custom Document Snippet Module
Step 3: Set up __manifest__.py file
   {
    'name': "Document Snippet",
    'version': '18.0.1.0.0',
    'author': "Surekha Technologies",
    'category': 'Custom',
    'license':'LGPL-3',

    'summary':"""
        This module provides a dynamic document snippet for Odoo websites, enabling users to display
       documents along with their metadata in a structured and customizable layout.
    """,

    'data': [
        'views/snippets/s_doc_snippet.xml',
    ],

    'assets': {
            'web.assets_frontend':[
                '/st_doc_snippet/static/src/js/documents.js',
                '/st_doc_snippet/static/src/css/styles.css'
            ],
        },

    'depends' : ['base','documents','web_editor','website','web'],

    'installable': True,
    'application': True,
}

Step 4: Create a controller for fetching data from Documents module
from odoo import http
from odoo.http import request

class Documents(http.Controller):
    """
    Controller for handling document-related operations, such as fetching documents
    and folder data from the 'documents.document' model.

    """

    @http.route(route='/documents', auth='public', csrf=False, type='json')
    def get_documents(self, **kwargs):
        """
        The function fetches a list of folders (file type='folder') and documents
        (file type!='folder') and returns them as JSON to be consumed by the frontend.

        - Folders are listed as unique folder names.
        - Documents include details such as filename, file URL, file type, folder ID,
          and document's overview.

        Returns:
            dict: A dictionary data-type containing two keys:
                - 'documents': A list of dictionaries with document details.
                - 'folders': A list of unique folder names.
        """

        folders = request.env['documents.document'].search([('type', '=', "folder")])

        folder_arr = []
        for rec in folders:
            if rec.display_name:
                folder_arr.append(rec.display_name)

        unique_folders = list(set(folder_arr))
        documents = request.env['documents.document'].search([("type", "!=", "folder")])

        documents_data = []
        for doc in documents:
            attachment = doc.attachment_id

            if attachment:
                thumbnail_data = doc.thumbnail

                file_data = {
                    'filename': attachment.name,
                    'file_url': '/web/content/%s' % attachment.id,
                    'file_type': attachment.mimetype,
                    'folder_id': doc.folder_id.name,
                    'thumbnail': thumbnail_data
                }

                # Append the file data dictionary to the documents_data list.
                documents_data.append(file_data)

        # Return the final data as a dictionary, containing documents and folders.
        return {
            'documents': documents_data,
            'folders': unique_folders
        }
Step 5: Create the OWL JS File to Fetch Documents
import PublicWidget from "@web/legacy/js/public/public_widget";
import { rpc } from "@web/core/network/rpc";
import { registry } from "@web/core/registry";

export const DocumentWidget = PublicWidget.Widget.extend({

   selector: '.dynamic_snippet',

    async start() {
        try {
            await rpc('/documents', {
                model: 'documents.document',
                method: 'get_documents',
                kwargs: {},
                args: []
            }).then((result) => {
                const documentsList = result.documents.map((doc) => {
                    return `
                        <div class="col-md-3 document-card">
                            <div class="card">
                                <img src="data:image/jpeg;base64,${doc.thumbnail}" class="card-img-top" alt="${doc.filename} Thumbnail"/>
                                <div class="card-body">
                                    <h5 class="card-title">${doc.filename}</h5>
                                    <p class="card-text">${doc.file_type}</p>
                                    <a href="${doc.file_url}" target="_blank" class="btn btn-primary">View Document</a>
                                </div>
                            </div>
                        </div>
                    `;
                }).join('');

                this.$('.documents').html(`<div class="row">${documentsList}</div>`);

            }).catch((error) => {
                console.error("Error loading documents:", error);
            });
        } catch (error) {
            console.error("Unexpected error:", error);
        }
    },
});

PublicWidget.registry.document = DocumentWidget;
return DocumentWidget;
Step 6: Snippet Template and it’s Declaration in Website Builder
<?xml version="1.0" encoding="UTF-8" ?>
<odoo>
<!-- Template for displaying documents as a snippet -->
<template id="doc_snippet" name="Document Snippet">
<section class="container dynamic_snippet">
<div class="row">
<div class="col-md-12"><br/>
<h1>Documents</h1><br/>
<div class="documents">
<t t-foreach="documents" t-as="document">
<t t-esc="document"/>
</t>
</div>
</div>
</div>
</section>
</template>
<!-- Template for inheriting and adding the document snippet to a website snippet -->
<template id="document_snippet" inherit_id="website.snippets" name="Document Snippet">
<xpath expr="//snippets[@id='snippet_content']" position="inside">
<t t-snippet="st_doc_snippet.doc_snippet"/>
</xpath>
</template>
</odoo>

Step 7: You can optionally add custom styles using CSS to enhance the UI of dynamic snippet.
.document-card {
    margin-bottom: 32px;
}

.card {
    height: 360px;
    display: flex;
    flex-direction: column;
    border: 2px solid #dddddd;
    border-radius: 4px;
    overflow: hidden;
    transition: transform 0.2s;
    justify-content: space-between;
    width: 100%;

}

.card:hover {
    transform: scale(1.05);
}

.card-img-top {
    height: 150px;
   object-fit: cover;
}

.card-body {
    flex-grow: 1;
}

.card-title {
    font-size: 1.2em;
   font-weight: bold;
}

.card-text {
    font-size: 0.9em;
   color: #666;
}
Step 8: Get the module set up and give it a quick test to ensure the working of the functionality.
- Update App List:
Go to Odoo and update the apps list.
- Install The Module:
Install the custom module and ensure that there are no errors.
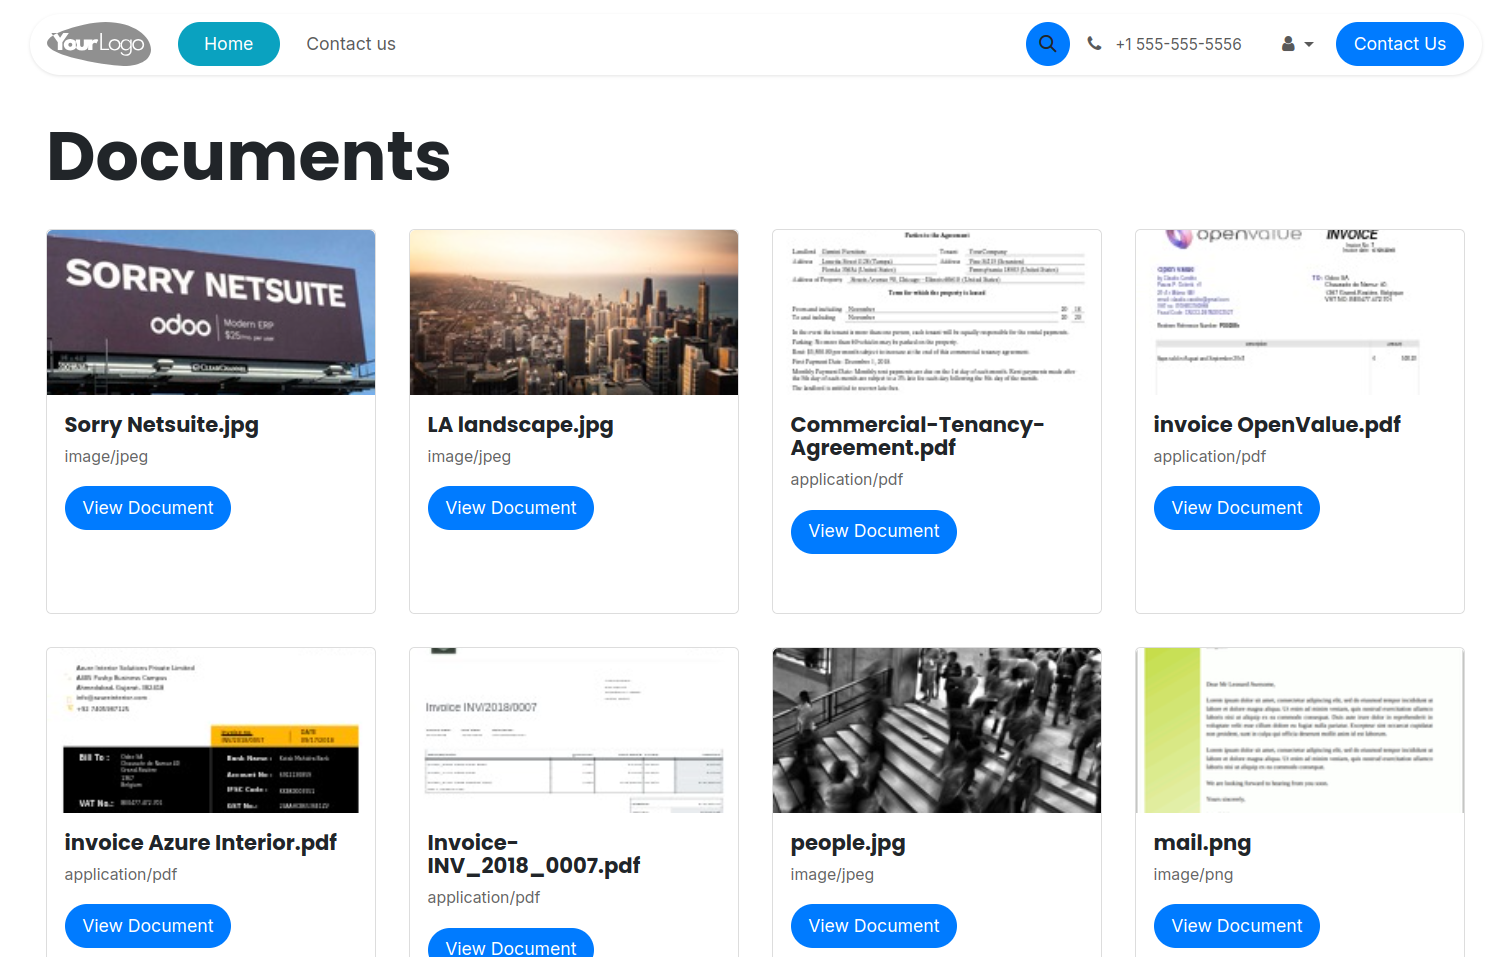
- Test the custom snippet in Odoo website:
Go to Website Module. Drag and Drop the snippet from Website Builder.
Odoo 18 Dynamic Snippet Example
Conclusion
We looked at how to create a dynamic snippet in Odoo 18 using OWL and modern frontend techniques. We went through setting up the module, getting data from the backend, and showing it live on the website. It’s a simple way to add flexible features that show real-time content based on your business data. With a few quick steps, your Odoo website can feel more modern and interactive.