Amazon Web Services (AWS) is a secured cloud services platform that offers compute capability, database storage, content distribution, and other features to support corporate expansion. hosting dynamic websites by running web and application servers in the cloud.
Suppose you have just created a new application that's currently residing on one EC2 instance within your environment that's being accessed by many users. Although it'd certainly work and supply a service to your users, this infrastructure layout brings some challenges.
The one instance where your application is located can fail and your application is going to be down and unavailable to your users. If you experience a sudden spike in traffic, your instance might not be able to handle the extra load supported by its performance limitations.
To strengthen your infrastructure and help to remediate their challenges, you ought to introduce an Elastic Load Balancer and extra instances running your application.
The main function of an Elastic Load Balancer is to help manage and control the flow of inbound requests destined to a group of targets by distributing these requests evenly across the targeted resource group.
Elastic Load Balancer will facilitate you to automatically distribute incoming web application traffic across multiple applications, microservices, and containers hosted on Amazon EC2 instances. Load-balancing increases the provision of applications and websites for users. The website depends on optimal performance and availability of 24 hours daily, 7 days per week. Ensuring high performance to handle any quiet traffic.
TYPES OF ELASTIC LOAD BALANCERS
Elastic Load Balancing supports the following types of load balancers:
- Application Load Balancers
- Network Load Balancers
- Classic Load Balancers
- Classic Load Balancers
In this blog, you will learn how to configure Application Load Balancing.

Application Load Balancers
A load balancer serves as the single point of contact for clients. The load balancer distributes incoming application traffic across multiple targets, such as EC2 instances, in multiple Availability Zones. This increases the availability of your application.
Let's say you have 3 different uses of your web application which are all served by different EC2 instances.
For example,
- A shop application which is shop.testexample.com or testexample.com/shop
- A blog application which is blogs.testexample.com or testexample.com/blogs
- An admin interface which is admin.testexample.com or testexample.com/admin
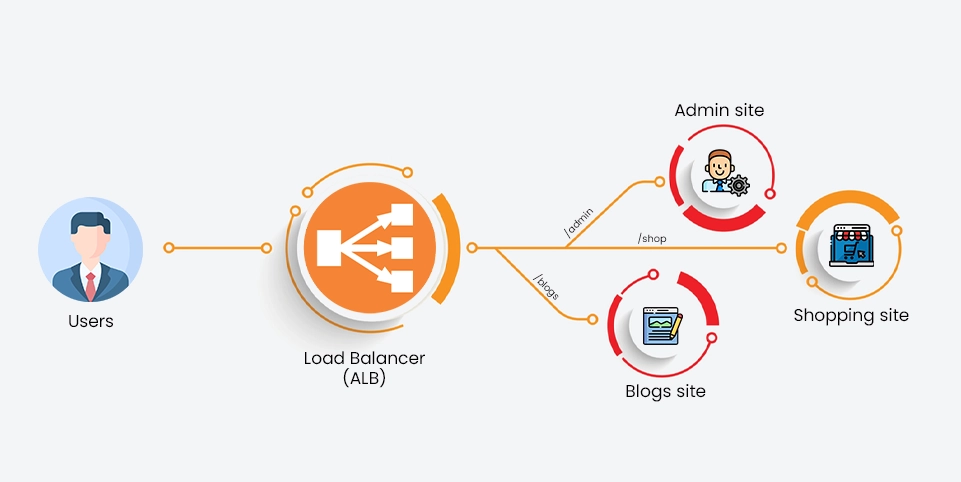
ALB provides 2 types of routing Host-Based and Path-Based. You can choose the type of routing according to your application.
For example if we have different paths for each application we can use Path-Based routing.
- In the above image, if someone hits testexample.com/blogs then he will be taken to the blogs site. In other words if the user hits the above site then he will be routed to our ec2 instance in which our blog application is set up.
- Same for the other 2 sites, users will be routed to our shop page or admin page if they hit testexample.com/shop and testexample.com/admin respectively.
- For simplicity's sake we have created 3 ec2 instances which contain different strings on their index.html files in the /var/www directory.
- All of the ec2 instances have an apache server installed.
- Before Creating a Load balancer we will have to create Target groups and register them with our instances.
- Go to Compute ? EC2 Instance service.
- In the Load balancing menu click on Target groups.
- Click on Create target group.
- In my example, I have set up 3 target groups:
- one is called 'shop' which routes to /shop/.
- one is called 'blogs' which routes to /blogs/.
- one is 'admin' which routes to /admin/.
- Optionally in the advanced health settings set the interval to 6 seconds and success codes to 200-299
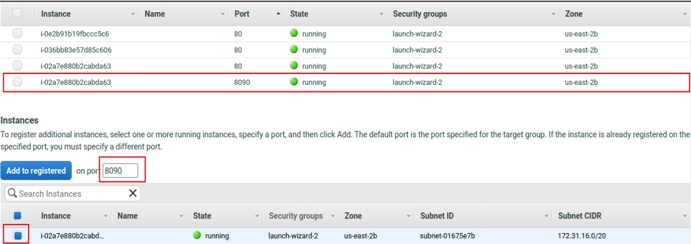
- After Target group creation we need to assign(register) our ec2 instances to each target group.
- Select the target group which you need to assign an ec2 instance.
- Switch to the Targets tab.
- Click on Edit and register the instances you need in this target group.
- Now let's create an Application Load Balancer in AWS.
- Go to Compute ? EC2 Instance service
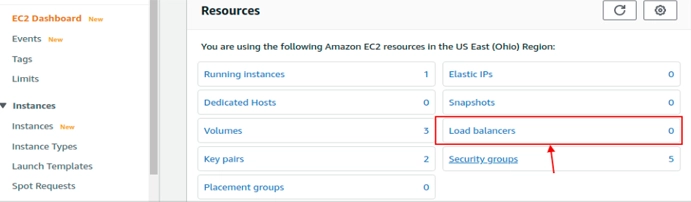
- Click on Load balancers in the EC2 Dashboard ? Create Load Balancer
- On the next page choose Application Load Balancer, click on the Create button.
- Configure Load Balancer
- Basic Configuration: To configure your load balancer,
- Add the Name for your Load Balancer. In our case I have named it Path-based alb.
- Select the Scheme.
- An Internet-facing load balancer routes requests from clients over the Internet to targets.
- An internal load balancer routes requests from clients to targets using private IP addresses.
- For our purpose we should select the Internet-facing scheme.
- Choose the IP address type either IPv4 (ipv4) or IPv4 and IPv6 (dualstack).
- Listeners: A listener is a process that checks connection requests using protocols and ports that you have configured.
- You can use any port you like, we have selected the default port (80) for this configuration
- Availability Zones: The targets defined within the ELB could be situated across different Availability Zones, or all placed within a single AZ.
- Virtual Private Cloud (VPC): It allows the users to use AWS resources in a virtual network. The users can customize their virtual networking environment as they like, such as selecting your own IP address range, creating subnets, and configuring route tables and network gateways.
- The default VPC has the benefits of the advanced features provided by EC2-VPC, and is ready for you to use also we don't need to specify a subnet when you launch an instance, the instance is launched into your default VPC.
- We have selected default vpc and selected all availability zones.
- Tags: add tags to identify your load balancer and help to organize them.
- You can add any tag you want.
- Click on Next: Configure Security Settings button.
- Configure Security Settings: To use an HTTPS listener, you must deploy at least one SSL/TLS server certificate on your load balancer.
Note: If you have not added a secure listener you might see a warning but you can ignore it. - Choose a certificate from AWS Certificate Manager(ACM) or Upload a certificate to ACM
- choose a Security policy.
- Click on Next: Configure Security Groups button.
- We can leave it empty because we don't need SSL/TLS server certificate for demonstration.
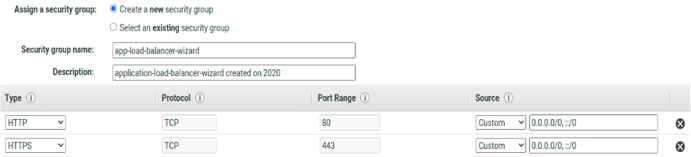
- Configure Security Groups: A security group is a set of firewall rules that control the traffic to your load balancer.
- Create a new security group or Select an existing security group to configure the security group.
- You can select one or multiple security groups and add rules in the security groups to allow specific traffic to reach your load balancer.
- Click on Next: Configure Routing button.
- Configure Routing:
- Add the target group. You can create a new target group or Select an existing target group. In this blog, we are going to select an existing target group.
- Click on Next: Review button.
- Review: Please review the load balancer details before continuing. After reviewing all the details, click on the Create button.
- Your Load Balancer is now created, you can check it's status from the load balancer dashboard.
- One more thing we need to do is write rules in the listener for the load balancer based on incoming requests.
- Go to Compute ? EC2 Instance service
- Click on Load balancers in the EC2 Dashboard
- Select Instance ? Go to Listener section
- Click ? view/edit rules from available listener
- Click ? Add icon and Click ? Insert Rule
- There is if and then condition
- If:
- Click ? Add Collection and Select Path
- Enter path in is value (Example: /blog* or /admin*)
- Then:
- Click ? Add Collection and Select Forward to
- Select your target group where you want to forward incoming requests. (we have already created target group earlier section)
- Follow the above load Application Load Balance section and create load balance for the remaining instance.
- Now You have successfully Configured Application Load Balancer in your web application. To check it, copy the DNS name from your load balancer and paste it into a browser. You should see the 1st instance’s welcome page in the browser.

- Now go to another browser and paste the same DNS name, you should see the other instance's output.
- The loads on all the EC2 instances will be handled by this Load Balancer.

- To check the load balancer is working on your Load Balancer is to shut down 1 ec2 instance.
- Check the health of the 1st instance and if this "Status Check Failed: Instance".
- Then ALB will automatically stop sending user requests to that instance and distribute all the requests in the remaining instance.
Are you interested in taking advantage of the AWS ecosystem? Or you want to optimise your already existing AWS ecosystem? Comment below, give us a call or email to know more about AWS services.
Conclusion:
The Application Load Balancer is a feature of Elastic Load Balancing that allows a developer to configure and route incoming end-user traffic to applications based in the Amazon Web Services (AWS) public cloud. It pushes traffic across multiple targets in multiple instances.