How to create custom report layout in odoo 17
 November 14, 2024
Creating custom report layouts in Odoo 17 is a crucial task for businesses that require personalized and detailed reports to match their unique needs. Odoo, a comprehensive suite of business applications, allows developers to modify and create report templates using its QWeb templating engine.
This process involves several steps, including setting up your development environment, defining QWeb templates, configuring report actions, and potentially incorporating custom Python code to manage the data. In this guide, we will walk through each step of creating a custom report layout in Odoo 17, ensuring you can generate reports that align perfectly with your business requirements.
Create Custom Report Layouts in Odoo 17
Step 1: Set Up Your Development Environment
- Install Odoo 17: Make sure you have Odoo 17 installed and running.
- Create a Custom Module: If you don't already have a custom module, create one using the Odoo scaffolding command.
./odoo-bin scaffold st_custom_report_module custom-addons/.
Step 2: Define Your Report Template
- Create the QWeb Template: In your custom module, create a directory structure for your report templates.
st_custom_report_module/
├── models/
├── report/
│ ├── report_template.xml
├── views/
│ ├── report_views.xml
├── __init__.py
├── __manifest__.py
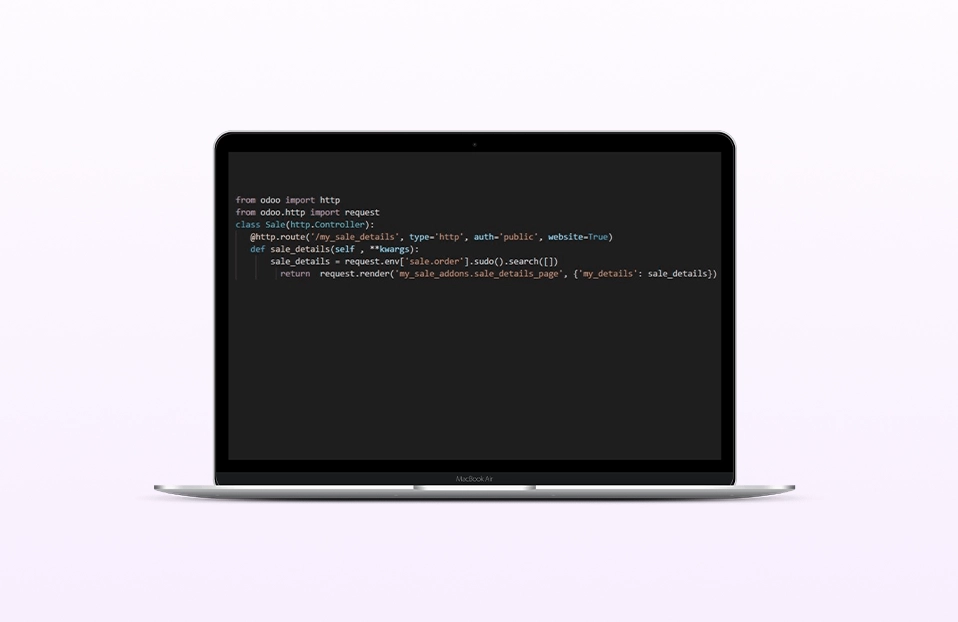
- Create the Report Template File: In the report directory, create a file called report_template.xml.
<!-- st_custom_report_module/report/report_template.xml -->
<?xml version="1.0" encoding="UTF-8"?>
<odoo>
<template id="report_saleorder_document">
<t t-call="web.html_container">
<t t-if="not o" t-set="o" t-value="docs" />
<t t-set="company" t-value="o.company_id" />
<div class="header">
<div style="border-top: 1px solid black; text-align: center;">
<img t-if="o.company_id.logo" t-att-src="image_data_uri(o.company_id.logo)" alt="Logo" />
</div>
<div style="font-size:14px; text-align:center; margin-top:15px;">
<div>
<strong t-field="o.company_id.partner_id.name" />
<span t-field="o.company_id.partner_id"
t-options="{'widget': 'contact', 'fields': ['address'], 'no_marker': true}" />
<span t-field="o.company_id.partner_id.website" />
</div>
</div>
</div>
<t t-call="web.external_layout">
<div class="page">
<div class="oe_structure" />
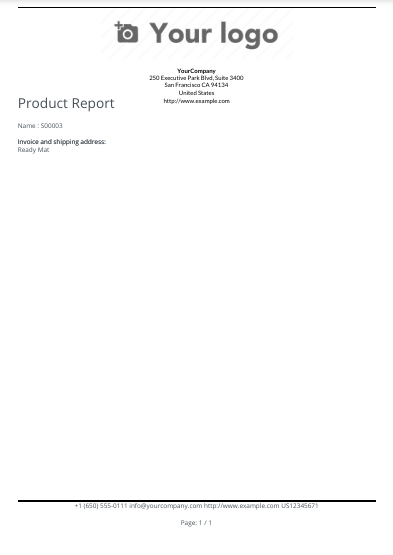
<h2>Product Report</h2>
<br />
<p>Name: <span t-field="o.name" /></p>
<div class="row">
<div class="col-6">
<strong t-if="o.partner_shipping_id == o.partner_invoice_id">
Invoice address:
</strong>
<strong t-if="o.partner_shipping_id != o.partner_invoice_id">
Invoice address:
</strong>
<div t-field="o.partner_invoice_id" t-options="{'no_marker': True}" />
</div>
</div>
</div>
</t>
<div class="footer">
<div class="text-center" style="border-top: 1px solid black;">
<ul class="list-inline">
<li t-if="o.company_id.phone">
E-mail: <span t-field="o.company_id.email" />
</li>
</ul>
</div>
</div>
</t>
</template>
</odoo>
Step 3: Define the Report Action
- Create Report Action and Report Template Entries: In the view's directory, create a file report_action.xml.
     <!-- st_custom_report_module/report/report_action.xml -->

	<?xml version="1.0" encoding="UTF-8"?>

	<odoo>

	<record id="action_report_custom" model="ir.actions.report">

	<field name="name">Sale Order Report</field>

	<field name="model">sale.order</field>

	<field name="report_type">qweb-pdf</field>

	<field name="report_name">st_custom_report_module.report_saleorder_document</field>

	<field name="report_file">st_custom_report_module.report_saleorder_document</field>

	<field name="binding_model_id" ref="st_custom_report_module.model_sale_order"/>

	<field name="binding_type">report</field>

	</record>

	</odoo>
Step 4: Update Module Manifest
- Modify __manifest__.py: Ensure your __manifest__.py includes references to the new XML files.
     # st_custom_report_module/__manifest__.py

	{

	'name': 'Custom Report Module',

	'version': '17.0.1.0.0',

	'depends': ['base', 'web', ’sale’],

	'data': [

	'report/report_template.xml',

	'views/report_action.xml',

	],

	}
Step 5: Install and Test Your Module
- Update App List: Go to Odoo and update the app list.
- Install Your Module: Install your custom module.
- Generate the Report: Navigate to the model record and generate the report to see your custom layout.
Example of Custom Report in Odoo 17
Conclusion
By following these steps, you can create custom report layouts in Odoo 17, allowing you to present data in a format that best suits your business requirements. This guide outlines the fundamental process, from setting up your development environment and defining your QWeb templates to configuring report actions and optionally extending your models with custom data. As part of Odoo development services, you can customize and enhance the platform to meet specific needs. Once your module is installed and tested, you can generate and view the customized reports directly from Odoo.