If you've ever explored various modules within Odoo, such as Accounting or Invoicing, you've likely encountered the Onboarding Panel—a feature designed to streamline user interaction and guide users through essential configuration steps. Take, for instance, the Onboarding Panel in the Invoicing module, where users can effortlessly configure company details, set up bank accounts, customize invoice layouts, and even create invoices directly from the panel itself.
Did you know that you can implement a similar onboarding panel or section within your own Odoo modules? That's right! With Odoo's versatile Banner route, you can not only replicate onboarding panels but also add customizable sections to enhance user experience and functionality. In this blog post, we'll explore how you can leverage the Banner route to seamlessly integrate a section top the Project kanban view, unlocking new possibilities for user interaction and module customization. Let's dive in and discover the steps to elevate your Odoo module with a dynamic and user-friendly section.
Code
Let's start by creating a template for the onboarding panel and defining the steps to be displayed within it. Begin by creating an XML file inside the data directory:
<?xml version="1.0" encoding="utf-8"?>
 <odoo>
   <data>
    <record id="onboarding_onboarding_step_setup_project"
    model="onboarding.onboarding.step">
       <field name="title">Create your Project</field>
       <field name="description">With Me</field>
       <field name="button_text">Create</field>
       <field name="done_text">Done!</field>
       <field name="panel_step_open_action_name">action_view_create_project
       </field>
       <field name="step_image" type="base64" file="base/static/img/
       onboarding_default.png"></field>
       <field name="step_image_filename">onboarding_accounting-periods.png
       </field>
       <field name="step_image_alt">Onboarding Project Synchronization
       </field>
       <field name="sequence">1</field>
     </record>

    <record id="onboarding_onboarding_step_setup_project_task"
    model="onboarding.onboarding.step">
      <field name="title">Create your Task</field>
      <field name="description">With Me</field>
      <field name="button_text">Create</field>
      <field name="done_text">Done!</field>
      <field name="panel_step_open_action_name">action_view_create_task
      </field>
      <field name="step_image" type="base64" file="base/static/img
      /onboarding_default.png"></field>
      <field name="step_image_filename">onboarding_accounting-periods.png
      </field>
      <field name="step_image_filename">Onboarding Task Synchronization
      </field>
      <field name="sequence">2</field>
    </record>

    <record id="onboarding_onboarding_project"
    model="onboarding.onboarding">
      <field name="name">Project Onboarding</field>
      <field name="step_ids" eval="[
      Command.link(ref('your_module_name.onboarding_onboarding_step
      _setup_project')),
      Command.link(ref('your_module_name.onboarding_onboarding_step
      _setup_project_task')),
      ]"/>
      <field name="panel_close_action_name">action_close_project_onboarding
      </field>
      <field name="route_name">project</field>
    </record>
  </data>
</odoo>
Next, we'll create the necessary Python files for managing the onboarding and onboarding steps:
For project onboarding
from odoo import api, models

class Onboarding(models.Model):
  _inherit = 'onboarding.onboarding'

  @api.model
 def action_close_project_onboarding(self):
  self.action_close_panel('your_module_name.onboarding_onboarding_project')

 def _prepare_rendering_values(self):
  """ Rendering the values """

  self.ensure_one()
  if self == self.env.ref('your_module_name.onboarding_onboarding_project',
  raise_if_not_found=False):
  step = self.env.ref('your_module_name.onboarding_onboarding_step
  _setup_project',raise_if_not_found=False)
  if step and step.current_step_state == 'not_done':
   # Add your logic
 return super()._prepare_rendering_values()
For project_onboarding_steps file
from odoo import api, models

class OnboardingStep(models.Model):
  _inherit = 'onboarding.onboarding.step'

  @api.model
 def action_view_create_project(self):
  action = self.env["ir.actions.actions"]._for_xml_id
  ("your_module_name.action_view_create_project")
    return action

  @api.model
 def action_view_create_task(self):
  action = self.env["ir.actions.actions"]._for_xml_id
  ("your_module_name.action_view_create_task")
    return action
Now, let's integrate the onboarding panel project app also define the actions for create :
 <?xml version="1.0" encoding="UTF-8" ?>
 <odoo>

   <record id="project_onboard_view" model="ir.ui.view">
     <field name="name">project.onboarding.panel</field>
     <field name="model">project.project</field>
     <field name="inherit_id" ref="project.view_project_kanban"/>
     <field name="arch" type="xml">
       <xpath expr="//kanban" position="attributes">
         <attribute name="banner_route">
         /onboarding/project
         </attribute >
       </xpath >
     </field >
   </record >

   <record id="action_view_create_project" model="ir.actions.act_window">
     <field name="name">Create Your Own Project</field>
     <field name="res_model">project.project</field>
     <field name="view_mode"> form</field>
     <field name="target">new</field>
     <field name="context">{'dialog_size': 'large'}</field>
   </record >

   <record id="action_view_create_task" model="r.actions.act_window">
     <field name="name">Create Your Own Task</field>
     <field name="res_model">project.task</field>
     <field name="view_mode"> form</field>
     <field name="target">new</field>
     <field name="context">{'dialog_size': 'large'}</field>
   </record >

 </odoo>
Lastly, add project, onboarding depends on your manifest file.
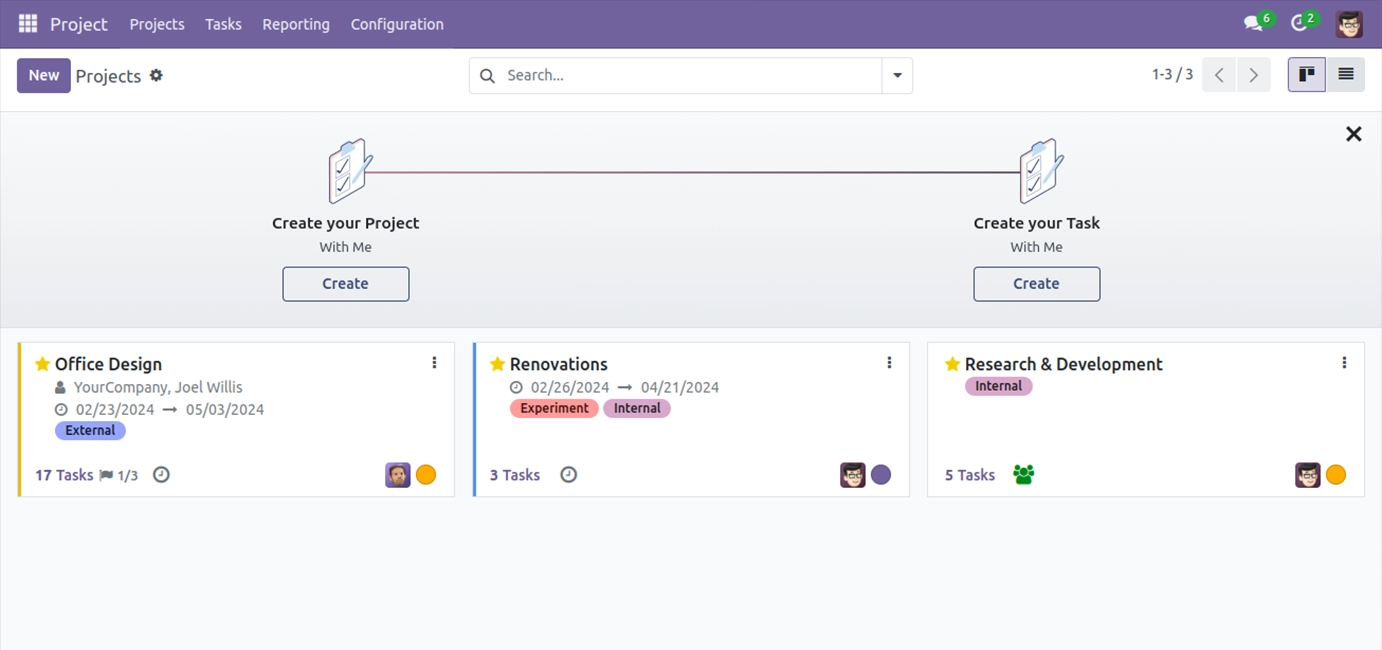
Conclusion
Adding an onboarding panel to your Odoo 17 modules is a straightforward process that can significantly enhance user experience and module adoption. By following the steps outlined above, you can seamlessly integrate an engaging onboarding experience into your modules, guiding users through essential configuration steps and maximizing their productivity. In addition, consider incorporating Odoo customization services to tailor the onboarding experience to your specific business needs and further enhance user adoption.
Let this blog serve as your guide to effortlessly incorporating onboarding panels within your Odoo modules, empowering users and driving module adoption to new heights.
