Liferay Inter portlet communication(IPC) is the mechanism by which one portlet communicates with another portlet. Basically IPC events mechanism is one of the ways to make inter portlet communication among the portlets and these portlets may be in same page or different pages in the portal.
Liferay supports event based IPC which was introduced in JSR 286. According to JSR 286, a portlet can generate event and another portlet can receive the event. JSR-286 makes it easy to share the data between two portlets.
You may find number of blogs/articles related to Liferay mvc portlet communication from the internet. Here I’m going to show you how JSF portlets can communicate with each other on Liferay platform.
I’m assuming that you have knowledge of JSF portlet working on Liferay platform. So, I will directly show you how the event based IPC mechanism works for JSF portlets.
Below are the configurations for generating and receiving event. A portlet can generate and receive any number of events. portlet.xml is the file where we have to define events.
Generate event by Portlet 1 :
Here’s a snippet from the Books portlet’s portlet.xml descriptor:
<portlet>
<portlet-name>books</portlet-name>
<supported-publishing-event>
<qname xmlns:x="http://liferay.com/events">x:ipc.bookSelected</qname>
</supported-publishing-event>
...
</portlet>
<event-definition>
<qname xmlns:x="http://liferay.com/events">x:ipc.bookSelected</qname>
<value-type>com.liferay.faces.demos.dto.Book</value-type>
</event-definition>
Receive event by Portlet 2 :
In this portlet the code snippet is similar to above portlet except this portlet process the event.
<portlet>
<portlet-name>book-details</portlet-name>
<supported-processing-event>
<qname xmlns:x="http://liferay.com/events">x:ipc.bookSelected</qname>
</supported-processing-event>
...
</portlet>
<event-definition>
<qname xmlns:x="http://liferay.com/events">x:ipc.bookSelected</qname>
<value-type>com.liferay.faces.demos.dto.Book</value-type>
</event-definition>
Here, supported-publishing-event tag use to publish/generate the event and supported-processing-event tag use to process/receive the event.
A QName is a qualified name contains namespace and event name to distinguish two events. Here the namespace is http://liferay.com/events and event name is x:ipc.bookSelected.
Using event-definition we can define the payload type at both generator and receiver side. Here, the type is a custom Java class(Book); it could have also been a primitive type or any standard class. These event definitions require you to use qname to uniquely identify the event. You can define multiple events in portlet.xml file.
Portlet 1 (Generate the event) :
Code snippet of view.xhtml
<h:form id="books-form">
<h:dataTable value="#{booksModelBean.allBook}" var="book">
<h:column>
<h:commandButton actionListener="#{booksBackingBean.selectionListener}" value="#{book}" />
</h:column>
</h:dataTable>
</h:form>
Code snippet of BooksBackingBean.java
@ManagedBean(name = "booksBackingBean")
@RequestScoped
public class BooksBackingBean implements Serializable {
public void selectionListener(ActionEvent actionEvent) {
UICommand uiCommand = (UICommand) actionEvent.getComponent();
Book book = (Book) uiCommand.getValue();
QName qName = new QName(“http://liferay.com/events”,”ipc.bookSelected”);
ExternalContext eCon = FacesContext.getCurrentInstance().getExternalContext();
ActionResponse actionResponse = (ActionResponse) eCon.getResponse();
Serializable eventPayload = book;
actionResponse.setEvent(qName, eventPayload);
}
}
Portlet 2 (Receive event) :
Code snippet of portlet.xml
<portlet-app>
<portlet>
<init-param>
<name>javax.portlet.faces.bridgeEventHandler</name>
<value>com.liferay.event.BookSelectedEventHandler</value>
</init-param>
</portlet>
</portlet-app>
Basically you have to declare which class handle the event processing in portlet.xml file as defined above. Here we have defined that BookSelectedEventHandler class handle the event processing part. So, it needs to implement the method handleEvent of class BridgeEventHandler
Code snippet of BookSelectedEventHandler.java
public class BookSelectedEventHandler implements BridgeEventHandler {
public EventNavigationResult handleEvent(FacesContext facesContext, Event event) {
EventNavigationResult eventNavigationResult = null;
String eventQName = event.getQName().toString();
if (eventQName.equals("{http://liferay.com/events}ipc.bookSelected")) {
Serializable value = event.getValue();
Book book = (Book) value;
// Process event...
String fromAction = null;
String outcome = "ipc.bookSelected";
eventNavigationResult = new EventNavigationResult(fromAction, outcome);
}
return eventNavigationResult;
}
}
Here, we take the example of Library Management.
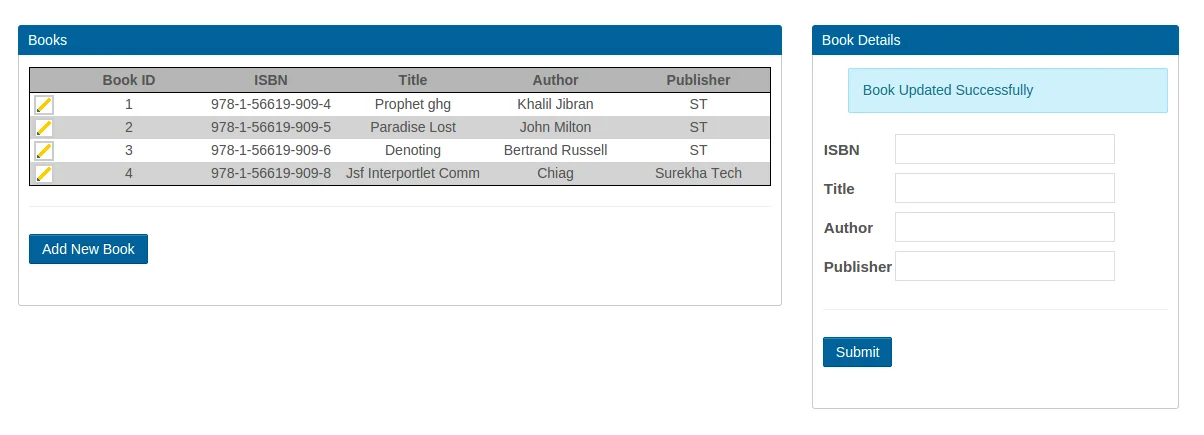
Above image shows two portlets. One portlet contains book list and another portlet handle book creation/updation part. Both portlet communicate and share the data using event mechanism. I have attached two war files of both portlet at the end of this article.
Download :
books-portlet(WAR)
book-details-portlet(WAR)
For professional paid support, you may contact us at [email protected] .