Enhancing Odoo 17 Development with Owl.js Components
 June 27, 2024
Introduction To OWL JS
Reactive Framework:
OWL is a JavaScript framework focused on building user interfaces using reusable components. It has been developed by Odoo, taking inspiration from popular modern frameworks like React and Vue.js.
The core concept behind OWL is that its components are data-driven and reactive. Whenever the underlying data changes, the components automatically update the rendered UI to reflect those changes seamlessly, without requiring full page reloads or manual DOM manipulation.
OWL Structure
In OWL, components serve as self-contained, reusable building blocks for constructing user interfaces. Each component comprises two key parts:
- JavaScript logic : This part defines the component's behavior, interactions, and any computations or data transformations required.
- XML Template : The template written in XML defines the structural makeup and layout of the component's user interface.
Folder Structure
In an Odoo module containing OWL components, the folder structure for organizing components typically follows this convention: module_name/ static/ src/ components/
OWL component files
- Create a folder module_name as the name of the folder is the root directory for the Odoo module.
- Inside that, create a static folder which contains static assets.
- Within static, create a src folder for source code files.
- And finally, the components folder inside src where all the components' files will be kept.
So, each self-contained OWL component, consisting of its JavaScript logic and XML template, would have its own file(s) within the component's directory under static/src/. This structure helps maintain a modular and organized codebase when building user interfaces using the OWL framework within an Odoo module.
Building Your Own First OWL Component (Counter)
Prerequisites:
- Odoo version 17 installed and configured for development on your local machine.
- Basic understanding of HTML, CSS and JS.
Steps:
- Create a basic odoo module with necessary manifest and init file (Don't forget to put 'web' in you depends on array as owl is defined inside web).
- According to the folder structure create a js file name counter.js.
- As we know owl js is using js module structure under the hood, so whenever we start working in that file, in the first line we have to write /** @odoo-module **/ to tell odoo to use js module structure (if it is not done in the starting of your file you will get an error cannot use import statement outside the module.)
- Now just for simplicity only write two import statements that are to import a component and other is to import registry just as shown below.
import { Component } from "@odoo/owl";
import { registry } from "@web/core/registry"; - Now define your custom component by extending Component and define a setup method in it like shown below
import { Component } from "@odoo/owl";
import { registry } from "@web/core/registry";
class Counter extends Component{
setup(){}
}
In OWL components, instead of using the constructor method directly, the setup method should be used for initialization logic. This follows the Odoo convention, as constructors cannot be overridden, while the setup method allows for a useful initialization pattern within the Odoo ecosystem. - Register the component in the action registry about which we will be discussing in the next section.
import { Component } from "@odoo/owl";
import { registry } from "@web/core/registry";
class CustomComponent extends Component{
setup(){}
}
registry.category("actions").add("registry_name", CustomComponent) - Now just for simplicity only write two import statements that are to import a component and other is to import registry just as shown below.
<?xml version="1.0" encoding="utf-8"?>
<odoo>
    <record id="action_counter" model="ir.actions.client">
        <field name="name">Counter</field>
        <field name="tag">registry_name</field>
        <field name="target">main</field>
    </record>
    <menuitem
        id="Counter_menu"
        action="action_counter"
        name="Counter Application"
        sequence="10" />
</odoo>
And don't forget to add this view file in manifest file. - Now restart the server and upgrade the module you will see a menuitem and after clicking on that you will land on a blank page only with navbar.So now let's add something to our UI using js and xml.
- Now let us write our logic for our counter application :
import { Component } from "@odoo/owl";
import { registry } from "@web/core/registry";

class Counter extends Component {
    static template = "module_name.Counter";

    setup() {
        this.state = useState({
            count: 0,
        });
    }

    increment() {
        this.state.count++;
    }

    decrement() {
        this.state.count--;
    }
}

registry.category("actions").add("counter", Counter);
useState is nothing but a hook that is use to maintain the state of the component and further state in simple word are the variables define in the component and to maintain the dynamic change of the variables useState hook is used. - Now let us write our logic for our counter application :
<?xml version="1.0" encoding="UTF-8"?>
<?xml version="1.0" encoding="UTF-8"?>
<template id="" name="">
<t t-name="module_name.Counter">
<div class="container mt-5">
<div class="row justify-content-center">
<div class="col-md-4">
<div class="card text-center">
<div class="card-header fs-2 bg-primary text-white">
Counter
</div>
<div class="card-body m-2">
<t t-esc="props.count" />
<h1 class="text-primary my-3">Current Value : <span t-esc="state.count" /></h1>
<button t-on-click="increment" class="btn btn-success m-2">Increment</button>
<button t-on-click="decrement" class="btn btn-danger">Decrement</button>
</div>
<div class="card-footer">
</div>
</div>
</div>
</div>
</div>
</t>
</template>
- Final Result
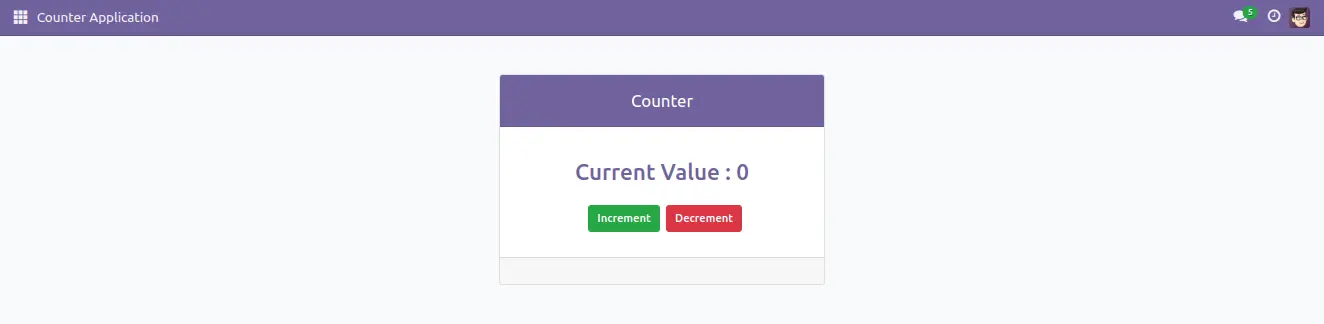
When increment button will be pressed then the current value will increase by 1 and on decrement button click current value will decrease by 1.
Conclusion:
In this blog, you've effectively constructed your Owl.js component within the Odoo 17 framework. This accomplishment lays the groundwork for crafting modern, reactive user interfaces (UIs) that elevate your Odoo applications.
Take the initiative, explore the possibilities of Owl.js, and leverage Odoo customization services if needed, to craft the ideal user experience for your organization.