Office 365 Mail Server Configuration In Odoo
 May 04, 2017
When we set up a new web site or an application, it is most likely that we also want an email server configured that can handle incoming and outgoing email to run your business smoothly and effectively. In this tutorial we will cover how to configure the Microsoft Office 365 email account for outgoing, incoming mail servers and also alias email configuration in Odoo. So, Let’s start to configure it.
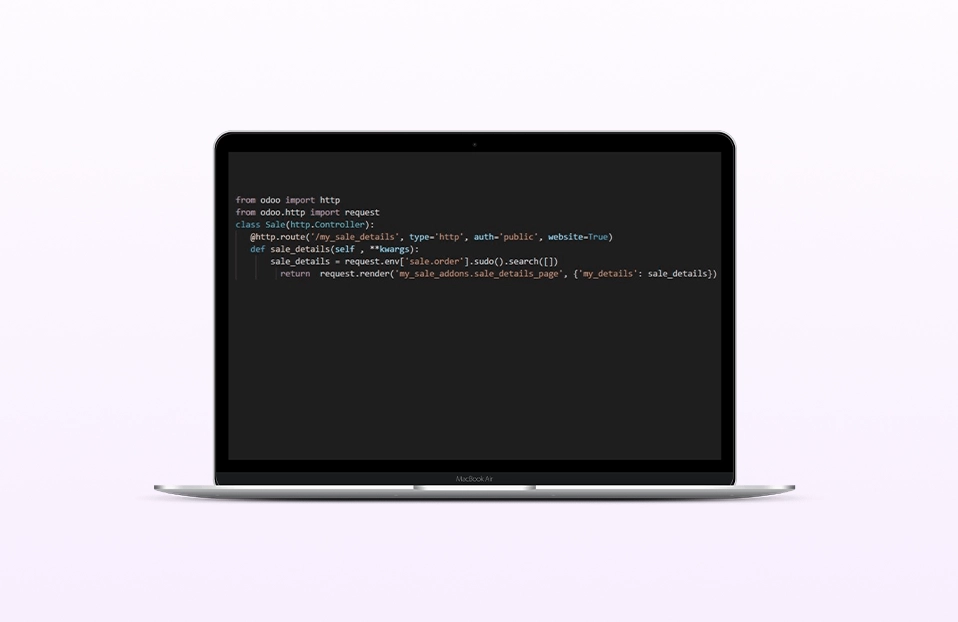
1. Outgoing Mail Server Configuration in Odoo
Activate the ‘Developer Mode’.
Go to Settings > Technical > Email > Outgoing Mail Servers.
Open any existing record or Create a new one. After that do following configurations:
Description: Office 365 Outgoing mail server
SMTP Server: smtp.office365.com
Connection Security: TLS (STARTTLS)
Username: [email protected]
Password: Office 365 mail server password
SMTP Port: 587
4.Click on “Test Connection” button to verify that your account is set up properly.
5.Go to user preferences by clicking on user name on the upper-right corner and click on Preferences from the dropdown. Then write the same email address which you configured for an outgoing mail address as below screenshot:
We have configured the outgoing mail server successfully. Try to send a Quotation to verify it.
2. Incoming Mail Server Configuration in Odoo:
Incoming Mail Server Configuration in Odoo:
Activate the ‘Developer Mode’.
Go to Settings > Technical > Email > Incoming Mail Servers.
Description: Office 365 incoming mail server
Server Type: IMAP Server
Server Name: outlook.office365.com
Port: 993
SSL/TLS: True
Username: [email protected]
Password: Office 365 mail server password
4.Click on “Test & Confirm” button to verify configuration.
5.Reply to the Quotation email which was sent through Odoo from Mail application.
6.Go to Incoming Mail Servers from step 2 and click on “Fetch Now” button. It will fetch the mail. You can verify by opening that Quotation.
3. Alias Configuration in Office 365 and Odoo
An alias is a way to disguise the original email address, through which communication is going on. It enables sender to send an email using the alias of the email rather than original email address to the recipient. We will have to configure an alias both in Office 365 and in Odoo.
Alias configuration in Office 365:
Log in to Microsoft account.
Select the App launcher icon in the upper-left and select “Admin” icon as per below screenshot:
3.Now Open the “Users” menu:
4.Select the user for which you have configured outgoing mail server in Odoo.
5.Provide the alias of the email through which you want to send mail.
Set alias email address in Preferences of Odoo:
Configure the outgoing mail server as mentioned the above steps.
Go to user preferences by clicking on user name on the upper-right corner and click on Preferences from the dropdown. Update the email address with the alias email address.
Now, If you send an email from Odoo then, it will display an alias of email instead of the original email address of the outgoing server which we have configured.