In Liferay DXP 7.4, workflow plays a critical role in controlling content publication. Most developers implement custom business logic inside workflow definitions using Groovy scripts.
However, as projects grow, Groovy-based logic becomes harder to maintain, debug, and version-control. In enterprise environments, teams often prefer strongly typed, testable Java implementations instead of inline scripting.
Fortunately, Liferay allows us to implement custom Workflow Condition Evaluators and Action Executors using Java.
In this blog, we will explore how to create and register custom Java-based workflow conditions and actions with practical implementation examples in Liferay 7.4.
Prerequisites:
- Basic knowledge of Liferay
- Liferay DXP 7.4+
- Any IDE like Liferay Developer Studio, Eclipse, or IntelliJ IDEA
- A Liferay Workspace setup
What is Workflow Action Executor
Using the Workflow Action Executor, we can define our custom business logic in java class and execute this from the workflow actions, no need to write the groovy script. For that, we need to implement ActionExecutor interface in java class.
What is Workflow Condition evaluator
Using the Workflow Condition evaluator, we can define our custom conditions in java class and execute this from the workflow Conditions and no need to write a custom groovy script. For that, we need to implement ConditionEvaluator interface.
Let's see how to create an Action Executor and Conditional Evaluator and execute it from the Liferay DXP Workflow.
How to create Action Executor
Create a Custom Action Executor by following below steps:
Step 1: Create a Liferay Workspace in Eclipse IDE
Begin by setting up a Liferay workspace in Eclipse IDE or Liferay Developer Studio. This will be the foundation for creating your Liferay modules.
Step 2: Create a Liferay Module Project (API Type)
Next, create a Liferay module project of type API. This module will serve as the container for our Action Executor.
Step 3: Create new Custom Action Executor
Create a public Java class in your module and use the following code to define a custom Action Executor:
package com.stpl.lr.workflow.action.executor;

import com.liferay.portal.kernel.log.Log;
import com.liferay.portal.kernel.log.LogFactoryUtil;
import com.liferay.portal.kernel.util.Validator;
import com.liferay.portal.kernel.workflow.WorkflowConstants;
import com.liferay.portal.kernel.workflow.WorkflowException;
import com.liferay.portal.kernel.workflow.WorkflowStatusManagerUtil;
import com.liferay.portal.workflow.kaleo.model.KaleoAction;
import com.liferay.portal.workflow.kaleo.runtime.ExecutionContext;
import com.liferay.portal.workflow.kaleo.runtime.action.executor.ActionExecutor;
import com.liferay.portal.workflow.kaleo.runtime.action.executor.ActionExecutorException;

import java.io.Serializable;
import java.util.Map;

import org.osgi.service.component.annotations.Component;

@Component(
    immediate = true,
    service = ActionExecutor.class
)
public class WorkflowActionExecutor implements ActionExecutor {

    private static final Log LOGGER = LogFactoryUtil.getLog(WorkflowActionExecutor.class);

    @Override
    public void execute(KaleoAction kaleoAction, ExecutionContext executionContext) throws ActionExecutorException {
        try {
            Map<String, Serializable> workflowContext = executionContext.getWorkflowContext();
            if (Validator.isNotNull(workflowContext)) {
                String transitionName = workflowContext.get("transitionName").toString();

                if (Validator.isNotNull(transitionName)) {
                    if (transitionName.equals("reject")) {
                        WorkflowStatusManagerUtil.updateStatus(WorkflowConstants.STATUS_DENIED, workflowContext);
                        WorkflowStatusManagerUtil.updateStatus(WorkflowConstants.STATUS_PENDING, workflowContext);
                    } else if (transitionName.equals("approve")) {
                        WorkflowStatusManagerUtil.updateStatus(WorkflowConstants.STATUS_APPROVED, workflowContext);
                    }
                }
            } else {
                LOGGER.error("Unexpected Error occurred while updating workflow!");
            }
        } catch (WorkflowException workflowException) {
            LOGGER.error("Unexpected Error occurred while updating workflow: " + workflowException.getMessage());
        }
    }

    @Override
    public String getActionExecutorKey() {
        return "java";
    }
}
Step 4: Build and Deploy Your Module on the OSGI
Build your module using the Liferay Gradle/Maven plugin and deploy it to your Liferay OSGI.
Step 5: Create Workflow Action Executor
Follow the below steps to create a new workflow and execute the custom Action Executor
- Now select a Creator and End node, and add a new Action with the following configuration

- Name: action executor
- Type: Java
- Script: com.stpl.lr.workflow.action.executor.WorkflowActionExecutor
- Execution Type: On Entry
- Priority: 1
- save it
Step 6: Assign created workflow to any assets like Blog
Follow the below steps to assign created workflow to the blog:
- Open the Application menu.
- Navigate to Workflow → Process Builder → Configuration.
- Find the Blog Entry -> Edit and select created Action Executor workflow.
- Save it.
Testing the Liferay Workflow Action Executor
To test the workflow action executor, create a new blog by any authorized user and approve or reject this blog by any administrator or any other authorized user.
- Log in as a Content Creator or Administrator.
- Go to Product Menu → Content & Data → Blogs.
- Create a new blog entry.
- Click Submit for Workflow.
The blog entry will now appear with the status of Pending, and the workflow process will be initiated.
- Log in as a Content Reviewer or Administrator.
- Open the My Workflow Task -> Assigned to My Roles.
- Find the created blog -> Assign to Me.
- Approve or reject it.
Verify Action Executor Execution
When the blog is approved or rejected, the custom Workflow Action Executor will be executed automatically.
Inside your action executor logic, you can check the transition name to determine which action was taken:
- If approved → update the blog status to Approved
- If rejected → update the blog status to Rejected and optionally return it to the Content Creator for corrections
How to create Conditional Evaluator
Create a Custom Conditional Evaluator by following below steps:
Step 1: Create a Liferay Module Project (API Type)
Next, create a Liferay module project of type API. This module will serve as the container for our Conditional Evaluator.
Step 2: Create new Custom Condition Evaluator
Create a public Java class in your module and use the following code to define a custom Conditional Evaluator:
package com.stpl.lr.workflow.condition.evaluator;

import com.liferay.portal.kernel.exception.PortalException;
import com.liferay.portal.kernel.model.role.RoleConstants;
import com.liferay.portal.kernel.service.ServiceContext;
import com.liferay.portal.kernel.service.UserLocalService;
import com.liferay.portal.kernel.util.GetterUtil;
import com.liferay.portal.kernel.workflow.WorkflowConstants;
import com.liferay.portal.workflow.kaleo.model.KaleoCondition;
import com.liferay.portal.workflow.kaleo.runtime.ExecutionContext;
import com.liferay.portal.workflow.kaleo.runtime.condition.ConditionEvaluator;
import java.io.Serializable;
import java.util.Map;
import org.osgi.service.component.annotations.Component;
import org.osgi.service.component.annotations.Reference;

@Component(
    immediate = true,
    property = "scripting.language=java",
    service = ConditionEvaluator.class
)
public class WorkflowConditionEvaluator implements ConditionEvaluator {

    @Override
    public String evaluate(KaleoCondition kaleoCondition, ExecutionContext executionContext) throws PortalException {
        Map<String, Serializable> workflowContext = executionContext.getWorkflowContext();
        ServiceContext serviceContext = executionContext.getServiceContext();

        long userId = GetterUtil.getLong(workflowContext.get(WorkflowConstants.CONTEXT_USER_ID));

        if (hasAdministratorRole(serviceContext, userId)) {
            // Return approve transition if user has administrator role
            return "approve";
        }
        // Return review transition if user does not have administrator role
        return "review";
    }

    /**
     * Checks whether the user has the Administrator role.
     *
     * @param serviceContext the service context containing company information
     * @param userId         the ID of the user to check
     * @return true if the user has the Administrator role, false otherwise
     * @throws PortalException if a portal exception occurs
     */
    private boolean hasAdministratorRole(ServiceContext serviceContext, long userId) throws PortalException {
        return _userLocalService.hasRoleUser(serviceContext.getCompanyId(), RoleConstants.ADMINISTRATOR, userId, false);
    }

    @Reference
    private UserLocalService _userLocalService;
}
Step 3: Build and Deploy Your Module on the OSGI
Build your module using the Liferay Gradle/Maven plugin and deploy it to your Liferay OSGI.
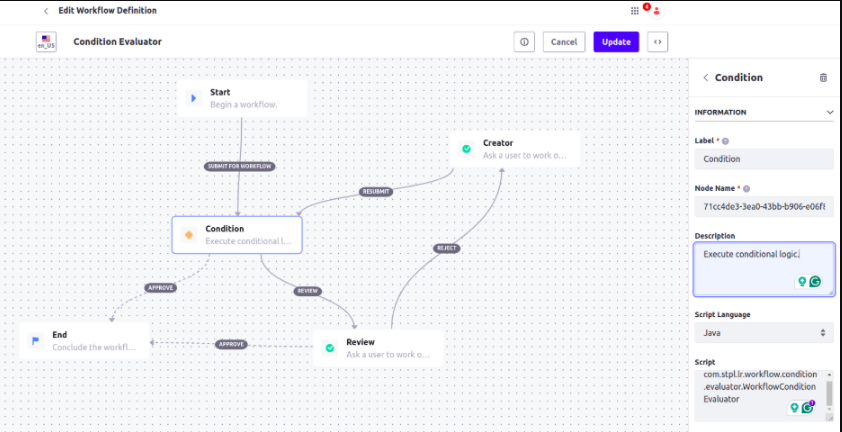
Step 4: Create Workflow Conditional Evaluator
Follow the steps below to create a new workflow and execute the custom Conditional Evaluator.
- Now select a Condition node, and add the following configuration
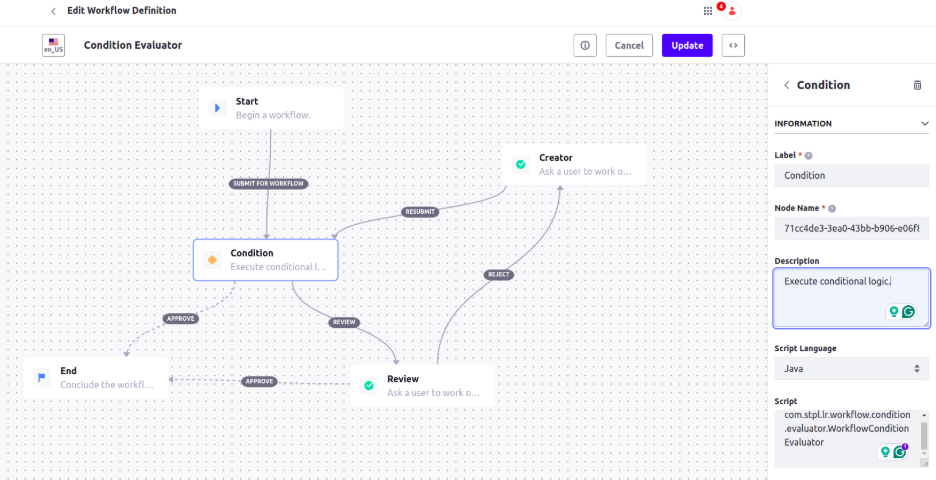
- Label: Condition
- Script Language: Java
- Script: com.stpl.lr.workflow.condition.evaluator.WorkflowConditionEvaluator
- Save it
Step 5: Assign created workflow to Blog
Follow the below steps to assign created workflow to the blog:
- Open the Application menu.
- Navigate to Workflow → Process Builder → Configuration.
- Find the Blog Entry -> Edit and select created Condition Evaluator workflow.
- Save it.
Testing the Liferay Workflow Condition Evaluator
To test the workflow Condition Evaluator, create a new blog by Administrator user.
- Log in as an Administrator.
- Go to Product Menu → Content & Data → Blogs.
- Create a new blog entry.
- Click Submit for Workflow.
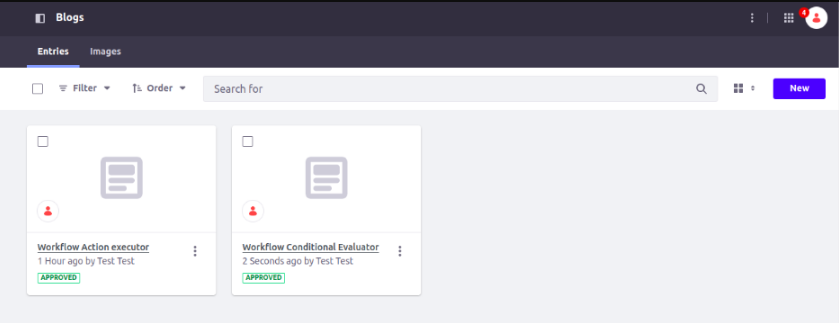
The blog entry will now appear with the status of Approved.
Verify Condition Evaluator Execution
When a blog is created and submitted to the workflow, the custom Workflow Condition Evaluator is executed automatically.
Inside the evaluator, we check the role of the submitting user and apply our custom business logic:
- If the user is an Administrator: The blog is approved automatically without requiring any additional workflow steps.
- If the user is not an Administrator: The workflow continues normally, and the approval task is assigned to the appropriate reviewer.
Conclusion
Liferay's Workflow Action Executors and Condition Evaluators provide powerful extension points that allow you to implement custom business logic directly within workflow processes. By creating your own Action Executor, you can perform automated tasks such as sending notifications and updating entity statuses. With a Condition Evaluator, you can dynamically control workflow routing based on real business rules like user roles, or custom entity data.
Through the above examples in this blog, you learned how we can create both components, integrate it into a workflow definition, and test their execution with Liferay Blogs. With these tools, you can design flexible, multi-level approval workflows tailored to your organization's specific needs.
FAQ
What is the difference between a Workflow Action Executor and a Condition Evaluator in Liferay?
A Workflow Action Executor is used to define custom business logic that gets executed during workflow actions, such as approving or rejecting content. A Condition Evaluator, on the other hand, is used to dynamically control workflow routing based on specific conditions, such as checking a user's role before deciding which workflow path to follow.
Why should I use Java instead of Groovy scripts in Liferay workflows?
Java-based implementations are strongly typed, easier to test, and simpler to maintain and version-control compared to inline Groovy scripts. As your project grows, Java gives you better code quality, IDE support, and debugging capabilities.
Which Liferay version supports custom Java-based Workflow Action Executors and Condition Evaluators?
This feature is supported in Liferay DXP 7.4 and above.
Do I need to deploy a separate module for the Action Executor and Condition Evaluator?
You can package both in the same Liferay module project or deploy them as separate API modules depending on your project structure. Both need to be registered as OSGi components and deployed to the Liferay OSGI container.
How does the Condition Evaluator decide which workflow path to take?
The Condition Evaluator returns a transition name as a string, such as "approve" or "review". Liferay then uses this returned value to route the workflow to the corresponding next step defined in the workflow definition.
Can I use the Workflow Action Executor with any Liferay asset, not just Blogs?
Yes. You can assign your custom workflow to any Liferay asset that supports workflow, such as Web Content, Documents, and Blogs, through the Workflow Process Builder Configuration.